I am working with Azure Function Proxies in my latest project and I have found them to be a really handy tool! With Function Proxies, we can expose endpoints in a Functions App which redirect to other resources in Azure (or anywhere really).
I won't go into much detail describing Proxies, Microsoft docs has some great info already:
"With proxies, you can specify endpoints on your function app that are implemented by another resource. You can use these proxies to break a large API into multiple function apps (as in a microservice architecture), while still presenting a single API surface for clients."
https://docs.microsoft.com/en-us/azure/azure-functions/functions-proxies
In my case, we are working on a front-end app built using TypeScript and React which uses Azure Functions as the back-end. For hosting the front-end, we have turned on the static website hosting for blob storage and then placed the HTML, JS and CSS files in it. Then, used Azure Function Proxies to redirect the endpoints in the Function App to the blob storage URLs of the front-end resources. It's all working quite nicely!
Only speed-bump in this type of architecture is the cold start experienced by serverless resources on the consumption plan. This is not a problem for us right now because this application is a proof of concept for a larger project. (There are other options available as well which include moving the Function App to an App Service Plan or using the Azure Functions Premium plan when it comes out preview. But that is a discussion for another time)
Back to the current post! When I was looking into deploying this application as part of the CI/CD pipeline using Azure DevOps, I was looking for an easy way to deploy the Azure Function Proxy configuration as well. Fortunately, I came across this Microsoft docs article which talks about a file called proxies.json. If this file is found within your Function App, the functions runtime reads it and creates the necessary proxies!
Here is how my proxies.json file looks in Visual Studio. Make sure the file is copied to the output directory:
And once the Functions App is deployed:
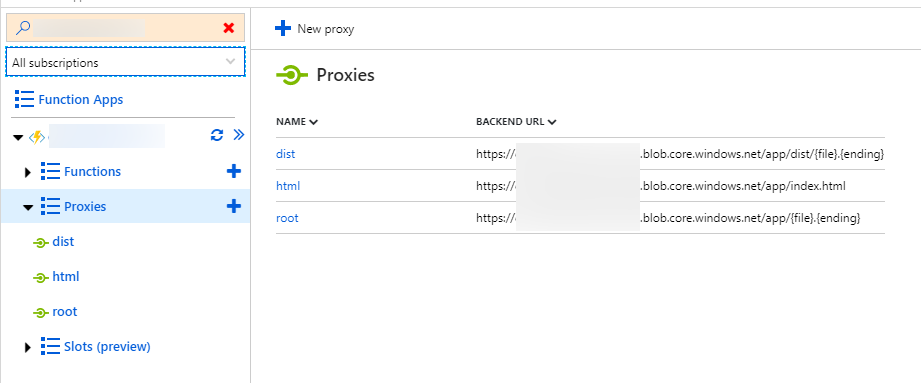
This way, if you are deploying and recreating Function Apps with your CI/CD pipeline, you can automate the creation of Function Proxies as well!
Hope you found this post useful.
Showing posts with label Azure DevOps. Show all posts
Monday, 1 July 2019
Monday, 4 March 2019
Create Azure DevOps pipelines for a Microsoft Teams app built with SPFx
In this post, let's walk-through the configuration needed to create Azure DevOps build and release pipelines for a Microsoft Teams solution.
The solution is built using the SharePoint Framework and will be surfaced in Microsoft Teams as a Tab.
As the code for the SPFx solution is being hosted in a GitHub repository, I will only focus on the Azure Pipelines configuration. For information on how to work with Azure Repos, see the official Microsoft docs: https://docs.microsoft.com/en-us/sharepoint/dev/spfx/toolchain/implement-ci-cd-with-azure-devops
These are the high level steps we are going to follow:
Build pipeline:
1) Create production package of the SPFx solution (.sppkg)
2) Create a Teams manifest package (.zip)
3) Publish the SPFx and Teams packages as Artefacts to be consumed from the Release pipeline
Release pipeline:
1) Deploy the SPFx package to the SharePoint Tenant App Catalog (using the Office 365 CLI)
2) Deploy the Teams manifest package to the Microsoft Teams App Catalog (using the Office 365 CLI)
So without further ado, here are the screenshots and scripts to achieve this:
(Click on the images to zoom)
Build pipeline:
Use Node 8.12.0:
npm install:
gulp bundle --ship:
gulp package-solution --ship:
The .sppkg file needs to be copied to staging directory in order to be published to the release pipeline:
Create a .zip file for the teams app catalog and copy it to the staging directory as well:
Publish the .sppkg and .zip files so that they can be consumed from the Release pipeline:
Release pipeline:
Now to create a new Release Pipeline which will deploy the packages to the respective app catalogs in the tenants.
The Artefacts used will be the .sppkg file and the .zip file for Teams which was published in the previous step:
Overview of tasks in the Release pipeline:
Before moving on to the tasks, we also need to configure some variables to hold the information for the tenants, credentials etc.
The username and password should be for an account with global admin permissions. This is because the Microsoft Graph API (used by the Office 365 CLI) needs this permission to deploy apps to the Microsoft Teams App catalog:
https://docs.microsoft.com/en-us/graph/api/teamsapp-publish?view=graph-rest-1.0#permissions
The TeamsManifestId will be used to check if the app already exists in the Teams App catalog. This can be fetched from the manifest.json file in the teams folder of the SPFx solution:
If you are feeling adventurous, you could look at cracking open the .zip file from the Release pipeline and then grabbing the id on-the-fly instead of having to specify it in a variable.
Next, we will need to use Node (same task as the build pipeline) and install the Office 365 CLI on the Release agent using:
npm install -g office365-cli
Next, we need to deploy the SPFx package to the SharePoint Tenant App Catalog:
Here is the script as a gist:
And lastly, we need to publish the Teams manifest to the Microsoft Teams App Catalog. We will do this using the Office 365 CLI as well. Thanks to Elio and Waldek to get this functionality in the Office 365 CLI at lightning speed!
Here is the script as a gist:
And that's it! You now have build and release pipelines configured to deploy SPFx solutions and Teams apps. The webpart will now be available in SharePoint and the tab will be available in Teams:
Hope you found this walk-through useful!
Subscribe to:
Posts (Atom)
