Friday 29 November 2013

Set UserProfile Picture using Client APIs in SharePoint 2013

With the SharePoint 2013 Client APIs, you can only read the User Profile Properties but not modify them. However the only property you can modify is the Current User's profile picture. Source article: http://msdn.microsoft.com/en-us/library/jj920104.aspx

The REST API expects the image to be in the arraybuffer format in order to be set. To convert an image to arraybuffer, we will be using the XMLHttpRequest object

The XMLHttpRequest object allows us to specify the format in which we want the content to be downloaded. The available options are: arraybuffer, blob, json, text, document and some other browser specific formats.

Complete documentation for the XMLHttpRequest object:
https://developer.mozilla.org/en-US/docs/Web/API/XMLHttpRequest

Also a very good article on how to use the XMLHttpRequest object:
https://developer.mozilla.org/en-US/docs/Web/API/XMLHttpRequest/Using_XMLHttpRequest

A very important point to note is that XMLHttpRequest will work with cross domain images only if the server which is hosting the images allows cross domain requests to be made.

Modern browsers support cross-site requests by implementing the web applications working group's Access Control for Cross-Site Requests standard.  As long as the server is configured to allow requests from your web application's origin, XMLHttpRequest will work.  Otherwise, an INVALID_ACCESS_ERR exception is thrown.

For the sake of simplicity, we will be using the images hosted in the same domain as SharePoint itself so we do not have to worry about cross domain requests.

1) Set Current User's UserProfile Picture using the REST API:


2) Set Current User's UserProfile Picture using the .NET Managed Client Object Model:


This is relatively easy as the SetMyProfilePicture managed method expects the image to be a System.IO.Stream. 

This code assumes you are working with SharePoint Online/Office 365. If you are working with an On-Premise deployment, you do not need to use the SharePointOnlineCredentials class. You can simply create an instance of the NetworkCredentials class for the authentication.

Saturday 5 October 2013

Knockout.js Simplified

Knockout is a fantastic JS library for data binding and dynamically generating complex HTML. It helps a lot in developing applications which are loosely coupled and where there is minimum dependency between the data and the views.

Before I knew knockout, I used to generate all my repetitive HTML right from my JavaScript file. This had significant disadvantages:
1) Every time I had to change my display code, I had to modify the JavaScript file.
2) The JavaScript file contained the business logic as well as the display logic of my application. This used to make the file very complicated to maintain.
3) If a UI designer had to change the HTML, he would have to consult me in order to look for where to make the changes so that the generated HTML would be according to his requirements.

With knockout, we can keep all the display logic (HTML) in the .html file while all the data logic (and business logic) can be separated in the JavaScript file.

Knockout JS implements the MVVM pattern for developing applications. Now if you are a beginner, all these acronyms like MVC/MVP/MVVM might get confusing. So let me try to explain what exactly is meant by the MVVM pattern.

MVVM stands for Model-View-ViewModel. I know this does not help you at all so let me go in a bit of detail:

Model : Your data. Typically a JSON or XML object which contains data fetched from different data sources like Web Services, SQL Tables, SharePoint Lists etc.

ViewModel: The component which aggregates the data into a format which the View expects. ViewModel also manages combining data from multiple Models. It also handles formatting, sorting, filtering of the data based on custom business logic.

View: HTML Structure which will display data to the user.

Hope that was helpful.

Now lets get into the code right away! We will be looking into a simple example where we will be getting data from an JavaScript Array (Model), filling that data into a ViewModel and then binding that ViewModel to the View (HTML).

Since this article is just introduction to KnockoutJS, I have kept it really simple. I have included the JS code as well as the HTML code in the same file so that it is easier to understand. You will want to separate out the JS code in a different file.

Here is the code:


For more details and tutorials, please see the Knockout.JS documentation which is really nice and detailed: http://knockoutjs.com/documentation/introduction.html

Friday 19 July 2013

SharePoint: Get User Profile Properties with REST API

In my last post SharePoint 2013: Working with User Profiles & JavaScript CSOM we saw how to get SharePoint UserProfile Properties using the JavaScript Client Object Model. In this post lets have a look at how to get them using the REST API. Here is a quick reference for the REST API endpoints.

(List of All User Properties and UserProfile Properties at the end of the post)


1) Get all properties of current user:

http://siteurl/_api/SP.UserProfiles.PeopleManager/GetMyProperties


2) Get single property of current user:

http://siteurl/_api/SP.UserProfiles.PeopleManager/GetMyProperties/PictureUrl
OR
http://siteurl/_api/SP.UserProfiles.PeopleManager/GetMyProperties?$select=PictureUrl


3) Get Multiple Properties for the current user:

http://siteurl/_api/SP.UserProfiles.PeopleManager/GetMyProperties?$select=PictureUrl,AccountName


4) Get all properties of Specific User:


For Office 365/SharePoint Online:
http://siteurl/_api/SP.UserProfiles.PeopleManager/GetPropertiesFor(accountName=@v)?@v='i:0%23.f|membership|vardhaman@siteurl.onmicrosoft.com'

For SharePoint 2013 On-Premises:
http://siteurl/_api/SP.UserProfiles.PeopleManager/GetPropertiesFor(accountName=@v)?@v='domain\username'


5) Get Specific UserProfile Property of Specific User:


For Office 365/SharePoint Online:
http://siteurl/_api/SP.UserProfiles.PeopleManager/GetUserProfilePropertyFor(accountName=@v,propertyName='LastName')?@v='i:0%23.f|membership|vardhaman@siteurl.onmicrosoft.com'


For SharePoint 2013 On-Premises:
http://siteurl/_api/SP.UserProfiles.PeopleManager/GetUserProfilePropertyFor(accountName=@v,propertyName='LastName')?@v='domain\username'


6) Get Multiple UserProfile Properties for Specific User:


Update (01/06/2016): Since the time I wrote this post, REST API batching has been implemented in SharePoint Online. As a result, we can make multiple REST requests to the GetUserProfilePropertiesFor function in a single REST call. This way, we can get Multiple custom/OOB UserProfile Properties for a Specific User without making multiple calls.

Here is my post on it:
SharePoint Online: Get UserProfile Properties with REST API Batching

Original Post Continues:

http://siteurl/_api/SP.UserProfiles.PeopleManager/GetUserProfilePropertiesFor
_api/SP.UserProfiles.PeopleManager/GetUserProfilePropertiesFor

As far as my research is concerned, this method is NOT supported in the REST API. The call to this method returns the following error:

"The method GetUserProfilePropertiesFor cannot be invoked as its parameter propertiesForUser is not supported."

If anybody finds any additional information on this, then I would love to update my blog on it. Here is my code for executing the above method:


-------

List of User Properties (Use the GetPropertiesFor function for these):

AccountName
DirectReports
DisplayName
Email
ExtendedManagers
ExtendedReports
IsFollowed
LatestPost
Peers
PersonalUrl
PictureUrl"
Title
UserProfileProperties
UserUrl

List of User Profile Properties (Use the GetUserProfilePropertyFor function for these):

AboutMe
SPS-LastKeywordAdded
AccountName
SPS-Locale
ADGuid
SPS-Location
Assistant
SPS-MasterAccountName
CellPhone
SPS-MemberOf
Department
SPS-MUILanguages
EduExternalSyncState
SPS-MySiteUpgrade
EduOAuthTokenProviders
SPS-O15FirstRunExperience
EduPersonalSiteState
SPS-ObjectExists
EduUserRole
SPS-OWAUrl
Fax
SPS-PastProjects
FirstName
SPS-Peers
HomePhone
SPS-PersonalSiteCapabilities
LastName
SPS-PersonalSiteInstantiationState
Manager
SPS-PhoneticDisplayName
Office
SPS-PhoneticFirstName
PersonalSpace
SPS-PhoneticLastName
PictureURL
SPS-PrivacyActivity
PreferredName
SPS-PrivacyPeople
PublicSiteRedirect
SPS-ProxyAddresses
QuickLinks
SPS-RegionalSettings-FollowWeb
SID
SPS-RegionalSettings-Initialized
SISUserId
SPS-ResourceAccountName
SPS-AdjustHijriDays
SPS-ResourceSID
SPS-AltCalendarType
SPS-Responsibility
SPS-Birthday
SPS-SavedAccountName
SPS-CalendarType
SPS-SavedSID
SPS-ClaimID
SPS-School
SPS-ClaimProviderID
SPS-ShowWeeks
SPS-ClaimProviderType
SPS-SipAddress
SPS-ContentLanguages
SPS-Skills
SPS-DataSource
SPS-SourceObjectDN
SPS-Department
SPS-StatusNotes
SPS-DisplayOrder
SPS-Time24
SPS-DistinguishedName
SPS-TimeZone
SPS-DontSuggestList
SPS-UserPrincipalName
SPS-Dotted-line
SPS-WorkDayEndHour
SPS-EmailOptin
SPS-WorkDayStartHour
SPS-FeedIdentifier
SPS-WorkDays
SPS-FirstDayOfWeek
Title
SPS-FirstWeekOfYear
UserName
SPS-HashTags
UserProfile_GUID
SPS-HireDate
WebSite
SPS-Interests
WorkEmail
SPS-JobTitle
WorkPhone
SPS-LastColleagueAdded

Tuesday 16 July 2013

Include Caching in jQuery getScript

While going through some MSDN documentation on SharePoint 2013, I noticed that Microsoft has suggested to use the jQuery.getScript method to load the SP.Runtime.js and the SP.js files on the page.
For Example:


I did not think about this twice but when I actually brought this into practice, I noticed that the function was fetching the files every time the page would load. After a bit of digging in the jQuery documentation, I found out that this is because the jQuery.getScript function disables caching. It gets the fresh copy of requested files every time by appending a current time time stamp at the end of the file path. You can see the firebug screen-cap of the call here:


This is not good for us because I don't want to spend extra time getting a fresh copy of the file on every page load. We know that once the file is fetched, the browser caches it and maintains a copy if any further requests for the same file are made in the future. jQuery.getScript by default does not allow us to take the advantage of this feature.

To overcome this limitation. I dug a little deeper into the jQuery docs and found that jQuery.getScript internally calls the good old jQuery.ajax function. This function has a "cache" parameter which we can use to set whether the ajax function looks into the browser cache for the requested file or it directly fetches it from the location. I created a handy function to wrap around the jQuery.ajax call to support caching. Here is the code:


After I run this code, I get the following output in firebug. As you can see, there is no time-stamp at the end of the second request and also the time taken to fetch the file is significantly less (about 90% less) than the call to get the fresh copy.


So as you saw, we have built our own wrapper around the jQuery.ajax function which allows us to get cached files and significantly improve page load times. Hope you find this tip helpful!

Happy JavaScripting!

Monday 15 July 2013

Batch Operations using the JavaScript Client Object Model

To improve performance and to reduce the time taken for data to travel over the wire, we can do batch operations using the Client Object Model in SharePoint. This can really help in reducing load time of pages and make the user experience better. Batch operations can be done using the .NET as well as the JavaScript Client Object Model. In this post, we are going to focus on how to perform batch operations using the JavaScript Client Object Model. In each of the following operations, only one call from the client to server will be made. It will contain all the information needed to perform the necessary operation. So without further ado, here is the code:

1) Batch Add Items to List:


2) Batch Update Items from List:


3) Batch Delete Items from List:

Now let us analyze what happens behind the scenes when we make one of these batch operations. Here is the firebug screen grab of the call to batch create 5 items:


Now as you can see, only one call is made from the client to the server. It contains all the XML necessary for creating the 5 items. Here is the relevant XML:


Hope you enjoyed this blog post. Happy SharePointing!

Addendum: I would also like to point out one of the hidden gems of the SharePoint world: if you are using Server Side Code (Full Trust), there is a similar batch method available called SPWeb.ProcessBatchData which can be used to bulk add, edit and delete list items. This is really helpful because it can operate on large number of items at once without making repeated calls to the database.

Tuesday 2 July 2013

Convert a SharePoint WebApplication from Classic authentication to Claims

Here is a quick Powershell script to convert a SharePoint WebApplication from Classic (Windows) Authentication to Claims Authentication. This script is tested in SharePoint 2010 only.

When working with SharePoint 2013, you will not need this in most cases as the default authentication provider is Claims.

Friday 15 March 2013

Modify Search Center Settings with JavaScript Client Object Model


Although there is currently no API in the JavaScript CSOM which lets you change the search center url directly, SharePoint stores the search settings in the Property Bag of the root SPWeb object in a site collection. You can set these property bag values and your search settings should get modified.

"SRCH_ENH_FTR_URL" – Search Center URL

"SRCH_SITE_DROPDOWN_MODE" – Search Scope Drop down option

"SRCH_TRAGET_RESULTS_PAGE” – Target Search Results page

Using JavaScript Client Object Model, you can set the values like this:

For the Search Scope Drop Down Options, here is a full set of values you can set:

Do Not Show Scopes Dropdown, and default to contextual scope: "HideScopeDD_DefaultContextual"
Do Not Show Scopes Dropdown, and default to target results page: "HideScopeDD"
Show scopes Dropdown: "ShowDD"
Show, and default to ‘s’ URL parameter: "ShowDD_DefaultURL"
Show and default to contextual scope: "ShowDD_DefaultContextual"
Show, do not include contextual scopes: "ShowDD_NoContextual"
Show, do not include contextual scopes, and default to ‘s’ URL parameter: "ShowDD_NoContextual_DefaultURL"

Tuesday 12 March 2013

SharePoint 2013: Modify Navigation Settings with JavaScript and JSOM

One of the new additions in the JavaScript Client Object Model in SharePoint 2013 is the Publishing Navigation API. Some of the other additions are the UserProfile API and the Taxonomy API which I have already posted about.

In this post, let us look at how to use the Navigation API to change the navigation settings in a SharePoint 2013 site.

The main reason I want to do these posts is that currently there is still no API Reference available on MSDN for them. So this might be helpful to people looking to achieve the same functionality.

Here are the things which you can change from this Navigation API: 

1) You can change the Navigation settings of Publishing Sites as well as Non-Publishing sites.

2) You can set the Navigation Provider of the Current Navigation (Quick Launch) as well as the Global Navigation (Top Navigation Bar)

3) You can set the Navigation Provider out of any of these three:
     a. Inherit from Parent Site
     b. Managed Navigation (Taxonomy) The navigation items will be represented using a Managed Metadata term set.
     c. Structural Navigation: Display the navigation items below the current site.

4) Since all this code is pure JavaScript, you can add it in a variety of places like Apps, WebParts, Pages, Page Layouts, Web Templates etc.

So without much further ado, here is the code to manipulate the Navigation Settings:

First, lets make sure that we have loaded all the required SharePoint JavaScript files on the page. I like to use the jQuery.getScript() for this. The scripts we will need are sp.runtime.js,  sp.js and sp.publishing.js.
Here is a simple way by which I load all the necessary files:


Now, the actual code:

1) Set the (Current/Global) Navigation to either "Inherit from Parent" or "Structural Navigation":


2) Set the (Current/Global) Navigation dependent upon a Term Set in the Term Store:


Hope you find this helpful!

Saturday 2 March 2013

SharePoint 2013: Provision AppPart/ClientWebPart through Elements.xml

In my last post, we saw how we can add an app part to page by directly adding the app part code in our .aspx pages. Here is a link to my last post for those interested: http://vrdmn.blogspot.in/2013/02/sharepoint-2013provision.html

Now lets take a look at how we can provision the app part declaratively through Elements.xml file. First, you will have to make sure that the App is installed on the site on which you are trying to deploy the app part. Otherwise your app part will not be provisioned correctly.

Here is the code to put in your Elements.xml file:


Keep in mind the following few properties:

ProductId: Its the ProductId of your App. A unique identifier which differentiates your app. Please see my last post on how you can get the ProductId of your App.


FeatureId: The same as ProductId. On first glance, it looks like it should be the GUID of the feature present in your app. But thats not the case as far as I know.


ProductWebId: A new Random GUID


WebPartName: The file name of the WebPart found in your Client WebPart XML file. See previous post for  more details.


Custom Properties: You can even provision custom properties and set their default values from here. In the example, I have the myEnumProp as a custom property in my App Part. Here is a link on how to add custom web part properties to your app part: 

http://msdn.microsoft.com/en-in/library/fp179921.aspx


Thursday 14 February 2013

SharePoint 2013: Provision AppPart/ClientWebPart to Page

Along with Apps, SharePoint 2013 has introduced App Parts (ClientWebParts) which give you the functionality of placing the app inside and iframe on a page. This way, you can view your app as a part of the page just like you would a normal webpart.

(The terms App Part and Client Web Part are interchangeable. I will be using both the terms in this post to emphasize the similarity)

Adding an App Part to the page from the SharePoint User Interface is pretty easy. You just put the page in edit mode and add the AppPart from the Insert Menu. Pretty similar to how you would add a regular WebPart.

Now what if you have to provision your AppPart in a Page or a PageLayout so that when a new page is created with a feature, your AppPart is automatically placed on that page?.

If you want to know how to add an app part to a page declaratively through the Elements.xml file, please have a look at my post here:
http://vrdmn.blogspot.in/2013/03/sharepoint-2013-declaratively-add-app.html


Lets look at how it can be done:

First and foremost, you will need to create an AppPart (Client WebPart) for your app. Here is a great tutorial on it:
http://msdn.microsoft.com/en-us/library/fp179921.aspx

Your Client WebPart xml file should be similar to this:


Here, I have created a Client Web Part with 2 Properties of type int and enum respectively.

Second, you have to make sure that your app is already installed on the Web on which you will be provisioning your page. The AppPart will only work if the app is installed on the same web.

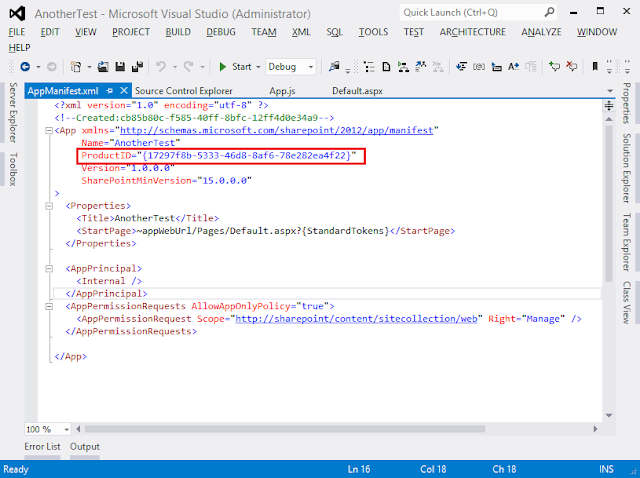
Next, you will need the ProductId of your app. Here is how to find it:

1) Open your app in Visual Studio -> Right Click on the AppManifest.xml -> View Code


2) Here you will find the ProductId of your app in the following location:


3) Save your ProductId in a convenient location.

4) Now open your Page or Page Layout and add the following code to it:


In FeatureId, enter the ProductId which we got from the app earlier.

In ProductWebId, create a new random GUID and add it. 

You can even set default values for the App Part Properties.

5) That's It, Now deploy your page and see that the App Part is Provisioned on the Page.

Sunday 3 February 2013

SharePoint 2013: Working with User Profiles & JavaScript CSOM

SharePoint 2013 has added a variety of functionality to the Client API. One of them is the ability to fetch User Profile data. Now you can directly query the user profiles and get the required data from the client site. This can be really useful if you are building apps.

If you want to use the REST API to work with user profiles, please see one of my other posts: http://www.vrdmn.com/2013/07/sharepoint-2013-get-userprofile.html

In this post, I will show you how to work with User Profiles using the JavaScript Client Object Model

Before we get started with the code, lets make couple of things sure. First,  you will need a reference to the following JavaScript files in your page:


(jQuery is not required but I have added it because we will need it for the $.ajax function when doing REST queries)

Second thing, you will need the domain\username of the user you want to get the user profile data for. This can be easy to get if you are in an On-Prem environment. But if you are working with SharePoint Online, this can be quite tricky. Your username might not always be in the domain\username format. It is stored in the LoginName property if you are querying the Site User Information List:

https://yoursite.sharepoint.com/sites/pubsite/_api/Web/GetUserById(17)

and it is stored in the AccountName property if your querying the User Profile Service:

https://yoursite.sharepoint.com/sites/pubsite/_api/SP.UserProfiles.PeopleManager/GetMyProperties

In SharePoint Online, it will most probably be in the following format:

i:0#.f|membership|vardhaman@yoursite.onmicrosoft.com


Quick Note: If you are using the REST API, you will need to encode the username before you use it in your call. The encodeURIComponent( ) function can be helpful here.

Enough talking. Lets jump into some code right away:

1) Get Multiple User Profile Properties:


2) Get Single User Profile Property:


3) Get User Profile Properties of the Current User:


4) Get Properties of Multiple Users in Single Request:


For this last example, Let's observe the XML which is sent to the server:


With this, we can confirm that only one call was made to the server to retrieve the properties of multiple users. This way, you can even retrieve multiple properties of multiple users in one call.

Tuesday 29 January 2013

SharePoint 2013: Elevate User Access with App Only Policy

In SharePoint 2013 Apps, the authorization is handled by a 2 part mechanism. Along with the current user's permissions, the app permissions are also taken into account. User permissions and app permissions are two separate entities which dictate whether an app is allowed to perform a certain action.

When you build an app, you can specify that what all permissions are going to be required for the app to run successfully. You have to specify this in the App Manifest under the Permissions tab.

(Click Image to Zoom)


When a user installs an app, he can only grant permissions to the app up to the level which he has. So if a user has "Read" permissions on a list, he cannot grant the app "Full Control" on the same list.


There are basically 3 types of app authorizations or authorization policies in SharePoint 2013.

1) User Only Policy: In this policy, only the user permissions are taken into account. App permissions are ignored. It is checked whether the user has the permissions to perform the action and if yes, then he/she is allowed to perform the action.

2) App + User Policy: The user as well as the app permissions are taken into account. This is an AND operation. If both the user and the app have the permission to perform the action,only then the action is allowed.

3) App Only Policy: Only the permissions granted to the app are taken into account. User permissions are ignored. So even if the current user accessing the app does not have appropriate permission, the action is allowed provided the app has the permission to do so.

The App Only policy works by using a separate OAuth token which runs under the user "SHAREPOINT/App" much like SPSecurity.RunWithElevatedPriviledges() runs under the "SHAREPOINT\System" user (app pool account) in the Server Object Model.

Since OAuth is required to generate the app token, the App-Only policy can only be used in the Auto-hosted and Provider-Hosted apps. SharePoint-Hosted apps cannot use the app only policy.


To enable the App Only policy in your app, you have to add the "AllowAppOnlyPolicy" attribute to your "AppPermissions" element in the App Manifest:


Note: Although you can add this attribute to the App Manifest of the SharePoint-Hosted apps, it will be ignored as the App Only policy is not supported in SharePoint hosted apps.


Enough chit chat, lets see how we can actually utilize the App Only policy to elevate user permissions. I have written the following code in the code behind of the Default.aspx of an Auto-Hosted App:


As you can see, the ClientContext which is opened with the appOnlyAccessToken will run with the identity of the SHAREPOINT\App account. This is a very good practice to remember even when using RunWithElevatedPreviledges in the Server Object Model. You can switch on/switch off database calls with app only token. This means that if you need to make only one operation with the elevated token, then you can do that and get back to using the current user's token in one action.

Saturday 12 January 2013

Authenticating .NET CSOM in SharePoint Online

The process of authenticating the .NET Client Object Model in SharePoint Online has been greatly simplified in the 2013 version. Earlier (2010), you had to go through a lot of steps for doing the exact same thing. You  had to open a web browser instance, force the user to enter the credentials in the browser and then grab that  cookie from Internet Explorer and pass it to the .NET CSOM. If you are interested, the code of the old authentication method can be found here:
http://blogs.msdn.com/b/cjohnson/archive/2011/05/03/authentication-with-sharepoint-online-and-the-client-side-object-model.aspx

Fortunately in the 2013 version, the process is a lot simplified by the introduction of the SharePointOnlineCredentials class. This class is part of the Microsoft.SharePoint.Client.dll itself so you don't have to include an extra assembly in your application. All you have to do is pass an instance of the SharePointOnlineCredentials class to the ClientContext.Credentials property. The SharePointOnlineCredentials takes in two parameters which are your Login Email for your Office 365 SharePoint site and your password in the SecureString format.

You can grab all the required SharePoint 2013 client assemblies from here:
http://www.microsoft.com/en-us/download/details.aspx?id=35585

For this particular demo, you will need to reference the Microsoft.SharePoint.Client.dll and the Microsoft.SharePoint.Client.Runtime.dll assemblies in your project.

 The code is as follows: