Wednesday 12 December 2018

Code Splitting in SharePoint Framework Part 2: Optimizing the SharePoint Starter Kit

I was having a look at the SharePoint Starter Kit recently and I have to say it's a very useful collection of sample SPFx webparts, extensions and other modern SharePoint building blocks. You should check it out if you haven't already.

While I was looking at the different components, I noticed something interesting: When I created a production package and observed the minified JavaScript files, the file-sizes were bigger than expected.

(Note that these are just the sizes when the files are extracted on the file system. When they are included in a package and loaded on SharePoint pages, they will be compressed so their sizes would be smaller. The image is just to help compare the file-sizes after the optimisations)


So I started having a closer look at the SPFx components and noticed a few interesting things:

1) @pnp/sp: 


As expected, many of the components were using the @pnp/sp package but each component was statically importing it. This meant that each component will have a copy of @pnp/sp in its individual bundle:

The solution was to implement code splitting and separate out @pnp/sp into it's own file:

This approach has two benefits:
  • All components share the same @pnp/sp bundle
  • The @pnp/sp code is loaded dynamically on the page only when required

2) @pnp/spfx-property-controls


The @pnp/spfx-property-controls package is great when it comes to having pre-created custom controls to use in the SPFx webpart property pane.

One thing worth noting though is that the property pane is loaded much less frequently than the webpart code itself. The property pane is used only to configure the webpart so the code is only needed then and not when the web part loads normally on the page.

To further optimize the webpart bundles, we can separate out the property pane code (including the components from the @pnp/spfx-property-controls package) and load it on the page dynamically only when the property pane is loaded.

So instead of statically importing the property pane components like this:

We could dynamically import them:

This would also mean that the property pane custom controls will be split into their own JavaScript bundles and multiple webparts using the same type of control will share the code:


This is particularly helpful with controls like `PropertyFieldCollectionData` which is more than 700kb in uncompressed format!

After implementing both these changes, we can see that the file sizes have been considerably reduced:


Also important to note is not only the filesize reduction, the main benefit of this approach is that there is no duplicate code in the components.

I have submitted a Pull Request with these changes to the SP Starter Kit GitHub repo if you want to checkout the code:
https://github.com/SharePoint/sp-starter-kit/pull/216

Here is a link if you want to checkout the official Microsoft docs on dynamic loading of packages:
https://docs.microsoft.com/en-us/sharepoint/dev/spfx/dynamic-loading

Thanks for reading!

Monday 8 October 2018

Code Splitting in SharePoint Framework (SPFx)

Code splitting is not a new concept to TypeScript/React/Webpack developers. In short, it is a optimisation technique which allows us to split our application bundle into smaller bundles and load them on-demand only when required.

E.g. when a React component or a third party package is only needed when the user clicks on a certain button, then there is no need to load in on the first page load. It can be fetched on-demand when the button is pressed. This reduces the amount of data fetched over the wire on first page load, thus improving performance and user experience. This can be particularly helpful in large applications with many third party packages and components.

In this post let's have a look at how to do code splitting in the SharePoint Framework. As an example, I am going to use an SPFx web part created using React but the code splitting approach can be used with other frameworks/libraries as well.

We are going to have a look at two scenarios where code splitting can really help:

1) Loading a React Component on-demand (where we load the DetailsList component from Office UI Fabric)

2) Loading a third party package on-demand (where we load the infamous-for-its-large-size moment js)

So to begin with, here is my render method of a React component created by default by the SPFx yeoman generator:

I have edited it to show only 2 buttons. This component will be our "main" component which will load other components and third party packages when a user clicks on the relevant button.

Load a React Component on-demand: 


The _loadDocumentsClicked function will fire when the user clicks on the Load Documents button. The DetailsList component is defined in a file called DetailsListComponent.tsx which is in the same folder as the main component.

Once the import function fetches the DetailsList component class, we create an an instance of the class and use ReactDom to insert the component to the detailsContainer div in our main component. 

Load a third party package (moment js) on-demand:


Similarly, the _loadMomentClicked function will fire when the load moment js button is clicked. it will fetch the moment package and then assign the value of moment().calendar() to a property in the current component's state.

And here is the code in action on a modern SharePoint page:

(click to zoom)

What is also important to note is that the bundle will be loaded only if it was not loaded earlier. The import function is smart enough to determine if the bundle is already downloaded and it does not request it again.

Hope you found this useful!

As always, the code for this is available on GitHub: https://github.com/vman/SPFxCodeSplitting

Wednesday 29 August 2018

Create Azure AD App Registration with Azure CLI 2.0

Previously, I have written about creating an Azure AD App registration using the Microsoft Graph API and PowerShell. But since then, the beta endpoint for creating app registrations had stopped working as reported in this GitHub issue: https://github.com/microsoftgraph/microsoft-graph-docs/issues/1365

Fortunately, I have recently discovered a great way to create Azure AD App Registrations using the Azure CLI 2.0. This also includes adding any permissions the app requires on resources e.g. Microsoft Graph, Office 365 SharePoint Online etc. This has not been previously possible with the Azure AD PowerShell Cmdlets.

So in this post, let's go through what is needed to achieve this:

First, you need to have the Azure CLI 2.0 installed on your machine. Follow this link to get it if you haven't already:
https://docs.microsoft.com/en-us/cli/azure/install-azure-cli?view=azure-cli-latest

Once you have the CLI, here is the code to create an Azure AD App Registration including the required permissions:

The JSON in the requiredResourceManifest.json file can be fetched from the manifest of an App registration already created in Azure AD. So the recommendation would be to manually create an App Registration in Azure AD and configure the required permissions. Once you have the right set of permissions, edit the manifest and grab the JSON from the requiredResourceAccess array.

Trusting the App:

Update (5th April 2019):

The Azure CLI now has a command to grant the app permissions on behalf of the admin as well
https://docs.microsoft.com/en-us/cli/azure/ad/app/permission?view=azure-cli-latest#az-ad-app-permission-admin-consent

az ad app permission admin-consent --id [--subscription]

If you still want to use the portal to grant the permissions you can do so as an Admin by going to the app and clicking on the "Grant Permissions" button:


For more possibilities with the Azure CLI 2.0, checkout the reference: https://docs.microsoft.com/en-us/cli/azure/reference-index?view=azure-cli-latest

Monday 6 August 2018

Sync Azure AD profile properties to SharePoint User Profiles using Azure Durable Functions

Recently, a client had asked us to synchronise user properties from their Azure AD profile to custom properties in their SharePoint UserProfile. This had to be a scheduled process as the data had to be kept up to date as well as it had to cater for any new profiles created in Azure AD/SharePoint.

We decided to use Azure Functions for this given the ease of configuring a timer triggered function (to run on schedule) and also the fact that functions run on a consumption based billing plan. This means that the client would get charged only for when the function executes (oh and also, the first million executions are free every month)

The main challenge we had to overcome was the limitation that an Azure Function has a default timeout of 5 minutes (which can be increased up to 10 minutes at the time of this writing) This means that if we were using a single Azure Function to update SharePoint UserProfile Properties for thousands of users, we were going to hit the timeout sooner or later. 

Fortunately, Durable Functions went GA recently which means that we have a way of managing state in the traditionally "state-less" Azure Functions. With durable functions, we can create an "activity" function to update the SharePoint User Profile properties for a single user. This function can be called in a loop for each user from an "orchestrator" function. Each run of the activity function is treated as a single execution and can be finished in the 5 minute default timeout.

So let's see how this can be done! We are using precompiled C# functions and Visual Studio 2017 to achieve this. Also make sure to have the Durable Functions nuget package installed in your Azure Functions project:
https://www.nuget.org/packages/Microsoft.Azure.WebJobs.Extensions.DurableTask/

The Durable Function workflow can be categorised into three different types of functions:


1) Client Function


These are standard Azure Functions which can be triggered by external events like timers, HTTP requests, queues etc. The only difference being they have an OrchestrationClient binding which is required to start orchestrations.

In our case, the Client Function is a simple timer triggered function which uses the OrchestrationClient to start a new Orchestration Function with the name O_SyncProfileProperties


2) Orchestrator Function


As the name suggests, the Orchestrator function acts as a coordinator of the Durable Functions workflow. It does the job of starting, stopping and waiting for activity functions and is also in charge of passing data (or state) in between them.

In our case, it calls the A_GetUsersToSync activity function to get the user profiles from Azure AD (using the Microsoft Graph API which is out of scope for this article) and then loops through the users to call the A_UpdateSharePointProfile function for each user


3) Activity Functions


As you might have guessed by now the Activity function is the one which actually does all the heavy lifting. For example, the actual CSOM code which will update the SharePoint UserProfile properties will live in the A_UpdateSharePointProfile activity function:

And that's it! In 3 simple steps, we have a Durable Functions Orchestration set up. For more information on Durable Functions including dos and don'ts, please see the documentation: https://docs.microsoft.com/en-us/azure/azure-functions/durable-functions-overview

Hope you found this post useful!

Monday 2 July 2018

Using Managed Service Identity with Key Vault from a .NET Azure Function

So Managed Service Identity along with Azure Functions support went GA recently. If you want to read the announcement and also want to get an overview of MSI, head over here: https://blogs.msdn.microsoft.com/appserviceteam/2018/06/26/announcing-general-availability-and-sovereign-cloud-support-of-managed-service-identity-for-app-service-and-azure-functions/

In this post, lets have a look at how easy it is to configure Managed Service Identity for an Azure Function and how it can be used together with Key Vault to secure sensitive information like Client Ids, Client Secrets and Passwords.

For example, when building an Azure Function which will interact with some data in SharePoint Online, we need a way to authenticate the Function with SharePoint. Two common methods used for authentication are 1) By creating an Add-In registration in SharePoint (appregnew.aspx) and 2) By using Azure AD authentication by creating an App Registration in Azure AD.

In both cases, we need to secure the ClientID and ClientSecret for the registration in such a way that only our calling code has access and any non-admin user browsing the Azure Function in the portal is prevented from seeing the sensitive data.  So let's see how we can do that using Managed Service Identity:

1) They very first thing you need to do is make sure that Managed Service Identity is configured for your Function App. You can do this simply by going to Function App Settings -> Managed Service Identity and ensuring that it is turned ON.


2) Create a Key Vault (or go to an existing one) and create two Secrets with names "ClientID" and "ClientSecret". You can also create additional Secrets relevant to your solution here.


3) Now we want our Azure Function App to have permissions to access the Key Vault. To do this, go to Access Policies -> Add New


4) Select the Function App as the principal and make sure under Secret permissions, it has at least the "Get" permission:


5) That's it in terms of the config! Now let's move on to the code to access the secured Client ID and Secret:

Make sure your Azure Function has the following NuGet packages:

Microsoft.Azure.KeyVault
Microsoft.Azure.Services.AppAuthentication

And here is an HTTP triggered .NET pre-compiled function which fetches the ClientId and ClientSecret from the Key Vault:

That's it! I was really surprised how easy MSI support for Azure Functions makes securing sensitive data. This way, any keys, secrets or passwords used by our solutions can be secured and retrieved without worrying about them getting in the wrong hands!

Quick note on pricing for MSI and Key Vault:

Update (5th August 2018): You can also use MSI when debugging locally. The steps to achieve that are added in this tweet:


Saturday 16 June 2018

Get/Set SharePoint Online Tenant properties with CSOM

SharePoint Online Tenant properties are key/value pairs which can be used to set custom configuration settings on the tenant. These properties can then be consumed by SharePoint Framework components or any other type of customisation.

Here is some quick code I have put together to work with SharePoint Online tenant properties using CSOM.

The important thing to note here is that when setting the properties, we can only use the context of an App Catalog site (either tenant level or site collection level)

When getting the properties, the context of any site can be used.

Set SharePoint Online Tenant Properties in the App Catalog using CSOM:


Get SharePoint Online Tenant Properties using CSOM:


Note: While working with this code, I noticed SharePoint Online Tenant properties are stored as a web property bag entry in the root site of the App Catalog site collection. The properties are serialized to a JSON string and stored in the property bag entry with the key "storageentitiesindex":

(click to zoom)

Monday 14 May 2018

SPFx: Calling back to SharePoint from an AAD secured Azure Function on behalf of a user

This post is part of a series where we explore consuming Azure AD secured Azure Functions from SharePoint Framework components. Articles in the series:

1) SharePoint Framework: Calling AAD secured Azure Function on behalf of a user
2) SharePoint Framework: Calling Microsoft Graph API from an AAD secured Azure Function on behalf of a user
3) Calling back to SharePoint from an AAD secured Azure Function on behalf of a user (this post)

In the previous post, we were successfully able to call the Microsoft Graph API from an AAD secured Azure Function and return data back to the SharePoint Framework web part.

Now in this post, lets see how we can make a call back to SharePoint on behalf of the logged in user from the Azure Function. We will only focus on the code in the Azure Function here, to fully understand the set up and auth process, I recommend you check out the previous posts in the series.


Updates to the Azure AD app registration:


In order to make a call back to SharePoint, we will need to add a Client Secret to the Azure AD app registration. Skip this step if you have already done this as part of the previous post.


We will also need to add the Office 365 SharePoint Online permissions scope to the Azure AD app registration. For this post, I am selecting the "Read and write items in all Site Collections" delegated scope. You can select the scope according to the operations you want to perform in SharePoint


Don't forget to grant the permissions again as a subscription admin. This is so that each user does not have to do this individually:


Here is what we are going to do in the code:

When the Azure Function executes, we already have an access token sent by the SharePoint Framework AadHttpClient in the Authorization header. This access token has the "user_impersonation" scope which only allows it to access the Azure Function. It cannot be directly used to call back to SharePoint.

In order to obtain new access token that will work with SharePoint, we will have to request it using the existing access token.

Once this function is called from the SharePoint Framework, we are able to get the data back to the web part:


Thanks for reading!

SPFx: Calling Microsoft Graph API from an AAD secured Azure Function on behalf of a user

This post is part of a series where we explore consuming Azure AD secured Azure Functions from SharePoint Framework components. Articles in the series:

1) SharePoint Framework: Calling AAD secured Azure Function on behalf of a user
2) Calling Microsoft Graph API from an AAD secured Azure Function on behalf of a user (this post)
3) SharePoint Framework: Calling back to SharePoint from an AAD secured Azure Function on behalf of a user

In the previous post, we were successfully able to call an AAD secured Azure Function from a SharePoint Framework web part.

Now once we are in the Function, lets see how to make a call to the Microsoft Graph on behalf of the logged in user. We will only focus on the Azure Function here, to fully understand the set up and auth process, I recommend you check out the previous post.


Updates to the Azure AD app registration:


In order to call the Microsoft Graph, we will need to add a Client Secret to the Azure AD app registration.


We don't need to add any new permission scopes for the purposes of this post as we are going to make a call to the /v1.0/me endpoint which requires the User.Read permission. According to the SPFx docs, if we exchange the SPFx generated token for a MS Graph token, it will automatically have the User.Read.All permission scope.

If you want to do anything beyond this with the Microsoft Graph, you will need to add the relevant permissions scope and grant permissions to it. In the next post, we will see how to do this by granting permissions to the "Office 365 SharePoint Online" permissions scope.

Here is what we are going to do in this post:

When the Azure Function executes, we already have an access token sent by the SharePoint Framework AadHttpClient in the Authorization header. This access token has the "user_impersonation" scope which only allows it to access the Azure Function. It cannot be directly used to call the Microsoft Graph.

In order to obtain new access token that will work with the Microsoft Graph, we will have to request it using the existing access token. Once we have the new token, we are able to make a call to the Microsoft Graph:

Once this function is called from our SharePoint Framework web part, we are able to get data back from the graph:


Thanks for reading!

Thursday 12 April 2018

Azure Functions: Add a message to a storage queue after a delay

I was looking at a specific problem today dealing with Azure Functions and adding messages to storage queues: I needed my Function to add a message to an output queue in order to trigger another function, but the challenge was, the message should not get added immediately and the second queue trigger function should not fire immediately as well.

We needed a delay between the completion of the first function and execution the second queue triggered function.

A not-so-great way of achieving this would be to add a Thread.Sleep before the message is added to the output queue but we really wanted to avoid that as it would keep the function running and would not be a truly "serverless" way of doing things.

I had a look at the visibilityTimeout setting in the host.json file but turns out it is meant for configuring the delay after which a retry is made when a function fails: https://docs.microsoft.com/en-us/azure/azure-functions/functions-host-json#queues

Fortunately, Jeff Hollan on twitter suggested a nice solution for this which utilised the initialVisibilityDelay property of the CloudQueue.AddMessage function. The great thing is this works seamlessly with Azure Function output bindings so we don't have to use the SDK ourselves.

Here is a sample of how my final code looks and it works pretty great!

Hope you find this useful!

Saturday 31 March 2018

Working with SharePoint Online Hub sites using CSOM

With SharePoint Online Hub sites launched for Targeted release tenants, here is some quick code I put together to work with them using CSOM:

1) Register a Hub site, Connect a site to a Hub site, Disconnect a site from a Hub site and Unregister a Hub site:


2) Grant and Revoke specific users rights to connect sites to a Hub site:


When a Hub site is registered, it is public by default. Any user is able to connect their site to the hub site. If you want only a specific set of users to be able to connect their site to the Hub site, you can grant "Join" rights to these users:

Hope this helps!

Monday 19 February 2018

SPFx: Calling AAD secured Azure Function on behalf of a user with AadHttpClient

This post is part of a series where we explore consuming Azure AD secured Azure Functions from SharePoint Framework components. Articles in the series:

1) SharePoint Framework: Calling AAD secured Azure Function on behalf of a user (this post)
2) Calling Microsoft Graph API from an AAD secured Azure Function on behalf of a user
3) SharePoint Framework: Calling back to SharePoint from an AAD secured Azure Function on behalf of a user

Recently, after long last, the support for easily calling Azure AD secured custom APIs was released in the latest version of the SharePoint Framework (v1.6). Here are the details if you want to learn more: https://docs.microsoft.com/en-us/sharepoint/dev/spfx/use-aadhttpclient

In this post, let's have a look at how to secure our custom API (Azure Function) with Azure AD and then call the custom API from within a SharePoint Framework web part on behalf of the currently logged in user. We will be able to get the current user identity/claims in the custom API to know which user made the call to the Azure Function.


So let's quickly jump into how we are going to achieve this:

1) Create an Azure AD app registration


Go to Azure AD > App registrations > New application registration and create a new app registration. I am calling my app "User Details Custom API for SPFx"


By default the app registration will have the Sign in and read user profile scope on the Windows Azure Active Directory API. For the purpose of this post, those permissions are enough for us. We don't need to modify anything here right now.

Click on Properties and copy the App ID URI of the app registration. We will need this later in the SharePoint Framework web part.

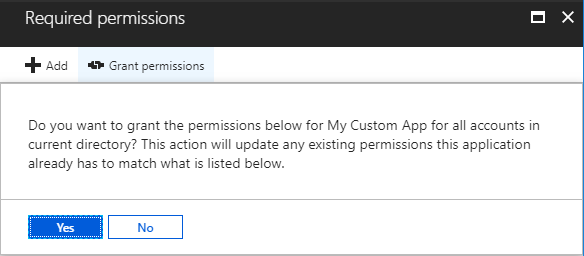
As a subscription admin, Grant permissions to the App registration for all users so that each user does not have to do this individually:


2) Create an Azure Function App and configure it


Go to App Services > Add > Function App and create a new Azure Function App which we will use to host our Azure Function


Once the Function App is created, we need to secure it with our Azure AD app registration.

Go to Function App > Platform Features > Authentication / Authorization


In the Authentication / Authorization pane, for "Action to take when request is not authenticated" select "Log in with Azure Active Directory".

For Authentication Provider, click on Azure AD > Advanced and for Client ID, paste the Client ID (Application ID) of our Azure AD app registration we created earlier.

In Allowed Token Audiences, add the App ID URI of the app registration we copied in Step 1


Click Ok and Save the Configuration.

Go to Function App > Platform Features > CORS and add the SharePoint Online domain from which your SPFx webpart will make a call to the Azure Function.


Click on Save.

3) Create the Azure Function


Now let's actually create the Azure Function which we will deploy to the Function App as our custom API.

Using Visual Studio 2017, I have created a precompiled .NET Framework Azure Function project. As we are going to use this function as an API, I have selected an Http Triggered function:

Notice that the Authorization level for the function itself is set to Anonymous. This is because we are using Azure AD at the Function App level to secure it.

All this function does is returns the claims of the current authenticated user in JSON format.

Publish the function to the Azure Function App we created earlier.

4) Create the SharePoint Framework web part


Before going ahead with this step, make sure you have the latest version of the SharePoint Framework yeoman generator (1.6 at the time of this writing) This page should contain all the current versions of the generator, npm and node supported by the SharePoint Framework: https://docs.microsoft.com/en-us/sharepoint/dev/spfx/set-up-your-development-environment

Once you have all the latest packages, create the SPFx web part with yo @microsoft/sharepoint


To keep it simple, I am making it a tenant scoped solution with no JavaScript framework.

5) Request permissions for the SPFx web part


Once the SPFx web part solution is created, navigate to the config/package-solution.json file and add the webApiPermissionRequests property:

The resource will be the name of the Azure AD app registration we used to secure our Azure Function and the scope will be user_impersonation as we want to make a call on behalf of the current user.

As of SPFx 1.6 release, we also have to add the User.Read permission for "Windows Azure Active Directory" as reported in this issue: https://github.com/SharePoint/sp-dev-docs/issues/2473

6) Using AadHttpClient to call the custom Azure Function


Now in your SPFx webpart, include the following imports:

and the code to use the AadHttpClient to make a request to your custom Azure Function:

To display the table properly, add the following to the .scss file of your web part:


7) Installing and running the SPFx package 


Since we are going to run the SPFx solution in debug mode, we will run the commands without the --ship or --production switch. This will enable us to debug the solution locally.

Run the following commands to build and package your solution:

gulp build

gulp bundle

gulp package-solution

Start local debugging with

gulp serve --nobrowser

Now, upload the .sppkg file from the sharepoint/solution folder to the App Catalog:


Select the checkbox and Click on Deploy.

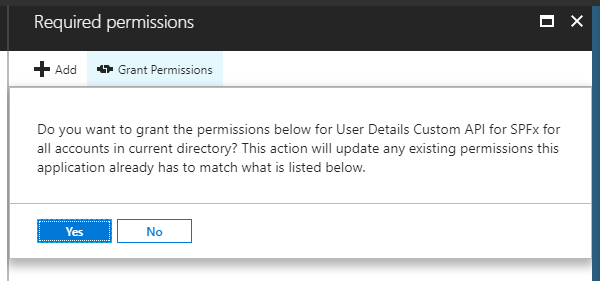
8) Granting permissions using the SPO Admin API management page


After deploying the package to the app catalog, as a SharePoint Administrator, navigate to the new SharePoint Online Admin centre and go to the API management section. You will notice the permissions we requested from the solution package can be approved from here. 

Approve the permissions before moving to the next step


9) Add web part to page


Now go to any modern page and add your web part to it. Since we have deployed a tenant scoped solution, no need to install it individually on each site.


The current user identity and claims coming through will be what we have sent from the Azure Function!

Hope this helps :) As always, the code from this post is available on GitHub: https://github.com/vman/spfx-azure-function-custom-api

Tuesday 30 January 2018

Use Flow HTTP Webhook to call Azure Function - Send notification email after PnP provisioning

When using Site Designs and PnP for applying provisioning templates to sites, the order of events is something like this:

  1. When a Communication site or an Office 365 Group connected Team site is created, a Site Design gets applied to it.
  2. The Site Design contains a triggerFlow action which starts a Microsoft Flow (configured to be triggered by an http request).
  3. The flow adds an item to an Azure storage queue which triggers and Azure Function.
  4. The Azure Function contains the PnP template and the code to apply the template to the newly created site.

This approach is described in the guidance here: Calling the PnP provisioning engine from a site script

Now the problem with this sequence of actions is that (as of this time) they are all Asynchronous events i.e. "fire and forget". When the Site Design executes the triggerFlow action, it does not wait for the Flow to complete before showing the success screen to the user. Similarly, after the Flow adds an item to the storage queue, quite understandably, it does not wait for the triggered Azure Function to finish executing before completing its run.

In this sequence of async events, if we want to perform an action like sending a notification email after the provisioning is complete, we have the following options:


Multiple Flows:

Use an output storage queue and in the Azure Function, add an item to it when the provisioning completes. Have another Flow triggered by the output queue, which sends the email. I am not a big fan of this approach as this means managing an output queue as well as a second Flow just for sending the email notification.


Polling:

If we want to avoid creating a second Flow, another option is to use a Do Until action and poll for when messages arrive on the queue. The main drawback of this approach is that we must keep track of different instances of the Flow. If multiple users are creating sites and there are multiple messages arriving on the queue, we want to send the email only after the message of our own site arrives. This is doable using the Flow instance id but a bit too complex for my liking :)

The solution: HTTP Webhook

Fortunately, there is a nice way to handle this. Using the HTTP Webhook action, we can basically wait for the provisioning to complete before returning the control back to the Flow. Since we are in a serverless world here, the Flow will essentially pause here and "wake up" when we want it to.

To use this approach, we have to make a slight modification to the approach suggested in the Microsoft documentation. In this approach, instead of firing the Azure Function with a queue trigger, we will fire it using the HTTP Webhook action. The Function will be configured to execute on HTTP trigger i.e. when an HTTP request is made to an endpoint.

Here is an overview of actions for the Flow:


The Flow starts when the Site Design executes the triggerFlow action:


Now this is where the magic happens. The HTTP Webhook action makes a request to the Azure Function. It passes the call back url as a parameter and then waits. Whenever the Azure Function finishes executing, it is expected to make a request to the call back url. When a request will be received in the call back url, the HTTP Webhook action will finish and the Flow will resume with the data passed back from the Azure Function.


Here is the code for the Azure Function:


Now, it is only matter of parsing the data returned from the Azure function and sending the email:


This way, we can perform actions in the Flow after the PnP template has been successfully applied to the site.

Hope this was helpful!

Monday 22 January 2018

SharePoint Online: Combine and reuse multiple site scripts in a site design

Site scripts and site designs were recently introduced in SharePoint Online/Office 365. They provide a great way to hook into the out of the box site creation dialog to apply customisation to the site being created. Here are some great articles if you want an overview of site scripts and site designs:


In the most basic sense, 

Site scripts are the JSON files used to define the artefacts to be created or the customisation to be applied after the site is created.

Site designs are site templates created by combining one or more site scripts. They can be assigned a title, description, preview image etc. which will be presented to the user in the 'Create new site' dialog.

In this post, let's have a look at how we can combine and re-use multiple site scripts to create site designs.

Here, I have a site script to create a document library on site creation:


Next, I have another site script to trigger a Microsoft Flow on site creation:


Now, here is a PowerShell script which will create 2 different Site Designs (templates). 

The first site design will only be configured to have the site script to create the document library.

The second site design will contain the same site script to create the document library. But in addition, it will also contain the site script to trigger a Microsoft Flow.


Once both site designs are successfully created, they will appear in the "Create a site" dialog on the SharePoint home in Office 365:


This way, you can combine and re-use multiple site scripts to create different site designs as per business requirements.

Troubleshooting:


1) Site scripts and site designs are in preview now and not meant to be used in production. They are also being gradually rolled out to Targeted Release tenants. I was only able to test them in 1 of my tenants. In all other tenants, I was getting the message: "The requested operation is part of an experimental feature that is not supported in the current environment."

2) You will need the latest version of the SharePoint Online Management Shell to get the site design cmdlets: https://www.microsoft.com/en-us/download/details.aspx?id=35588