Monday 2 December 2019

SharePoint Framework Web Part and Property Pane Lifecycles

I was working on a SharePoint Framework webpart, especially on the property pane, and needed to understand when the SPFx WebPart lifecycle methods are executed. Specifically, the order in which they are fired.

I tried searching for this but couldn't find much information, so thought of creating this post as it might be helpful for other who might be looking for it.

The Microsoft docs on these methods/APIs are fairly extensive and they give a good overview of what each method does:
https://docs.microsoft.com/en-us/javascript/api/sp-webpart-base/baseclientsidewebpart?view=sp-typescript-latest#methods
https://docs.microsoft.com/en-us/javascript/api/sp-webpart-base/basewebpart?view=sp-typescript-latest

What is missing though is the order in which these methods are fired. So this post should serve as a nice complement to the docs.

I should mention that this post only focuses on the native SPFx lifecycle methods. If you are creating an SPFx webpart with React for example, the react lifecycle is out of scope for this post as there is loads of information available already on the interwebs.


SPFx webpart method execution order:


When loading the web part on a page, the methods are fired in the following order:


1) protected onAfterDeserialize(deserializedObject: any, dataVersion: Version): TProperties;

2) protected onInit(): Promise<void>;

3) protected render(): void;

4) protected onBeforeSerialize(): void;

When the web part is removed from a page, the methods are fired in the following order:


1) protected onDispose(): void;


SPFx webpart property pane method execution order:


Opening the property pane:

1) protected loadPropertyPaneResources(): Promise<void>

2) protected getPropertyPaneConfiguration(): IPropertyPaneConfiguration;

3) protected onPropertyPaneRendered(): void;

4) protected onPropertyPaneConfigurationStart(): void;


Updating the properties in the property pane:


The SPFx property pane can be set in either the reactive mode or in a non-reactive mode:

"Reactive implies that changes made in the PropertyPane are transmitted to the web part instantly and the user can see instant updates. This helps the page creator get instant feedback and decide if they should keep the new configuration changes or not.

NonReactive implies that the configuration changes are transmitted to the web part only after "Apply" PropertyPane button is clicked."

When in reactive mode, if any property is changed, the methods are fired in the following order:


1) protected onPropertyPaneFieldChanged(propertyPath: string, oldValue: any, newValue: any): void;

2) protected render(): void;

3) protected getPropertyPaneConfiguration(): IPropertyPaneConfiguration;

4) protected onPropertyPaneRendered(): void;

5) protected onPropertyPaneConfigurationComplete(): void;


When in non-reactive mode, if any property is changed, the methods are fired in the following order:


1) protected onPropertyPaneFieldChanged(propertyPath: string, oldValue: any, newValue: any): void;

2) protected getPropertyPaneConfiguration(): IPropertyPaneConfiguration;

3) protected onPropertyPaneRendered(): void;


When in non-reactive mode, after clicking on the "Apply" button, the methods are fired in the following order:

1) protected onAfterPropertyPaneChangesApplied(): void;

2) protected render(): void;

3) protected onPropertyPaneConfigurationComplete(): void;

4) protected onPropertyPaneRendered(): void;


When the property pane is closed by clicking on the "X" button

1) protected onPropertyPaneConfigurationComplete(): void;


Hope you found the post helpful! Let me know if I might have missed any. Would love to update this post in the future.

Thursday 7 November 2019

Building a Microsoft Teams Bot: Get Team context details including Office 365 Group and SharePoint site url

The Microsoft Bot Framework v4.6 was released this week at Ignite and it's got some really great additions:
https://github.com/microsoft/botframework/blob/master/whats-new.md#november-2019-ignite

One thing which I am very happy about is that building Bots for Microsoft Teams has become way easier now!

This wasn't always the case. Previously, the Bot Framework was separate to the Teams Bot Builder and they both didn't play nice all the time. Throw in more stuff like Bot Framework v3/v4, Messaging extensions, Adaptive Cards and it lead to tweets like this:


But now, the Teams Bot Builder is part of the the Bot Framework SDK itself which is very good news. If you are just getting started building Bots for Microsoft Teams, you only need to install the Bot Framework package. Apart from that, the code to work with Microsoft Teams has been simplified as well.

Imagine you are building a Teams Bot and it needs to interact with the Office 365 Group which underpins the Team. Or maybe the Bot needs to store or retrieve some data from the SharePoint site associated with the Team. Let's see how easy it is now to achieve this:

Before we look at the code, make sure you are using the Microsoft.Bot.Builder 4.6+ version of packages in your Bot:

https://github.com/Microsoft/botbuilder-dotnet/#packages
https://www.nuget.org/packages/Microsoft.Bot.Builder/

We will also need the Microsoft Graph .NET SDK:
https://docs.microsoft.com/en-us/graph/sdks/sdk-installation

And here is the code:


We are using the new TeamsInfo class available in the Bot Framework to get the current team details. This class also has a few other helper methods which you might find useful:
https://github.com/microsoft/botbuilder-dotnet/blob/master/libraries/Microsoft.Bot.Builder/Teams/TeamsInfo.cs

Internally the TeamsInfo.GetTeamDetailsAsync method calls the `/v3/teams/{team-id}` API endpoint to get the Office 365 Group id (a.k.a AADGroupId in the API). We can then use the Microsoft Graph API to get the other details including the SharePoint site url.

Hope this helps! For more details on building bots for Microsoft Teams, have a look at the official docs: https://docs.microsoft.com/en-us/microsoftteams/platform/bots/how-to/create-a-bot-for-teams

Wednesday 30 October 2019

Getting anonymous thumbnails of SharePoint Online files with Microsoft Graph

If you are developing an application based on the Microsoft 365 platform which also uses files stored in SharePoint Online, chances are that you might want to make the file thumbnails available on a device (or client) without going through SharePoint authentication. It could be a mobile app or Microsoft Teams app which needs to show the thumbnails. In these cases, the end user has already signed into the app so might not be a good idea to ask them to sign in again to access files stored in SharePoint.

One thing which comes to mind straight away is to use the Data URLs of the thumbnail images. But data URLs can get fairly big as they are just the base 64 representation of the images. Also, if you have large images and you need to display a lot of them at the same time, the data travelling over the wire to your device can get fairly big.

Fortunately, the Microsoft Graph provides a great way to get the thumbnail of a file. It is also provided as an anonymously accessible link (which expires in 1 hour) so we don't have to worry about the user having to sign in again to SharePoint. More details on Microsoft docs:
https://docs.microsoft.com/en-us/graph/api/driveitem-list-thumbnails?view=graph-rest-1.0&tabs=http

This approach works for getting the thumbnails of any type of file stored in SharePoint Online. But in this post, I am going to focus only on modern pages.

First, let's see how the code for this looks in the Microsoft Graph .NET SDK:

This code translates to the following Graph REST API call:

and the response:
(click to zoom)

The thumbnail url returned here can be used on any device, app or Adaptive Card to display the image without the need for authenticating to SharePoint. But bear in mind that this image url is only valid for 1 hour as there is an Azure AD access token attached to it. After that you might have to request a new url by making the same Microsoft Graph call.

Hope this helps!

Friday 4 October 2019

Microsoft Teams messaging extensions: User authentication, OAuth and Microsoft Graph

Microsoft Teams messaging extensions allow us to enhance teams messages with business data. We are able to fetch information (e.g. from Microsoft Graph or 3rd party APIs) based on various factors like the current user, current team or current channel and post it as part of a message using rich Adaptive cards.


This gives us a great way of creating Teams based integrations with other Line of Business (LOB) applications.

I won't go much deeper into the different possibilities with messaging extensions in this post. Instead, we will focus more on how they are built and how to authenticate the current user.

To know more about messaging extensions, have a look at the Microsoft docs:
https://docs.microsoft.com/en-us/microsoftteams/platform/concepts/messaging-extensions/messaging-extensions-overview

Teams messaging extension architecture:


The way in which the messaging extensions work is by leveraging the Microsoft Bot Framework and utilising the following moving pieces:

1) A Bot Channel Registration which is essentially the identity of the Bot/Messaging extension. We need this to get the Bot Id and also to set "Microsoft Teams" as one of the channels served by the bot.

2) An endpoint which will receive (and respond to) HTTP POST messages from teams when the messaging extension commands are invoked.

3) A Teams App Manifest which contains the JSON specifying the messaging extension properties, the Bot  Id, and the messaging endpoint.

Those are the primary building blocks of a Teams messaging extension (or even a Teams Chat Bot for that matter, but that's out of scope for this post)

To see a walk-through of building a messaging extension from scratch, check out Cameron Dwyer's post: https://camerondwyer.com/2019/09/09/how-to-create-a-microsoft-teams-messaging-extension-pop-up-dialog-with-a-custom-ui/

Fetching data from Microsoft Graph as the current user (delegated authentication)


This is how the sign in flow will look. The user will have to sign in only once into the app. After that, the token flow (including the access tokens and refresh tokens) will be handled by the Bot Framework.

The user is prompted to sign in the first time they launch the compose messaging extension. After the sign in is completed, the messaging extension is able to show "security trimmed" data from the Graph. In this case, it's the groups the current user has joined:


Now let's see how we can leverage the Microsoft Graph in our messaging extensions. Before fetching data from the Graph, we will need an Azure AD OAuth token for the current user in Teams. To get the token flow working, first we need to create and Azure AD App Registration and give it necessary permissions:


Next, we need to create and configure the Bot Channel Registration:


Next, create and configure an OAuth Connection Setting in the Bot Channel Registration. The Client Id, Client Secret and Tenant Id should come from the AAD App Registration created in the previous step.


And here is the code to include in the Bot which handles the AAD sign in flow of the user. I am using the Bot Framework v4 for this Bot:


This code will fetch you the access token needed for calling the Graph. After that you can use the Graph SDK to get the required data:


Hope this was helpful. Given the complexity of Microsoft Teams development at this time, this post wasn't as comprehensive as I wanted it to be. There are challenges to getting everything to work together including Bot Framework v4, Teams Bot Builder (preview), Adaptive Cards and Messaging extensions. Hope the story becomes much simpler in the future.

Monday 2 September 2019

Create SPFx Library components containing Office UI Fabric React

When using Office UI Fabric React (OUIFR) components in SPFx projects, if you analyse the bundle structure you will notice that OUIFR components take up a lot of space which leads to increased bundle size.

If there are multiple SPFx components loaded on the page which depend on OUIFR components, the size of each bundle will be affected, as by default the OUIFR components are included in each SPFx bundle.

One way to mitigate this issue is to include all your custom components (which depend on OUIFR) into an SPFx library component and then consume the library component from SPFx webparts and extensions. This will make sure that if you have reusable custom components, they won't be loaded multiple times on the page if multiple SPFx webparts (or extensions) are consuming them.

Let's see how to achieve this. We will be working with SPFx 1.9.1 which contains the GA version of Library Components:

1) Create SPFx Library and Consumer component structure


First, make sure you have an SPFx library project as well as a "consumer" SPFx project containing webparts (or extensions). Instructions on how to create this are in the Microsoft docs: https://docs.microsoft.com/en-us/sharepoint/dev/spfx/library-component-tutorial

The code for this post is also available on GitHub if you want to have a look: https://github.com/vman/spfx-lib-components-ouifr


2) Create a new custom react component which internally uses Office UI Fabric React


In the library component project, create a new react component in a new file e.g. ButtonComponent.tsx


Here are the contents of the custom react component:


3) Update the index.ts file


In the index.ts file of the library component, include the new component to be exported:


4) Update config.json


Next, in the config/config.json file of the library component, make sure that the entry point is pointing to /lib/index.js


This step was not necessary in SPFx 1.8.2-plusbeta but seems there is a bug in SPFx 1.9.1. I have created a GitHub issue here:

5) Update the consumer web part


Make sure that the library component is referenced in the consumer webpart e.g. through npm link or by using a monorepo manager like rush or lerna.

More details on using npm link in this in the Microsoft docs: https://docs.microsoft.com/en-us/sharepoint/dev/spfx/library-component-tutorial

And finally, in your consumer SPFx react webpart, you can reference the custom component:


When you deploy both the SPFx packages in the app catalog and then add them on a page, you will see different bits of code being loaded separately:


And that's it! Sample repo on GitHub: https://github.com/vman/spfx-lib-components-ouifr

Monday 1 July 2019

Deploying Azure Function Proxies along with Function Apps

I am working with Azure Function Proxies in my latest project and I have found them to be a really handy tool! With Function Proxies, we can expose endpoints in a Functions App which redirect to other resources in Azure (or anywhere really).

I won't go into much detail describing Proxies, Microsoft docs has some great info already:

"With proxies, you can specify endpoints on your function app that are implemented by another resource. You can use these proxies to break a large API into multiple function apps (as in a microservice architecture), while still presenting a single API surface for clients."
https://docs.microsoft.com/en-us/azure/azure-functions/functions-proxies

In my case, we are working on a front-end app built using TypeScript and React which uses Azure Functions as the back-end. For hosting the front-end, we have turned on the static website hosting for blob storage and then placed the HTML, JS and CSS files in it. Then, used Azure Function Proxies to redirect the endpoints in the Function App to the blob storage URLs of the front-end resources. It's all working quite nicely!

Only speed-bump in this type of architecture is the cold start experienced by serverless resources on the consumption plan. This is not a problem for us right now because this application is a proof of concept for a larger project. (There are other options available as well which include moving the Function App to an App Service Plan or using the Azure Functions Premium plan when it comes out preview. But that is a discussion for another time)

Back to the current post! When I was looking into deploying this application as part of the CI/CD pipeline using Azure DevOps, I was looking for an easy way to deploy the Azure Function Proxy configuration as well. Fortunately, I came across this Microsoft docs article which talks about a file called proxies.json. If this file is found within your Function App, the functions runtime reads it and creates the necessary proxies!

Here is how my proxies.json file looks in Visual Studio. Make sure the file is copied to the output directory:


And once the Functions App is deployed:


This way, if you are deploying and recreating Function Apps with your CI/CD pipeline, you can automate the creation of Function Proxies as well!

Hope you found this post useful.

Monday 29 April 2019

Using Microsoft Rush to manage SPFx projects with library components

If you haven't heard about Rush JS yet, you are probably not alone. In my opinion it's one of the hidden gems of the SPFx ecosystem or even the larger web dev ecosystem for that matter. It's a great open source tool which can be used to manage large repositories (monorepos) containing multiple node/npm projects with dependencies on each other. To know more about Rush, you can visit its website: https://rushjs.io/

In this post, we are specifically going to look at how we can use Rush to manage SPFx repositories containing multiple solutions including SPFx library components, web parts and extensions.

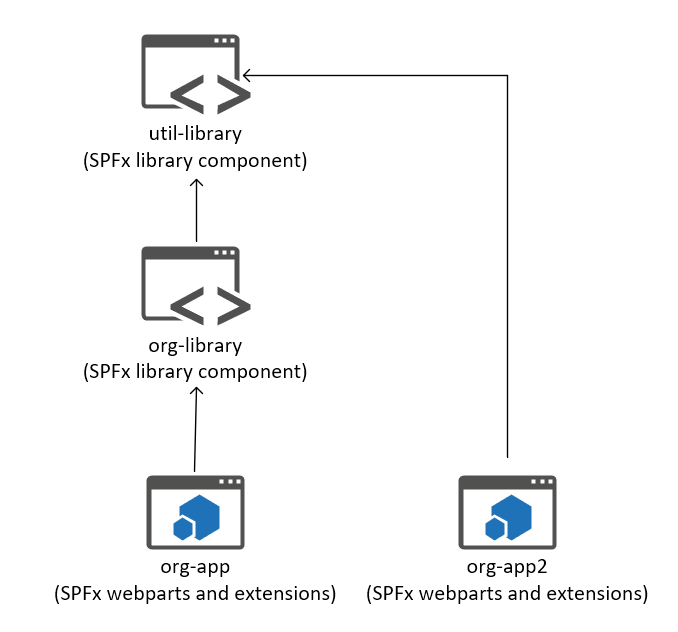
With SPFx library components being introduced in preview in v1.8 and expected to be generally available in v1.9, sooner or later you might find yourself trying to manage large SPFx repositories like this:
(click to zoom)

In this repo, there are 4 SPFx solutions: The org-app solution contains SPFx components which depend on org-library which is an SPFx library component. org-library itself depends on another SPFx library component util-library. And finally, another "consumer" solution org-app2 depends directly on util-library

When working in this type of repository, things will get tricky to manage real fast because of the various SPFx solutions, their dependencies on each other, needing to run gulp build or gulp serve multiple times after changing a single file, remembering which consumer projects to update after the libraries have been changed, managing multiple node_modules folders (if not using pnpm) etc. This is where Rush comes in.

If all projects are part of one Rush repository:
  1. You don't have to manage node_modules folders individually for each project. Rush will maintain a common node_modules folder and create symlinks in each project which point to it.
  2. Rush will also create a single lock file for your entire repository and all projects.
  3. You don't have to use npm link to connect your library to consuming webpart packages. Rush handles all the linking and unlinking for you.
  4. When you are working on the library and the consumer components simultaneously, you don't have to run gulp build multiple times. You just need to run "rush build" once. More on this later.
  5. When working on multiple libraries and components with different dependencies, you don't have to keep track of which webpart depends on which library. Rush will do this for you and handle the necessary updates.
  6. Based on your project dependencies, Rush will parallelise builds of projects which do not depend on each other. Thus, reducing build time.
Now before you go converting all your existing repositories to Rush, there are a couple of considerations to think about as well:
  1. Most Rush commands only work with Git repositories. It uses git change tracking to determine which files changed and which repositories to update. So, if you are using TFVC or any other version control system, you might be out of luck. More details on this here: https://github.com/Microsoft/web-build-tools/issues/1250
  2. When working on SharePoint Framework projects in a Rush repository, the local workbench seems to be broken currently. The SPO workbench works. A bug is logged here: https://github.com/SharePoint/sp-dev-docs/issues/3736
Now with all that out of the way, lets create a simple Rush repository with just couple of SPFx components! What we are going to do is create a Rush repository, create an SPFx library component (corporate-library), then create an SPFx webpart component (corporate-apps) and then consume the library component from the webpart. We will then use Rush to build and manage this repository.


First, we need to perform some setup:


This should install rush, convert your root folder to a git repo and a rush repo, and then commit the rush files to git.

Next, we will create the SPFx library component:


Notice we are using the --skip-install flag as we don't want to install the npm packages right now. We will do this with rush later. Select the options as in the following image:


Add the SPFx library component to your git repo:


Next, we will create the SPFx webpart project:


We will again use the --skip-install flag to skip installing the npm packages.

Select the options as per the following image:


Now add the webpart project to your git repo:

Your final solution structure should look like this:


Next, we need to tell Rush that the corporate-apps project has a dependency on the corporate-library project. We will do that by updating the dependencies in the corporate-apps/package.json file


After this, we need to configure Rush to work with our repository and project structure. For this, we need to update the rush.json file in the root folder. 

We can define the node, npm and rush versions we will use for this repository. You can use other package managers like pnpm and yarn with rush as well. For a list of all available options see here: https://rushjs.io/pages/configs/rush_json/

More importantly, we need to define our project folders and package names in this file. This is what Rush uses to find folders corresponding to package names.

By default, the file has a lot of config options and comments, but we only need these values for the demo:


Next, as we are going to use npm as the package manager, we need to delete the common\config\rush\pnpmfile.js file as it is only meant to be used with pnpm.

After this, it is time to install all the npm packages needed by all the projects in our repository. For that we just need to run:


Rush will install all npm packages in the common\temp\node_modules folder and create symlinks in each project to the common folder.

Next, we need to build our repository with:


Due to the dependencies added the corporate-apps/package.json file, Rush will build the library project first and then the consumer project.

Now we can use the code from our library project in our webpart project. Go to the corporate-apps\src\webparts\consumer\ConsumerWebPart.ts and add the following code:

If you run rush build again, you will see that the library project is not updated. This is because rush knows that only the webpart files changed and it should only update the relevant projects. Here is a working demo of the repository:

(click to zoom)

And that's it! You can now build on this to start including multiple SPFx libraries and components to your repository.

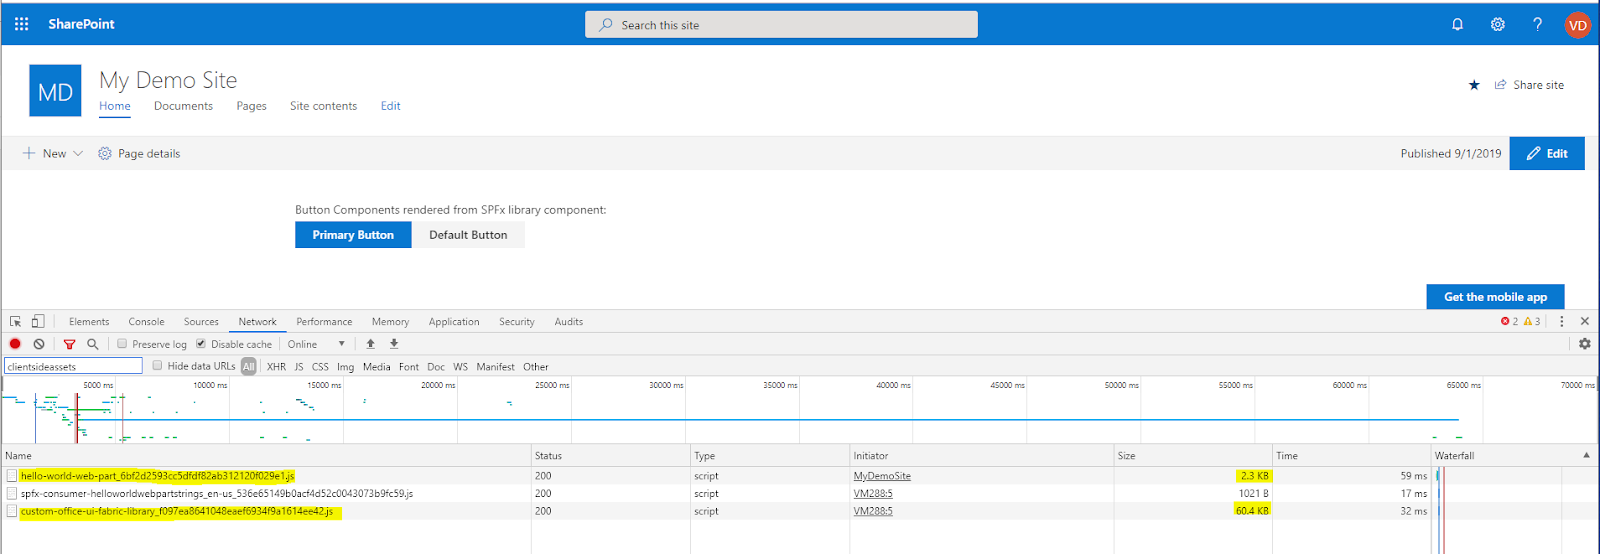
Here is an image of a larger Rush repository in action (the same one mentioned at the start of this blog) You can see that depending on the files changes, Rush updates only the required projects.


Also, all your projects in the Rush repository are still standalone SPFx projects. You can navigate to each project's working directory and run gulp build, gulp bundle or gulp package-solution just like you would in normal SPFx projects.

Hope you find this post helpful! Let me know in comments if you feel there is anything I have missed.

Links:

1) The simple Rush repository we built in this post: https://github.com/vman/SPFxRushSimpleDemo
2) Slightly more complex Rush repository: https://github.com/vman/SPFxRushComplexDemo
3) SPFx library component overview: https://docs.microsoft.com/en-us/sharepoint/dev/spfx/library-component-overview
4) Rush website: https://rushjs.io/

Wednesday 10 April 2019

Service Locator pattern in SPFx: Using nested scopes to work with multiple components

In the previous post, we saw how SharePoint Framework code can be decoupled by using the Service Locator pattern and Service Scopes. In short, we are able to register instances of our services on the "global" service scope and then consume those instances from any part of our code.

We can also consume instances of default services registered on the global service scope e.g. MSGraphClient, AadHttpClient, SPHttpClient etc. These registrations are done by the SharePoint Framework and all we have to do is hook into the global service scope to fetch their instances.

Now, when we register our custom service on the global service scope, all components on the SharePoint page share a single instance of the service. By components, I mean SPFx web parts and extensions. In this post, to keep things simple, I will only talk about web parts but the concepts apply to extensions as well.

When the first webpart on the page makes a call to the service scope, an instance of the custom service is created and returned. Any further calls made by the same or different webparts on the page will return the same instance of the service. Now this behaviour can be either good or bad depending on your requirements.

If you want different webparts on the page to have their own instances of the custom service, let's see how to achieve this:

Let's consider a simple custom service:

The service contains a private variable count which is initialised to 0. The increaseAndReturnCount function increases the count by 1 and then returns the value. Not the best code ever written but fits our current purpose.

Now, let's register and consume an instance of our custom service from an SPFx webpart:

If you are wondering where do we register this service as we only seem to be calling the consume function. The consume function does the registration for us by creating a default instance of the service, registering it on the service scope and then returning the same instance.

When we register our service on the global service scope returned by this.context.serviceScope, all webparts and SPFx components will share the same service instance:


Although multiple webparts are added on the page, they all share the same service instance and the same count variable keeps on increasing. OK, technically I am adding the same webpart multiple times on the page but the behaviour is the same even for different webparts calling the same service.

Now, to get around this issue, we only need to make a simple change to our code. We don't need to change any of the service code, we just need to change the way in which the service instance is created and returned:

By creating a new service scope as a child of the global service scope, we get a new service scope which is isolated to the current web part. This way, each web part will get it's own service scope to register and consume service instances.

And as a result, we get a new instance of the counter service for each web part where the counter variable is initialised to 0:


This way, we are able to create and maintain isolated service scopes per component on our page.

Hope you found this post useful!

The code is in GitHub if you want to take a look: https://github.com/vman/MultiInstanceServiceScopes

Wednesday 27 March 2019

Service Locator pattern in SPFx: Using Service Scopes

I have written about this topic in the past but with the recent increase in SharePoint Framework adoption and with more features becoming available (e.g. MSGraphClient, AadHttpClient), I felt it would be a good time to revisit this.

With SPFx solutions getting more complex day by day and with lots of components to manage, passing the web part (or extension) context around to different parts of your code can get difficult to maintain real fast.

The problem:


For example, imagine we have created a custom service which needs the MSGraphClient to make a call to the Microsoft Graph and we are consuming this service in our SPFx webpart. To initialise the service, we need to either pass in the entire web part context to it, or explicitly pass in the MSGraphClient object from the context.

In the first case, we are unnecessarily passing in all other objects in the context to this service as well.

And in the second case, our code becomes tightly coupled i.e. in the future, if our service needs something else from the webpart context, we have to update the service as well as the consuming code (i.e. the webpart) to pass in the new dependency.

The solution:


Using the Service Locator pattern in SPFx through service scopes, we can abstract away the implementation details of our custom services from the calling code (i.e. webparts, extensions).

With service scopes, we can get hold of instances of SPFx classes like MSGraphClient, AadHttpClient, SPHttpClient and PageContext from our services without having to explicitly pass them in from the webparts.


In this post, lets see how to achieve this:

1) Calling the MSGraphClient from a custom service:


Consuming the custom service from an SPFx webpart:


If you observe the code, our calling webpart does not have any knowledge of the implementation details of the custom service, specifically the fact that it used the MSGraphClient internally to retrieve the current user details. In the future, if we wanted to change the implementation of the service, we could do it without changing any web part code.

2) Calling the AadHttpClient from a custom service:


Similarly, we can also use service scopes to get hold of an instance of the AadHttpClient class. In the code below, to keep things simple, I am using the AadHttpClient to make a call to the Microsoft Graph. Eventually, the result is the same as the previous code but it should demo how to use the AadHttpClient through service scopes.


Consuming the custom service from an SPFx webpart:


3) Calling the SPHttpClient from a custom service:


And finally, if we just want to make a call to the SharePoint REST API from our SPFx code, we can also use service scopes to get hold of an instance of the SPHttpClient class. The following code also demonstrates how to get an instance of the PageContext class to get different run time context values like the current web url. Using the current web url, we can make a call to the SharePoint REST API to get the web details:


Consuming the custom service from an SPFx webpart:


And that's it for this post! I am planning more posts on this topic in the future so keep an eye out for those :)

As always, the code from this post is available on GitHub: https://github.com/vman/ServiceScopeTestBench

Monday 4 March 2019

Create Azure DevOps pipelines for a Microsoft Teams app built with SPFx

In this post, let's walk-through the configuration needed to create Azure DevOps build and release pipelines for a Microsoft Teams solution. 

The solution is built using the SharePoint Framework and will be surfaced in Microsoft Teams as a Tab. 

As the code for the SPFx solution is being hosted in a GitHub repository, I will only focus on the Azure Pipelines configuration. For information on how to work with Azure Repos, see the official Microsoft docs: https://docs.microsoft.com/en-us/sharepoint/dev/spfx/toolchain/implement-ci-cd-with-azure-devops

These are the high level steps we are going to follow:

Build pipeline:


1) Create production package of the SPFx solution (.sppkg)
2) Create a Teams manifest package (.zip) 
3) Publish the SPFx and Teams packages as Artefacts to be consumed from the Release pipeline

Release pipeline:


1) Deploy the SPFx package to the SharePoint Tenant App Catalog (using the Office 365 CLI)
2) Deploy the Teams manifest package to the Microsoft Teams App Catalog (using the Office 365 CLI)

So without further ado, here are the screenshots and scripts to achieve this:

(Click on the images to zoom)

Build pipeline:


Use Node 8.12.0:


npm install:


gulp bundle --ship:


gulp package-solution --ship:


The .sppkg file needs to be copied to staging directory in order to be published to the release pipeline:


Create a .zip file for the teams app catalog and copy it to the staging directory as well:


Publish the .sppkg and .zip files so that they can be consumed from the Release pipeline:


Release pipeline: 


Now to create a new Release Pipeline which will deploy the packages to the respective app catalogs in the tenants.

The Artefacts used will be the .sppkg file and the .zip file for Teams which was published in the previous step:


Overview of tasks in the Release pipeline:


Before moving on to the tasks, we also need to configure some variables to hold the information for the tenants, credentials etc.


The username and password should be for an account with global admin permissions. This is because the Microsoft Graph API (used by the Office 365 CLI) needs this permission to deploy apps to the Microsoft Teams App catalog:
https://docs.microsoft.com/en-us/graph/api/teamsapp-publish?view=graph-rest-1.0#permissions

The TeamsManifestId will be used to check if the app already exists in the Teams App catalog. This can be fetched from the manifest.json file in the teams folder of the SPFx solution:


If you are feeling adventurous, you could look at cracking open the .zip file from the Release pipeline and then grabbing the id on-the-fly instead of having to specify it in a variable.

Next, we will need to use Node (same task as the build pipeline) and install the Office 365 CLI on the Release agent using:

npm install -g office365-cli


Next, we need to deploy the SPFx package to the SharePoint Tenant App Catalog:


Here is the script as a gist:

And lastly, we need to publish the Teams manifest to the Microsoft Teams App Catalog. We will do this using the Office 365 CLI as well. Thanks to Elio and Waldek to get this functionality in the Office 365 CLI at lightning speed!


Here is the script as a gist:

And that's it! You now have build and release pipelines configured to deploy SPFx solutions and Teams apps. The webpart will now be available in SharePoint and the tab will be available in Teams:


 Hope you found this walk-through useful!