Showing posts with label Microsoft Teams Development. Show all posts

Sunday, 10 March 2024

Create a Microsoft 365 Copilot plugin: Extend Microsoft 365 Copilot's knowledge

Microsoft 365 Copilot is an enterprise AI tool that is already trained on your Microsoft 365 data. If you want to "talk" to data such as your emails, Teams chats or SharePoint documents, then all of it is already available as part of it's "knowledge".

However, not all the data you want to work with will live in Microsoft 365. There will be instances when you want to use Copilot's AI on data residing in external systems. So how do we extend the knowledge of Microsoft 365 Copilot with real time data coming from external systems? The answer is by using plugins! Plugins not only help us do Retrieval Augmented Generation (RAG) with Copilot, but they also provide a framework for writing data to external systems. 

To know more about the different Microsoft 365 Copilot extensibility options, please have a look here: https://learn.microsoft.com/en-us/microsoft-365-copilot/extensibility/decision-guide

So in this post, let's have a look at how to build a plugin which talks to an external API and then infuses the real time knowledge into Copilot's AI. At the time of this writing, there is nothing more volatile than Cryptocurrency prices! So, I will be using a cryptocurrency price API and enhance Microsoft 365 Copilot's knowledge with real time Bitcoin and Ethereum rates!

(click to zoom)

So let's see the different moving parts of the plugin. We will be using a Microsoft Teams message extension built on the Bot Framework as a base for our plugin:  

1) App manifest

This is by far the most important part of the plugin. The name and description (both short and long) are what tell Copilot about the nature of the plugin and when to invoke it to get external data. We have to be very descriptive and clear about the features of the plugin here as this is what the Copilot will use to determine whether the plugin is invoked. The parameter descriptions are used to tell Copilot how to create the parameters required by the plugin based on the conversation.

2) Teams messaging extension code

This function does the heavy lifting in our code. It is called with the parameters specified in the app manifest by Copilot. Based on the parameters we can fetch external data and return it as adaptive cards. 

3) Talk to the external system (Cryptocurrency API)

This is helper function which is used to actually talk to the crypto api and return rates. 

Hope you found this post useful! 

The code for this solution is available on GitHub: https://github.com/vman/M365CopilotPlugin

Thursday, 16 November 2023

Teams tab fails to load in the new Microsoft Teams Desktop client

The new Microsoft Teams Desktop client was made generally available for Windows and Mac recently. The good news is that the new client provides feature parity for 3rd party apps like Focusworks AI giving customers a choice of using their preferred Teams client to access the apps.

However, if you have a custom built Microsoft Teams tab or a task module as part of your solution, and find that it fails to load in the new Microsoft Teams client, there might be a specific reason for it. 

And since there is no way to invoke the Developer tools in the new Teams desktop client yet (November 2023), the experience can get a bit frustrating. 

In my case, I have a custom React/TypeScript based tab which is using the @microsoft/teams-js library to interact with Teams. 

Since teams tabs are just HTML pages, we need to make sure that the page is being loaded inside Teams before continuing to execute the code. To do that we can use the context.app.host.name property and check that the value was "teams" before moving ahead.

However, with the new desktop client my tab was failing to load. After a bit of digging around I realised that the new Teams desktop client has an entirely different host name property and the value is "teamsModern" as mentioned here: https://learn.microsoft.com/en-us/javascript/api/%40microsoft/teams-js/hostname?view=msteams-client-js-latest

So changing my code to include the new value as well worked!

Hope this saves you some debugging time!

Monday, 19 December 2022

Building a Microsoft Teams app: Posting a message to Teams on behalf of the current user

If you are building a Teams app and want to integrate with Teams channel messages, this post will be helpful to you. Specifically, we will be looking at posting a Teams channel message, from the app, on behalf of the currently logged in user.  For example, there could be a scenario where an event occurs within the Teams app and as a result a message needs to be posted to a Teams channel but instead of it coming from a bot, it needs to be posted by the logged in user's account.

Let's see how this can be done. 

1. Azure AD app and Permissions

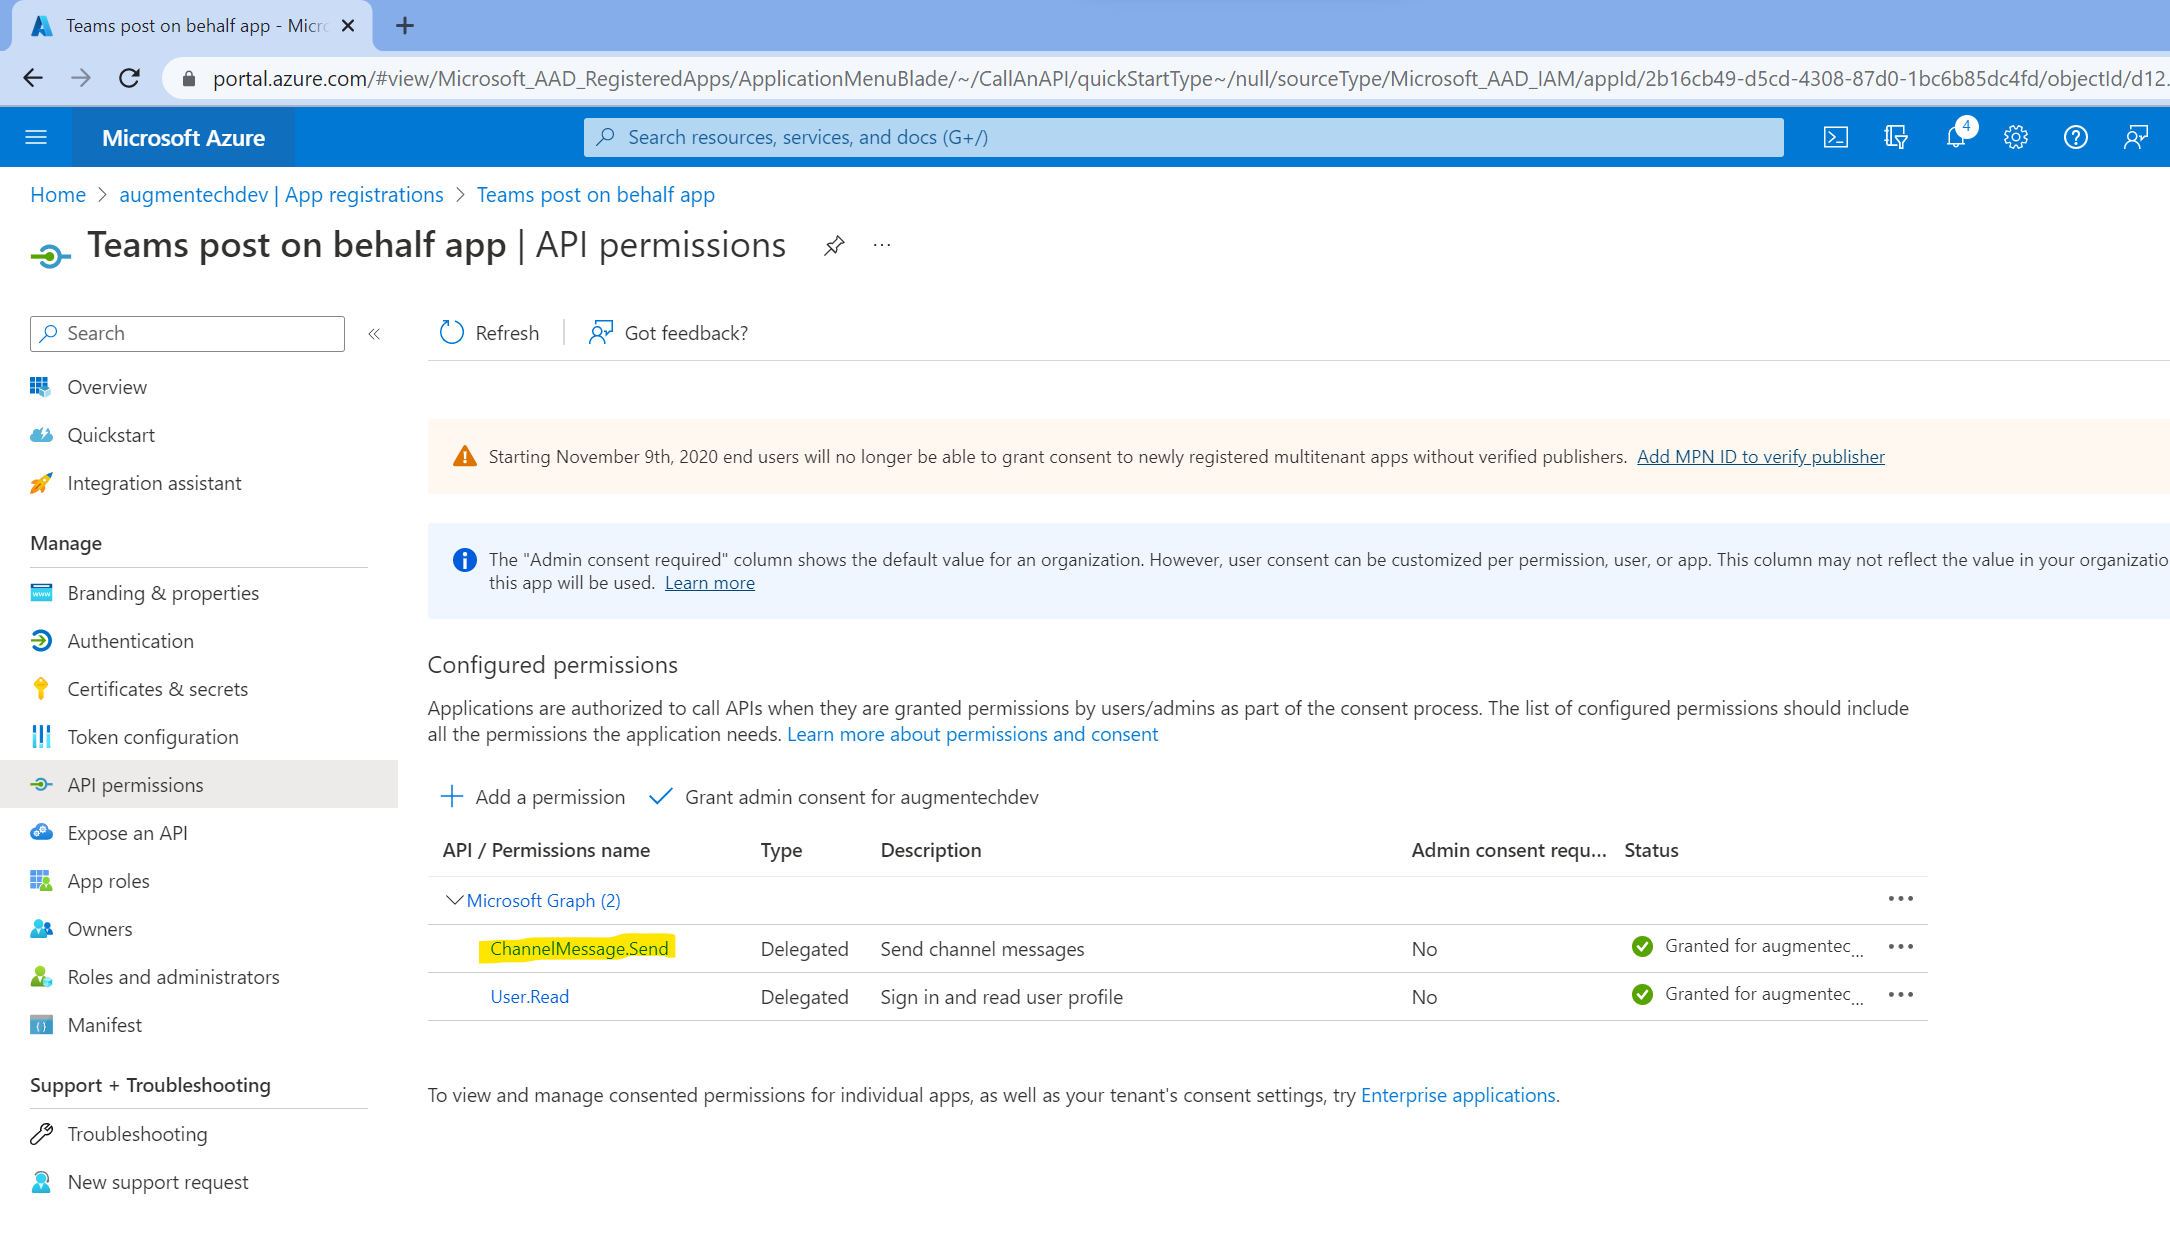
First thing we need is an Azure AD app setup with the Microsoft Graph ChannelMessage.Send delegated permission. This permission is needed for posting messages to Teams using the current user credentials.

I should mention setting up the right permissions is part of a larger configuration in the Azure AD app needed for Single Sign On (SSO) setup in Teams app. You can see the full configuration here: Register your tab app with Azure AD - Teams | Microsoft Learn 


2. Current user's id token from Teams JS SDK v2 

Once the permissions are setup, we need to setup our frontend so that it can grab the current user's id token from Microsoft Teams. More info on Azure AD id tokens here: Microsoft identity platform ID tokens - Microsoft Entra | Microsoft Learn 

Although this token is available from Teams JS SDK v2, it cannot itself be used to make graph calls. We need to exchange it for a Microsoft Graph access token. For this we will send the id token to our backend:

3. Getting Microsoft Graph delegated access token and posting message to Teams

It is recommended to do the token exchange as well as any further Graph calls from the backend of your app instead passing the Graph access token back to the frontend and making the calls from there:

In the code we first graph the id token from the Authorization header, then exchange the id token for a Microsoft Graph access token, then finally we are able to make a Graph call to post a message to Teams as the current user.


Hope this helps!

Wednesday, 23 November 2022

Building a custom Microsoft Teams tab: Show a native loading indicator

When building a custom Microsoft Teams tab with Teams manifest v1.7+, there is an option to natively show a loading indicator in Teams before our app loads. This can be helpful if your app needs to fetch any data before the first load.

There are two parts to showing the loading indicator: 

1. The showLoadingIndicator property in the Teams manifest needs to be set to true.
2. When the tab loads, the app.initialize() and app.notifySuccess() methods of the Teams JS SDK v2 should be called to indicate to Teams that the app is ready to load and to hide the loading indicator.

Now there are some "interesting" things to know about this. If you are using the Teams Developer Portal to configure your Teams app, then as of now the showLoadingIndicator property is set to true by default and there is no way to change this in the portal. You will have to download the app manifest and make the necessary changes in the json manually.

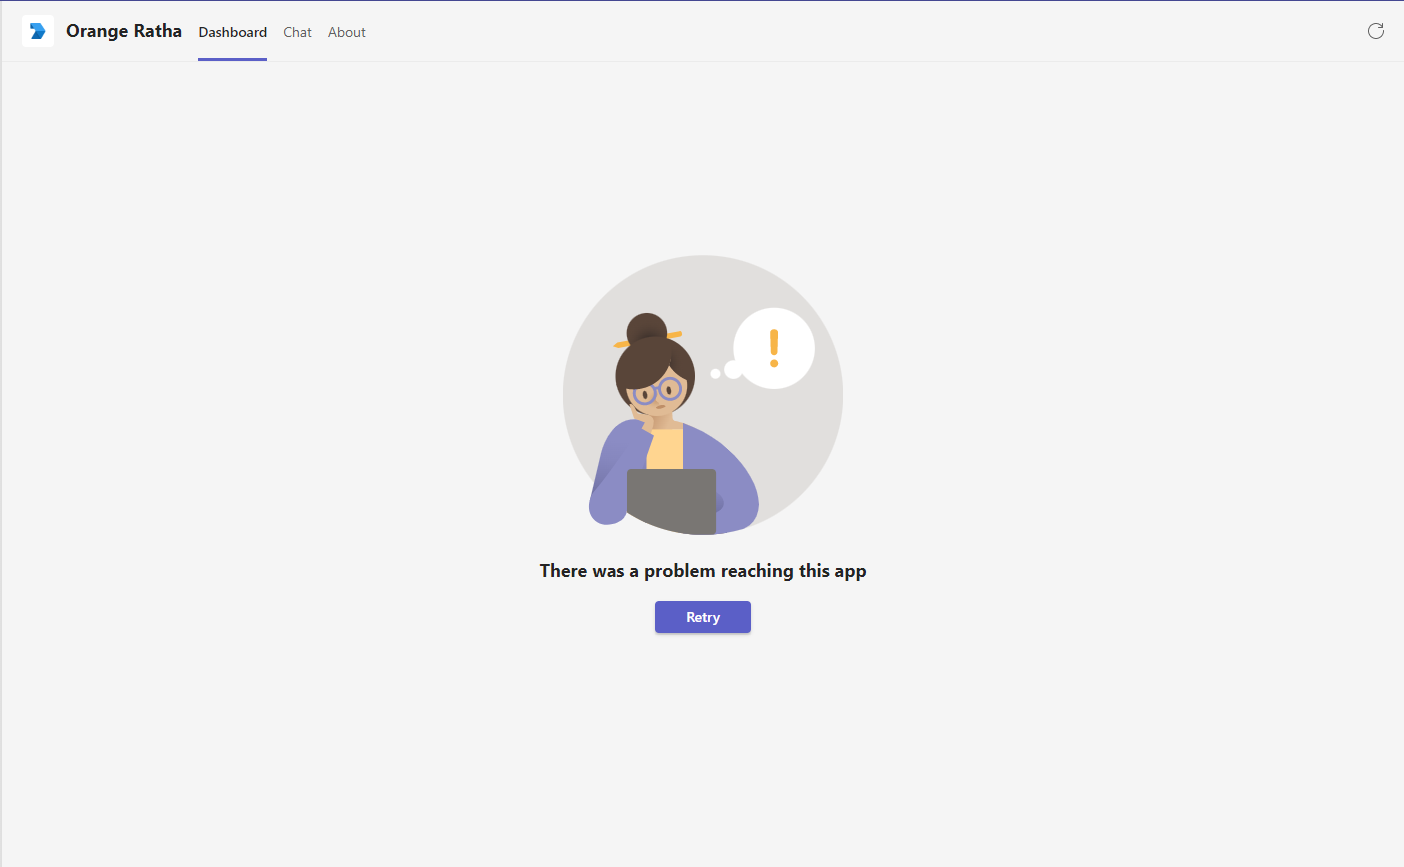
If you are just starting with Microsoft Teams development and are unaware of the loading indicator option, the error message shown on the tab is not much help in figuring out the issue. It simply says:

"There was a problem reaching the app"


This is because the showLoadingIndicator property has been set to true by the Teams Developer portal and we don't yet have our tab calling the app.initialize() and app.notifySuccess() methods of the SDK. So, Teams thinks that our app has failed to load and shows the error message.

There are two possible solutions to fixing this problem:

1. Set the showLoadingIndicator property to false manually in the manifest json. But the drawback to this approach then, is that no native loading indicator would be shown, and the users might have to stare at a blank screen until the content loads.

2. Let the showLoadingIndicator property be set to true and then make sure we call the app.initialize() and app.notifySuccess() methods of the SDK.

Manifest.json:


Tab react code:


There are further options possible with the loading indicator like hiding the loading indicator even if the app continues to load in the background and explicitly specifying loading failure. To see more details about those, the Microsoft docs are a good place to start: Create a content page - Teams | Microsoft Learn

Hope this helps!

Monday, 7 February 2022

Working with the Microsoft Graph communications API in a Microsoft Teams meeting app

Following up on my previous post about Microsoft Teams meeting apps, let's now have a look at how we can invoke the Microsoft Graph in our meeting app. 

Specifically, we will be using the Microsoft Graph communications API to get all meeting participants.

When I was first looking at this scenario, I thought it would be quite straightforward as this seems to be quite a common use case for meeting apps. However, I was in for a bit of a surprise as that did not turn out to be the case. 

My thinking was that I would get a meetingId as part of the Teams JS SDK context object and I would use this meetingId to get details from the Graph. But it turns out that the meetingId which the Teams JS SDK provides is completely different than the meetingId recognised by that Microsoft Graph

To fetch the meetingId which the Graph recognises, we have to introduce the Bot Framework SDK to the mix and exchange the Teams JS SDK meetingId for the Graph meeting Id. 

So let's see how to achieve this using code:

1) Using Teams JS SDK, get user id, meeting id, tenant id

This bit is straightforward, in your Teams tab you can get the meeting context using the Teams JS SDK:

2) Use Bot SDK to get Graph meeting ID from the Teams meeting id

Next, from your Teams Bot, call the /v1/meetings/{meeting-id} API. Couple of things you should know beforehand: 

This API is currently in developer preview. This means that it will only work for when the Microsoft Teams Clients have been switched to preview mode.

Secondly, we have to turn on Resource Specific Consent (RSC) for your app and request the required scopes. More details on both points here: https://docs.microsoft.com/en-us/microsoftteams/platform/apps-in-teams-meetings/api-references?tabs=dotnet#get-meeting-details-api

Once you have everything setup, you can call the API to get the meeting details:

The response would contain a details object with an msGraphResourceId property. This will be the meeting id which would work with the Graph API.

3) Use Graph API to get meeting participants from Graph meeting id

Finally, from the msGraphResourceId, we can make a regular call to the Graph to get the meeting details. Specifically, we will call the /onlineMeetings/{meetingId} endpoint: https://docs.microsoft.com/en-us/graph/api/onlinemeeting-get?view=graph-rest-1.0&tabs=http

In this case, we will get the meeting participants:

Make sure you have the correct Delegated or Application permissions granted to the Azure AD app registration you are using for authenticating to the Graph.

This is not an ideal situation as you might not have a requirement for a Bot in your Teams app and might be building a tab for example. In this case, Yannick Reekmans has written a post for you here: https://blog.yannickreekmans.be/get-full-meeting-details-in-a-teams-meetings-app-without-using-bot-sdk/  

That's it for now. Hope you find this helpful when exploring meeting apps right now.

Thursday, 13 January 2022

Working with Apps for Microsoft Teams meetings

Microsoft Teams meetings extensions or "Apps for Teams meetings" are the newest entry in the Microsoft Teams extensibility story. They can be used to build custom experiences right into the meeting experience. Meeting participants are able to interact with the custom experiences either before, during or after the meeting. To know more about apps for Teams meetings, a great place to start is the Microsoft docs: https://docs.microsoft.com/en-us/microsoftteams/platform/apps-in-teams-meetings/teams-apps-in-meetings

Pre-meeting and Post-meeting experiences

The pre and post meeting experiences are not too different than what we are used to when building Tabs for Teams. The basic structure remains the same with the only different thing being that the Teams SDK provides the meeting specific APIs when invoked from a meeting app. These APIs can be used to get meeting details like participants and meeting context in our app. More information on the APIs here: https://docs.microsoft.com/en-us/microsoftteams/platform/apps-in-teams-meetings/api-references?tabs=dotnet


In-meeting experiences

When it comes to the In-meeting experiences, there are two main areas: The side panel and the in meeting dialog box (also known as content bubble). The side panel is used to show custom experiences while the meeting is in progress


And the in-meeting dialog box (or content bubble) is used to show content, prompt or collect feedback from the users during the meeting:


I should mention here that the In-meeting experiences only work in the Teams desktop and mobile clients as of now. They don't work in the Teams web browser interface at the time of this writing. To me this is the biggest challenge for using them in production.

Now that's enough introduction of the concepts, let's take a look at how to actually build these experiences and what are the moving pieces when building them. The Microsoft docs do provide some great step by step tutorials for each of the use cases. 

In this post we will look at the In-meeting dialog box. We will take a look at the Microsoft's code sample and walk through it. You can find the code sample here: https://github.com/OfficeDev/Microsoft-Teams-Samples/tree/main/samples/meetings-content-bubble/csharp

1) Configure an Azure Bot and enable Teams Channel

Create a bot in Azure and configure the endpoint which should receive the Teams events:


Next, add the Teams channel so that the bot is able to talk to Microsoft Teams:


2) Update the Teams manifest

For the In-meeting dialog box, we don't have to make any special changes in the manifest. We just need to make sure that since the dialog box will be shown via the bot, our Teams app manifest should have the bot configured as part of it. 


3) Create an Azure AD app registration for the app


When we created the Azure Bot, a new Azure AD app registration was created behind the scenes as well. Grab the client id and client secret from this app as we would need it later to add to our bot config


4) Start the ngrok tunnel and update the code sample:

To debug locally, you will need to setup an ngrok tunnel to your local machine. More details here: https://ngrok.com/


And in the code sample, update the bot client id and client secret along with the ngrok tunnel url:


5) In meeting dialog code:

The way to bring up an in-meeting dialog is to use the regular Bot Framework turnContext.SendActivityAsync(activity) code but with updated Teams channel data:

You will notice that in the In-meeting dialog url, there is a reference to {_config["BaseUrl"]}/ContentBubble 

This means that the contents of the in-meeting dialog have to be hosted in our app. This is good news as that means we have complete control over what is displayed in the dialog. In this code sample, the contents are hosted in an MVC view:

And once everything fits together, we can see the sample code running to show an In-meeting dialog launched in the context of a meeting:


Hope this helps, and thanks for reading!

Thursday, 16 December 2021

Building a Microsoft Teams bot: Sending custom data from an adaptive card button to the bot

This is the third article in my "Building a Microsoft Teams Bot" series. In this series, I have written down some interesting things I came across while creating a Microsoft Teams Bot app which is now available on AppSource: https://appsource.microsoft.com/en-us/product/office/WA200002297

Click here to see the previous articles in the series: 

Building a Microsoft Teams Bot: Posting an Adaptive Card carousel as a welcome message

Building a Microsoft Teams Bot: Deep linking to a Teams message from an Adaptive Card button

Todays article is around how to pass custom data from Adaptive Cards back to the Teams bot. This can be useful in scenarios when we want to show multiple options to the user in an Adaptive card and when the user selects an option, we want to send that option back to the bot and perform a relevant operation.


To achieve this, we will use the data property of the Adaptive Card Submit action: https://adaptivecards.io/explorer/Action.Submit.html 
This property contains a key value pair of custom data which can be sent back to the bot. 

Here is a sample of how the card json will look when posting it to Teams:

To build this type of card in our bot code, we will iterate over the options and create Adaptive card Submit buttons with the relevant values in the data property:

And finally, when the user clicks on a button, Teams platform will send the corresponding data property back to the bot. This can then be used in the Submit action of the bot to perform a relevant operation.

Hope this was helpful!

Tuesday, 9 November 2021

Building a Microsoft Teams Bot: Deep linking to a Teams message from an Adaptive Card button

This is the second article in my "Building a Microsoft Teams Bot" series. In this series, I am planning to write down some interesting things I came across while creating a Microsoft Teams Bot app which is now available on AppSource: https://appsource.microsoft.com/en-us/product/office/WA200002297

Click here to see the previous article in the series: Building a Microsoft Teams Bot: Posting an Adaptive Card carousel as a welcome message

Todays article is around how to create deep links to teams messages from Adaptive cards. This can be useful in scenarios when you want to send users to a specific Teams chat message when they click on an Adaptive Card button:


If you are building the deep link manually, it can be grabbed from the "Copy link" button from the ellipsis menu in a Teams message:


Deep links to personal chats are in a different format compared to channel messages.
 
For Teams messages, the deep link format is:

https://teams.microsoft.com/l/message/{ChannelId}/{messageId}

For personal chats, the deep link format is:

https://teams.microsoft.com/l/message/19:{userAadObjectId}_{botId}@unq.gbl.spaces/{messageId}?context=%7B%22contextType%22:%22chat%22%7D

For bots and messaging extensions, this deep link can be built from parts of the payload sent to the Bot from the Teams platform when the bot is invoked:

Once you have the desired deep link, the next step is to assign it as the URI to an Adaptive Card button:

And that's it! Now you can easily add buttons to your adaptive cards which take the user to specific messages in Teams personal chats or channels. 

Hope this was helpful!

Monday, 12 July 2021

Working with Adaptive Card Universal Actions in a Microsoft Teams Bot

Universal Actions for Adaptive cards are a mechanism to handle user interactions uniformly no matter where the user is accessing the Adaptive Card from. It allows Bot developers to send the same Adaptive Cards to Microsoft Teams, Outlook etc. without having to write redundant client specific code. As the Microsoft docs state:

Universal Actions for Adaptive Cards evolved from developer feedback that even though layout and rendering for Adaptive Cards was universal, action handling was not. Even if a developer wanted to send the same card to different places, they have to handle actions differently. Universal Actions for Adaptive Cards brings the bot as the common backend for handling actions. 

https://docs.microsoft.com/en-us/microsoftteams/platform/task-modules-and-cards/cards/universal-actions-for-adaptive-cards/overview?tabs=mobile

In addition to these user interactions, there are couple of really useful features delivered as part of Universal Actions. They are "User Specific Views" and "Up to date cards"

User specific views:

By using user specific views, different users see different views on the card depending on their identity and the actions they have taken. This was not the case earlier when all users who viewed an Adaptive Card posted in a Teams channel saw the same exact card. Lets see a quick example:

First lets talk about the refresh property. The property contains two important values: action and userIds. When an adaptive card containing a refresh property will load, first the Teams platform will check if the current user viewing the Adaptive Card is present in the userIds property. If they are, then an action will be sent to the bot containing the verb mentioned in the verb property. We will have to write Bot Framework code which handles this call from the Teams platform. As a response to this call, we can return a new adaptive card which will only be visible to the current user. 

All other users viewing the Adaptive card who are not part of the userIds property will keep seeing a shared common view of the base card. 

Up to date cards:

With up to date cards, we can use the Bot Framework message update functionality to update the user specific views in adaptive cards on the fly. This is so that the cards are updated to their latest state without the user having to reload the card.   

Now that we have covered the different moving parts, let's see how we can put all of this together in a code sample for a approving an asset in a Teams channel:

1) A user starts the approval process by sending a command to the bot:


The user starting the approval request is the "Owner" of this asset. When the owner sends an approval request, an adaptive card with a "Approve" button will be shown to everyone in the Team who is not the owner. Where as, the owner will see a view on the card which contains a list of users who have approved the request.

2) Approving the asset and refreshing the Adaptive Card with latest state: 

Any user in the team can click on the approve button to approve the asset. Once they approve, they will be shown a different card.


Owner will always see who approved the card. This will be kept up to date using the message edit mechanism without the need to manually reload the card.


Now we come to the crux of the blog post. Whenever a user will click on the "Approve" button, or and Adaptive Card will load which contains a refresh property with the current user's userId, an adaptiveCard/action request will be sent to our bot. The request will contain information on the action such as the verb and the context in which the action occurred. 

Out bot framework code will have to respond with the correct card depending on the action. 

In the above code, when the approveClicked action occurs, we add the user approving the asset to our persistent storage and return a card to them thanking them for the approval.

When the refreshCard action occurs, it means that a user listed in the userIds property of a card is trying to view the card. So based on the identity of the user, we will return the correct card. This is used to show the owner of the card a list of users who have approved it.

Hope you found the post useful!

Full code sample of this blog post available on GitHub: https://github.com/vman/Universal.Actions

Monday, 18 January 2021

Building a Microsoft Teams Bot: Posting an Adaptive Card carousel as a welcome message

In November 2020, I was happy to release my side project "Snooze Bot" as a free app on the Microsoft Teams store: https://appsource.microsoft.com/en-us/product/office/WA200002297 

I had been working on it for a few weeks. The fact that all of us were under lockdown gave me some extra time in the evenings and weekends to focus on learning the Microsoft Teams platform and create an app on it which addressed a gap which I noticed in my day to day use. 

We all get a lot of Teams messages daily and need a way to manage them or come back to them at a later time. Snooze bot helps us do exactly that. It lets us Snooze message which we want to deal with later. When a message is snoozed, we get an option to select the duration after which Snooze Bot should remind us about the message. When the time arrives, the bot will send you personal message in teams reminding about the snoozed message.


If you haven't checked out Snooze Bot yet, feel free to install it and give it a try. I am happy to hear any feedback and potential improvements. 

One of my goals when creating the app was to learn about the Microsoft Teams developer platform and also blog about the interesting things I came across. So in this series of posts, let's outline some Microsoft Teams development concepts which I found really useful. The first one being posting an Adaptive Card carousel as a welcome message when the bot is added by the user.

It's always recommended as a good practice to send a welcome message when the user adds the bot. According to the Microsoft docs: 

In personal contexts, welcome messages set your bot's tone. The message includes a greeting, what the bot can do, and some suggestions for how to interact (for example, “Try asking me about …”). If possible, these suggestions should return stored responses without having to sign in.

Also, sending the welcome message one of the requirements before the app is accepted in AppSource by the validation team.

So we can send a simple chat message from the bot to the user as a welcome message. So why go for an Adaptive Card carousel? This is because adding too much information in a single message can get overwhelming for the user and they might be tempted to just skip it. Also if your bot has a lot of functionality you need a way to efficiently present that information to the user. This is where carousels created by Adaptive Cards some into play:  


So let's have a look at the code which helps us send the welcome message in Snooze Bot

The Adaptive Card json:


First, we need to define the Adaptive cards which will show up in the welcome message. I am storing mine as json files in my solution. The cards contain helpful text and also links to images which show the functionality of Snooze Bot

The Bot:


Next, the actual bot code itself. Since I am using .NET Core for this bot we will need the Adaptive cards nuget package:


And here is the code where we do the following things:

1) Capture the OnMembersAddedAsync event from the Bot Framework
2) Get the Adaptive cards from the json files 
3) Insert the adaptive cards into a Bot Framework carousel and send it to the user

And that's it. Whenever a user will download and install the app, the welcome message will be sent to them introducing your bot and it's funtionality. Hope you found the post useful!

Monday, 20 July 2020

Microsoft Teams Bot Framework: Mention a user in an Adaptive Card

Microsoft Teams announced support for Adaptive Cards 1.2 recently. With that, a nifty feature to allow mentioning users in Adaptive Cards posted in Teams was also introduced. This allows us the ability to send a notification to the user and can draw their attention towards the card.

User gets a notification of the mention:


(click to zoom)

Other users are able to contact the user directly from the mention in the card:


(click to zoom)


In the docs, there is a great example of the JSON we need to send to Teams to post the card containing the mention. So in this post, lets see how we can do this when using the Bot Framework .NET Core SDK:

For this code to work, we will need the following Nuget packages:


Quick note: I noticed that the user mentioned is only notified when the Adaptive card is first created. If you update the same adaptive card later and mention the same user again, they are not notified. This is probably for the best as the Adaptive card might be updated several times and if you got a notification every time, it might be really annoying to the user.

Hope you found this post useful!

Monday, 27 April 2020

SPFx Teams tab: Use react hooks to dynamically handle theme changes

When developing a custom Teams tab with the SharePoint Framework, we want to make sure that the SPFx custom tab (web part) is styled according to the current selected theme.

Also, if the user switches the theme (e.g. from default to dark), we want to make sure that the styling of our SPFx web part also changes without the user having to reload the tab.


Let's see how we can do this. In this post, depending on the Teams theme, we will dynamically add a CSS class to our top level react component. And when the theme changes, we will change this class as well. That will be the scope of this post without going into further details of Styling/CSS.

Also, since I have been exploring React hooks recently, we will be using them in the demo code.

The very first thing we need to do is to make sure that our SPFx tab loads with the currently selected theme when the tab loads for the first time.. This can be achieved with the teamsJS sdk bundled with SPFx:

The theme property will either have the values "default", "dark" or "contrast" (at the time of writing this post). Depending on this property, we can add a CSS class to the top level container of our web part.

Now the important part. When the user updates the theme, we want to fire an event which can be used to set the new theme in our tab. Luckily the teamsJS sdk provides us with a function which can be used to register this event handler:

https://docs.microsoft.com/en-us/microsoftteams/platform/tabs/how-to/access-teams-context#theme-change-handling

With this, we are able to capture the theme update dynamically and update our component state. Next, we also want to change the CSS class of the top container when the theme changes. We will do this by using the useEffect hook again and setting the class depending on the selected theme.

This hook takes in the themeState as a dependency which means that it will run anytime themeState changes. We will use it to update the styleState.

I could have been a bit more clever here and simply updated the class in the registerOnThemeChangeHandler function itself. But I wanted to keep the themeState and styleState separate to have them loosely coupled and also to play around with hooks a bit more ;)

Here is the complete code for the React Functional component:

Hope you found the post useful! As always, the code for this post is available on GitHub: https://github.com/vman/spfx-teams-theme-hooks

Monday, 24 February 2020

Microsoft Bot Framework v4: Send proactive messages to Teams channels and users

What is a Bot Framework Proactive message?

Usually, for starting a conversation with a Microsoft Teams bot, the user has to initiate the conversation either by sending a personal message to the bot, or by mentioning the bot in a Teams channel or by invoking a messaging extension.

With proactive messaging, the bot can start a conversation with a user (or in a Teams channel) without anyone having to invoke the bot first. This conversation can be started based on any custom logic fit for your application e.g. The occurrence of  an external event, or a webhook getting triggered or even on a scheduled periodical basis.

More about Bot Framework proactive messages here: https://docs.microsoft.com/en-us/azure/bot-service/bot-builder-howto-proactive-message?view=azure-bot-service-4.0&tabs=csharp

I should mention that the bot will first need to be installed in the Team, if you want to send a proactive message to a Teams channel, or to the users who are part of that team.


How to send proactive messages?

So in this post, let's look at a few code samples which make it very easy for our Teams Bot to send proactive messages to users or channels in a Team.

These code samples are based on a standalone .NET Core console app. This is mainly to show that as long as you have the necessary information, your code doesn't need to be running under the Bot messaging endpoint. Once you have the information from the Bot messaging endpoint, the proactive messaging code can run from any platform e.g. from an Azure Function.

If you have a look at the Bot Framework code samples published by Microsoft, they all use code which is running under the messaging endpoint. This initially led me to believe that even for proactive messaging, the code should live under the same endpoint. But as we will see in this post, that is not the case.

What are the prerequisites?

As mentioned before, our bot will need to be installed in a Team first. This will allow the bot messaging endpoint to receive the required values from Teams and send it to our proactive messaging code. If the bot is not installed in the Team, you will get a "Forbidden: The bot is not part of the conversation roster" error.

Base URL (serviceUrl)

This is the Url to which our proactive messaging code should send all the requests. This Url is sent by Teams in the Bot payload in the turnContext.Activity.serviceUrl property. For all intents and purposes this url will remain constant but after having a discussion with Microsoft, they have recommended that this url might change (very rarely) and our bot should have the logic for updating the stored base url periodically from the payload sent to the bot. More about the Base Url here: https://docs.microsoft.com/en-us/azure/bot-service/rest-api/bot-framework-rest-connector-api-reference?view=azure-bot-service-4.0#base-uri

Internal Team Id

This is the internal team id which is not the same as the Office 365 Group Id. The internal team id is in the following format: 19:bf2b184e7cbb4f9f9ca1b47f755cd943@thread.skype

You can get the internal team id from the Bot payload in the channelData.team.id property. You can also get this id through the Microsoft Graph API: https://docs.microsoft.com/en-us/graph/api/resources/team?view=graph-rest-1.0#properties

Channel Id

If we want our bot to post to a specific channel in a Team, then we will need the channel id as well. The format for the channel id is exactly the same as the internal team id. Also, you can get the channel id from the bot payload as well as the Microsoft Graph api: https://docs.microsoft.com/en-us/graph/api/resources/channel?view=graph-rest-1.0#properties

Internal Teams User Id

This would only be needed if you want to send a proactive personal message to a specific user. For all users in a team, Teams maintains an encoded user id so that only bots installed in a team are able to message users. To get this user id, our bot needs to call the conversations/{conversationId}/members REST API endpoint. Fortunately for us the Bot Framework wraps this call in a handy SDK method as shown in the third code sample below.

So once we have all the required values from the Bot messaging endpoint, we are able to send proactive messages. For this sample code, I am using the Microsoft.Bot.Builder v4.7.2
https://www.nuget.org/packages/Microsoft.Bot.Builder/

1) Post a proactive message in a Teams channel


(click to zoom)

2) Post a proactive message in a Teams channel and mention a user in it


(click to zoom)


3) Post a proactive personal message to a user


This code has been updated for Bot Framework v4.12.2 NuGet Gallery | Microsoft.Bot.Builder 4.12.2

Also, before running this code, make sure that the user has installed the bot app in the personal scope or is a member of a Team which has the bot installed.

(click to zoom)

Hope you found the post useful!

Wednesday, 15 January 2020

Create Microsoft Teams manifest manually for Personal app powered by SPFx

SPFx 1.10 was released recently which now includes support for Teams personal apps. Catch the announcement here: https://developer.microsoft.com/en-us/sharepoint/blogs/announcing-sharepoint-framework-1-10-extending-sharepoint-framework-across-microsoft-365/

To deploy a personal app with an SPFx package, you have the option of deploying the package to the SharePoint tenant app catalog and clicking on the "Sync to Teams" button which then makes the app available in Teams as shown here: https://docs.microsoft.com/en-us/sharepoint/dev/spfx/integrate-with-teams-introduction

But what if you are coming at it from the Teams app point of view? You already have a Teams app with a bot or a messaging extension and want to add the SPFx powered personal app to it. You probably don't want to use the "Sync to Teams" option in this case because then your SPFx web-part will be available as a separate app in the Teams app catalog.

Fortunately, it's very simple to define a staticTab in the Teams manifest which points to the SPFx webpart. This then makes the SPFx webpart available as a teams personal app:

Notice the teams and personal query string parameters as they are very important. You will also have to replace the component id with the id of your web-part.

I have also updated the official MS Docs with this approach:
https://docs.microsoft.com/en-us/sharepoint/dev/spfx/web-parts/guidance/creating-team-manifest-manually-for-webpart

Thanks to my colleague Jarbas for working with me in figuring out this one!

Thursday, 7 November 2019

Building a Microsoft Teams Bot: Get Team context details including Office 365 Group and SharePoint site url

The Microsoft Bot Framework v4.6 was released this week at Ignite and it's got some really great additions:
https://github.com/microsoft/botframework/blob/master/whats-new.md#november-2019-ignite

One thing which I am very happy about is that building Bots for Microsoft Teams has become way easier now!

This wasn't always the case. Previously, the Bot Framework was separate to the Teams Bot Builder and they both didn't play nice all the time. Throw in more stuff like Bot Framework v3/v4, Messaging extensions, Adaptive Cards and it lead to tweets like this:


But now, the Teams Bot Builder is part of the the Bot Framework SDK itself which is very good news. If you are just getting started building Bots for Microsoft Teams, you only need to install the Bot Framework package. Apart from that, the code to work with Microsoft Teams has been simplified as well.

Imagine you are building a Teams Bot and it needs to interact with the Office 365 Group which underpins the Team. Or maybe the Bot needs to store or retrieve some data from the SharePoint site associated with the Team. Let's see how easy it is now to achieve this:

Before we look at the code, make sure you are using the Microsoft.Bot.Builder 4.6+ version of packages in your Bot:

https://github.com/Microsoft/botbuilder-dotnet/#packages
https://www.nuget.org/packages/Microsoft.Bot.Builder/

We will also need the Microsoft Graph .NET SDK:
https://docs.microsoft.com/en-us/graph/sdks/sdk-installation

And here is the code:


We are using the new TeamsInfo class available in the Bot Framework to get the current team details. This class also has a few other helper methods which you might find useful:
https://github.com/microsoft/botbuilder-dotnet/blob/master/libraries/Microsoft.Bot.Builder/Teams/TeamsInfo.cs

Internally the TeamsInfo.GetTeamDetailsAsync method calls the `/v3/teams/{team-id}` API endpoint to get the Office 365 Group id (a.k.a AADGroupId in the API). We can then use the Microsoft Graph API to get the other details including the SharePoint site url.

Hope this helps! For more details on building bots for Microsoft Teams, have a look at the official docs: https://docs.microsoft.com/en-us/microsoftteams/platform/bots/how-to/create-a-bot-for-teams

Friday, 4 October 2019

Microsoft Teams messaging extensions: User authentication, OAuth and Microsoft Graph

Microsoft Teams messaging extensions allow us to enhance teams messages with business data. We are able to fetch information (e.g. from Microsoft Graph or 3rd party APIs) based on various factors like the current user, current team or current channel and post it as part of a message using rich Adaptive cards.


This gives us a great way of creating Teams based integrations with other Line of Business (LOB) applications.

I won't go much deeper into the different possibilities with messaging extensions in this post. Instead, we will focus more on how they are built and how to authenticate the current user.

To know more about messaging extensions, have a look at the Microsoft docs:
https://docs.microsoft.com/en-us/microsoftteams/platform/concepts/messaging-extensions/messaging-extensions-overview

Teams messaging extension architecture:


The way in which the messaging extensions work is by leveraging the Microsoft Bot Framework and utilising the following moving pieces:

1) A Bot Channel Registration which is essentially the identity of the Bot/Messaging extension. We need this to get the Bot Id and also to set "Microsoft Teams" as one of the channels served by the bot.

2) An endpoint which will receive (and respond to) HTTP POST messages from teams when the messaging extension commands are invoked.

3) A Teams App Manifest which contains the JSON specifying the messaging extension properties, the Bot  Id, and the messaging endpoint.

Those are the primary building blocks of a Teams messaging extension (or even a Teams Chat Bot for that matter, but that's out of scope for this post)

To see a walk-through of building a messaging extension from scratch, check out Cameron Dwyer's post: https://camerondwyer.com/2019/09/09/how-to-create-a-microsoft-teams-messaging-extension-pop-up-dialog-with-a-custom-ui/

Fetching data from Microsoft Graph as the current user (delegated authentication)


This is how the sign in flow will look. The user will have to sign in only once into the app. After that, the token flow (including the access tokens and refresh tokens) will be handled by the Bot Framework.

The user is prompted to sign in the first time they launch the compose messaging extension. After the sign in is completed, the messaging extension is able to show "security trimmed" data from the Graph. In this case, it's the groups the current user has joined:


Now let's see how we can leverage the Microsoft Graph in our messaging extensions. Before fetching data from the Graph, we will need an Azure AD OAuth token for the current user in Teams. To get the token flow working, first we need to create and Azure AD App Registration and give it necessary permissions:


Next, we need to create and configure the Bot Channel Registration:


Next, create and configure an OAuth Connection Setting in the Bot Channel Registration. The Client Id, Client Secret and Tenant Id should come from the AAD App Registration created in the previous step.


And here is the code to include in the Bot which handles the AAD sign in flow of the user. I am using the Bot Framework v4 for this Bot:


This code will fetch you the access token needed for calling the Graph. After that you can use the Graph SDK to get the required data:


Hope this was helpful. Given the complexity of Microsoft Teams development at this time, this post wasn't as comprehensive as I wanted it to be. There are challenges to getting everything to work together including Bot Framework v4, Teams Bot Builder (preview), Adaptive Cards and Messaging extensions. Hope the story becomes much simpler in the future.

Monday, 4 March 2019

Create Azure DevOps pipelines for a Microsoft Teams app built with SPFx

In this post, let's walk-through the configuration needed to create Azure DevOps build and release pipelines for a Microsoft Teams solution. 

The solution is built using the SharePoint Framework and will be surfaced in Microsoft Teams as a Tab. 

As the code for the SPFx solution is being hosted in a GitHub repository, I will only focus on the Azure Pipelines configuration. For information on how to work with Azure Repos, see the official Microsoft docs: https://docs.microsoft.com/en-us/sharepoint/dev/spfx/toolchain/implement-ci-cd-with-azure-devops

These are the high level steps we are going to follow:

Build pipeline:


1) Create production package of the SPFx solution (.sppkg)
2) Create a Teams manifest package (.zip) 
3) Publish the SPFx and Teams packages as Artefacts to be consumed from the Release pipeline

Release pipeline:


1) Deploy the SPFx package to the SharePoint Tenant App Catalog (using the Office 365 CLI)
2) Deploy the Teams manifest package to the Microsoft Teams App Catalog (using the Office 365 CLI)

So without further ado, here are the screenshots and scripts to achieve this:

(Click on the images to zoom)

Build pipeline:


Use Node 8.12.0:


npm install:


gulp bundle --ship:


gulp package-solution --ship:


The .sppkg file needs to be copied to staging directory in order to be published to the release pipeline:


Create a .zip file for the teams app catalog and copy it to the staging directory as well:


Publish the .sppkg and .zip files so that they can be consumed from the Release pipeline:


Release pipeline: 


Now to create a new Release Pipeline which will deploy the packages to the respective app catalogs in the tenants.

The Artefacts used will be the .sppkg file and the .zip file for Teams which was published in the previous step:


Overview of tasks in the Release pipeline:


Before moving on to the tasks, we also need to configure some variables to hold the information for the tenants, credentials etc.


The username and password should be for an account with global admin permissions. This is because the Microsoft Graph API (used by the Office 365 CLI) needs this permission to deploy apps to the Microsoft Teams App catalog:
https://docs.microsoft.com/en-us/graph/api/teamsapp-publish?view=graph-rest-1.0#permissions

The TeamsManifestId will be used to check if the app already exists in the Teams App catalog. This can be fetched from the manifest.json file in the teams folder of the SPFx solution:


If you are feeling adventurous, you could look at cracking open the .zip file from the Release pipeline and then grabbing the id on-the-fly instead of having to specify it in a variable.

Next, we will need to use Node (same task as the build pipeline) and install the Office 365 CLI on the Release agent using:

npm install -g office365-cli


Next, we need to deploy the SPFx package to the SharePoint Tenant App Catalog:


Here is the script as a gist:

And lastly, we need to publish the Teams manifest to the Microsoft Teams App Catalog. We will do this using the Office 365 CLI as well. Thanks to Elio and Waldek to get this functionality in the Office 365 CLI at lightning speed!


Here is the script as a gist:

And that's it! You now have build and release pipelines configured to deploy SPFx solutions and Teams apps. The webpart will now be available in SharePoint and the tab will be available in Teams:


 Hope you found this walk-through useful!