Monday 7 November 2016

Introducing: SharePoint Online Public CDN Manager

Update 24th March 2017: This post was updated since the general availability of the Office 365 Public CDN. The SPO CDN Manager now supports the GA version of the Office 365 Public CDN.

The Office 365 Public CDN recently reached General availability. It allows static assets like images, JavaScript, CSS etc. to be hosted in a globally available CDN. Find out more about it here.

With the general availability, the Office 365 PowerShell and SharePoint Online CSOM were also updated with APIs which could be used to manage the Public CDN.

Although the APIs are handy, what was missing was a nice and simple GUI to manage the CDN settings. So I set out to create an app which would give a nice overview of all the CDN settings including folders in the tenant which have been configured as Origins, file types which have been set to be pushed to the CDN and finally a way to enable/disable the CDN.

Introducing the SharePoint Online Public CDN Manager:


Check it out now: https://spocdnmanager.azurewebsites.net/


Checkout the code on GitHub: https://github.com/vman/SPO-CDN-Manager


As you can tell, the SharePoint Online Public CDN Manager can be used to:

1) Add/Remove CDN Origins i.e. SPO Libraries which will be used to store static assets.

2) Add/Remove File types. Which files will be pushed to the CDN.

3) Enable/Disable the CDN on a tenant.

4) Create the default CDN origins specified by the Office 365 Public CDN

The Implementation:


1) It is an MVC app which is Multi Tenant and hosted on the Azure App Service. It uses the March 2017 Release of SharePoint Online CSOM to talk to SharePoint.
https://dev.office.com/blogs/new-sharepoint-csom-version-released-for-Office-365-march-2017

2) For the UI, the Office UI Fabric core styles are used together with the Office UI Fabric JS Components


3) The app requires "Office 365 SharePoint Online" Full Control permissions on all site collections. This is because the CDN is a tenant wide setting and can be modified only by Tenant Administrators or SharePoint Administrators.


The app uses Delegated (User) authentication for every call to SharePoint so that only Tenant/SharePoint Administrators can access the CDN Properties:
So even if a user who is not an Admin lands on the page, they are not able to fiddle with the CDN settings.

Tenant vs Office365Tenant


Something interesting I came across while working on this. There are 2 classes available in CSOM now to manipulate tenant settings:

Microsoft.Online.SharePoint.TenantManagement.Office365Tenant

Microsoft.Online.SharePoint.TenantAdministration.Tenant

Both these classes have the Public CDN properties which can be used to manage the CDN. But the interesting this is that the Tenant class requires the Tenant Administration Url (https://yourtenant-admin.sharepoint.com) to instantiate but the Office365Tenant class can be instantiated by a regular site url in SharePoint Online. (https://yourtenant.sharepoint.com/sites/publishing)

If a regular SharePoint site url is used to instantiate the Tenant class, you get an exception saying:

Current site is not a tenant administration site.

This is why I have used the Office365Tenant class. Checkout the code on GitHub for more details.

Workaround for Internet Explorer "Quirks":


The SPO CDN Manager has been tested on latest version of Chrome, Edge and IE. It works without any issues on Chrome and Edge.

But, to get it working on IE, you will have to add the remote site https://spocdnmanager.azurewebsites.net to IE's trusted sites.

Thanks for reading! Hope you find the SPO CDN Manager useful.

Thursday 20 October 2016

Working with the CSOM External Sharing API in SharePoint Online

I was recently working on a SharePoint Online project where we had quite a heavy use of the External Sharing CSOM API.

Here are some utility functions I have put together which might be useful in the future.

I have used the SharePoint Online CSOM version 16.1.5626.1200 for this:
https://www.nuget.org/packages/Microsoft.SharePointOnline.CSOM/16.1.5626.1200/

Also, there are some really nice samples in SharePoint Patterns and Practices (PnP) around External Sharing

1) Site Collection External Sharing

2) External Sharing Expiration Service

In my case however, I have used the native CSOM API methods for creating the utility functions.

1) Get Externally Shared Documents


This method uses search to get all documents which are externally shared. You can modify the search query to filter by site, site collection, document library etc.


2) Get external users for a document


This method uses the native CSOM API to get all the users with whom a particular document is shared.


3) Get all external users in a Site Collection:


4) Get all external users in a Tenant:


Hope this helps!

Tuesday 13 September 2016

SharePoint Framework: Org Chart web part using Office UI Fabric, React, OData batching and Service scopes

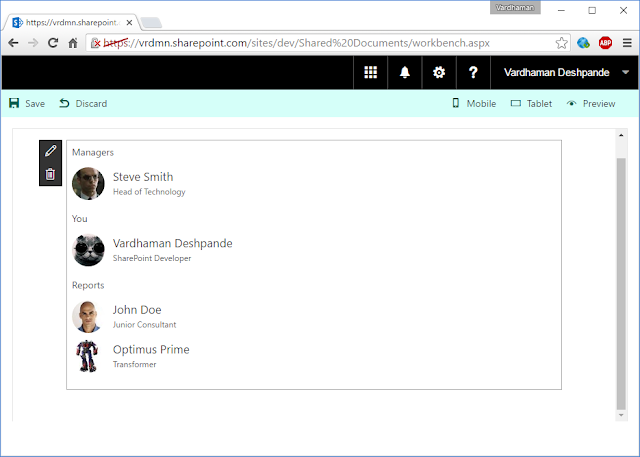
Here is a SharePoint Framework web part I have put together to show an organisation chart for the current user: 

Code is available on GitHub as part of the SharePoint Framework client-side web part samples & tutorials: https://github.com/SharePoint/sp-dev-fx-webparts/tree/master/samples/react-organisationchart


(click to zoom)

1) For getting the Manager and the Reports of the current user, the ExtendedManagers and DirectReports user profile properties are used.


2) Uses the OrgChart CSS directly from the Office UI Fabric: http://dev.office.com/fabric/OrgChart (Not the Office UI Fabric React components which are still in progress)


The Office UI Fabric CSS is bundled together with the web part and not referenced externally. In the OrganisationChart.module.scss:

Thanks to my colleague and buddy Paul Ryan for this tip.

3) The REST API calls are made with the HttpClient belonging to the current ServiceScope. No need to pass web part properties or the web part context. 


4) The Managers and DirectReports are fetched by registering a mapping of the UserProfileService class in the current ServiceScope


5) OData Batching is used to get details (Photos, Titles, Profile Urls) of all DirectReports in a single call. (Similarly, if more than one Manager exists in the ExtentedManagers property, details of all users are fetched in a single batch call)


More on OData Batching in my previous post: Batch REST requests in SPFx using the ODataBatch preview

Hope you find this useful!

Thursday 1 September 2016

Get all Suspended or Terminated Workflow instances in SharePoint Online

Here is some quick code I put together today to get all Suspended workflow instances on a list in SharePoint Online.

This code can be used to get all instances for a given status. (Suspended, Terminated etc.)

I have used the SharePoint Online CSOM August 2016 Update for this code:
http://dev.office.com/blogs/new-sharepoint-csom-version-released-for-Office-365-august-2016-updated


Thanks for reading!

Wednesday 31 August 2016

Batch REST requests in SharePoint Framework (SPFx) using SPHttpClientBatch

This post has been updated on 5th March 2017 for the SharePoint Framework 1.0 (GA) release.

All the code for this, as always, is on GitHub: https://github.com/vman/SPFx-REST-Operations

This is one of my favorite things in the SharePoint Framework right now. The ability to easily batch REST API calls and send them to SharePoint in a single request.

There is a new class called SPHttpClientBatch which is used to combine multiple REST requests. You can find more about this in the API docs:
https://dev.office.com/sharepoint/reference/spdx/sp-http/sphttpclient


As shown in the docs, the SPHttpClientBatch class has 2 primary methods: execute and fetch. The fetch method is used to queue all the different requests and execute is used to execute them all at once.

The get and post methods are syntactical sugar to call fetch but with the method parameter set to GET or POST.

The amazing thing about the fetch method is that it returns a Promise object which correlates to the API call being made. This way, when the Promise gets resolved/rejected after the execute method, we can easily track the response. This is better explained in the code below :)

So let's have a look at how we can utilize the SPHttpClientBatch class in an SPFx webpart:

First, we will need to import all the necessary modules:

And here is the actual code:


When this code is executed, we can see that a single batch request is sent to SharePoint containing the information about the requests in the Payload:

(click to zoom)


And when the Response is returned, we can hook into each individual Promise object to get its value:

(click to zoom)


Isn't this Awesome? It is going to save a lot of round trips to the server and also help in performance optimization.

Thanks for reading!

Saturday 27 August 2016

SharePoint Framework: Validating properties in the Web part property pane

Yup, you read it right. Validations can be added to the properties in the web part property pane of an SPFx webpart. The validation function can be Synchronous as well as Asynchronous. 

This means that we can immediately determine whether a property is valid or we can make an HTTP request (e.g. to SharePoint) and then determine if a property is valid depending on the response.

In the following code, I have added a validation to the title property to make sure that it is not the same as the SharePoint site title. Also, I have added a validation to the description property making sure that it is not less than 10 characters. 


The code is pretty straightforward. This code should be placed inside your Web part class:

As you can see from the code, the _validateTitleAsync function fires when the title property is edited. It makes a GET request to SharePoint to get the title of the web:


The code for this post is located here: https://github.com/vman/SPFx-Web-part-property-validator

The complete Web part class with the property pane editor is here:
https://github.com/vman/SPFx-Web-part-property-validator/blob/master/src/webparts/propValidator/PropValidatorWebPart.ts

While working on this post, I have discovered two possible issues with the way property pane validations currently work in the SharePoint Framework. I have posted them here if you are interested:

1) Rename IPropertyPaneTextFieldProps.onGetErrorMessage to IPropertyPaneTextFieldProps.GetValidationMessage

2) When property pane is in Non-Reactive mode, the validation function should only fire when clicked on "Apply"


Thanks for reading!

Monday 22 August 2016

Making a POST request to SharePoint from an SPFx webpart

In this post, let's see how to make an HTTP POST request from an SharePoint Framework (SPFx) web part. There are lots of posts out already which show you how to make a GET request so I will not cover that here. It is fairly straightforward once you understand all the moving parts.

Import the necessary modules in your SPFx webpart code:

Now, the code which makes a POST request to create a list:

And my "Developer workbench" list is created:


Hope this helps.

Sunday 21 August 2016

First SPFx webpart: Get/Set a single value userprofile property in SharePoint

This post is now out of date after the release of SharePoint Framework GA version. Please refer to one of my other posts which have been updated post GA:

1) Making a POST request to SharePoint from an SPFx webpart
2) Batch REST requests in SharePoint Framework (SPFx) using SPHttpClientBatch
3) Working with the REST API in SharePoint Framework (SPFx)
4) Using Redux Async Actions and ImmutableJS in SharePoint Framework

Original Post follows:

So the Developer preview of the SharePoint Framework was released last week and I decided to get my hands dirty right away. This is a webpart I created just to get a hang of things and to learn the key concepts of the SharePoint Framework.

The code is on GitHub: https://github.com/vman/Edit-User-Properties


Since I had not worked with React a lot, I decided to choose it as my JS framework.

Things I managed to wrap my head around while creating this simple webpart:

1) How to create a SPFx webpart with React as the JS framework.

2) How to talk to SharePoint from within the SPFx webpart with context.httpClient.get and context.httpClient.post

4) Creating reactive as well as non reactive webpart properties

5) The new _spClientSidePageContext object which contains heaps of context data. According to the wiki, properties of this object will be deprecated and moved under the Context object of the webpart.
https://github.com/SharePoint/sp-dev-docs/wiki/Drop-1

(For now, I had to manually create an ambient declaration for this object but hopefully soon, the need for this will go away as it will be moved in the Context object)

6) Office UI Fabric and React Components for Office UI fabric


Since lots of these things were new to me, you might find some bugs/mistakes/horrors in the code so apologies for that in advance. Don't forget to leave a comment and I will be happy to update my code.

Thanks!

Sunday 14 August 2016

Upload changed display templates to SharePoint using Gulp

Here is a quick tip which might be helpful when working with display templates. A typical SharePoint solution can have a large number of display templates but while working with them, you might me modifying/customizing only one at a time. Here is a quick gulp task I have put together which watches for changes in the HTML file of the display template and uploads only the changed display templates to the Master Page gallery.

Then I just start the watch task and change/save a display template:


Whenever I save an HTML file of my display template, it gets uploaded and checked-in in the Master Page Gallery. That causes a corresponding JS file to get generated automatically so I don't have to worry about managing it. 


If you are maintaining your Display Template JS files in source control, you will have to remember to copy the generated JS file back into your solution. 

Hope this helps you speed up your Display Template development. I have uploaded this project on GitHub here: https://github.com/vman/Gulp.DisplayTemplates

Thanks for reading!


Monday 18 July 2016

Getting started with TypeScript, Browserify and Gulp in SharePoint

In my previous post Simple bundle, minify and upload JS to SharePoint using Gulp we saw how Gulp tasks can be used to simplify our JavaScript development experience in SharePoint. I am really impressed with Gulp as it has increased my productivity and I don't remember the last time I used SharePoint Designer :)

Now let's see how can we bring TypeScript into the mix. I have been playing around with TypeScript for a while now and here is my basic development workflow:

1) Create a main app.ts file which will contain the primary code for my application or "WebPart". In addition, app.ts will also have import references to any custom or third party modules e.g. jQuery

3) Use tslint to check the quality of my TypeScript

4) Use browserify and tsify to parse my TypeScript file and create a single JavaScript file (app.js) which includes all the dependencies required to run my app.

5) Minify my app.js using gulp-uglify and rename it to app.min.js using gulp-rename

6) Upload the debug and minified files to the Style Library in SharePoint using gulp-spsave

7) Then the JavaScript files can be used any way I like e.g. embed it using a Custom Action or in a Script Editor or a Content Editor WebPart.

Before we begin, if you are using Visual Studio 2015 like me, make sure you have the latest version of Node installed and Visual Studio is configured to use it. Here is an excellent tutorial on how to do this: How to configure Visual Studio 2015 with the latest version of Node.js and NPM

Now let us have a look at the important bits of my solution. I have uploaded the entire solution on GitHub here: https://github.com/vman/MyTypeScript

1) app.ts file:


At the top, the import statements are used to indicate that the code in this file is dependent on these modules. The first being jQuery and the second being my custom User module. Next, we simply create an object of the User class and call it's getDetails and displayDetails methods.

2) User.ts


There is a bit more going on in my User.ts class. Just like my app.ts, the first line indicates, with an import statement, that this file is dependent on the jQuery module. The getDetails function gets the AccountName, DisplayName and Email of the current user from the SharePoint REST API and stores them as properties of the current instance. The  displayDetails function logs the same properties (of the current instance) to the console.

3) package.json


Here is a list of all npm packages used in my solution. Notice the jQuery package, browserify and tsify use it to include jQuery in the final bundle as it is requested by my app.


4) gulpfile.js


And finally, here is my gulpfile.js which does all the heavy lifting:


5) Gulp tasks:


The watch-ts-upload-to-sp task looks for any changes in the .ts files (app.ts and User.ts). If any changes are noticed, it runs the upload-to-sp task.

The upload-to-sp task has dependencies chained up so that the tasks are run in the following order:

1) lint-ts to check the code quality of TypeScript
2) browserify to import all the required modules and create a single app.js bundle file
3) minify-js to create a minified file.
4) Finally, the upload-to-sp task runs to upload the app.js and app.min.js files to the Style Library.

(click to zoom)


A note on Typings:


TypeScript uses TypeScript definition '.d.ts' files to provide intellisense while writing a file. The TypeScript Definition Manager "Typings" is the current recommended approach of including definition files in your project: https://github.com/typings/typings

I have included typings as an NPM package in my solution (have a look my package.json file) and then used the following commands to get the required typings in my project:

Thanks for reading!

Friday 17 June 2016

SharePoint Online: Write User Profile Properties with REST API

In my previous posts, we saw how to Set user profile properties using JSOM & JavaScript and Set another user's profile properties with CSOM

Now, here are some code snippets I have put together to set SharePoint User Profile properties with the SharePoint REST API

  • This code only works with SharePoint Online at this time.
  • Can be used to set single value as well as multi value user profile properties.
  • Can be used to set default (OOB) as well as custom user profile properties.


1) Set Single Value User Profile property with REST API:


2) Set Mutli Value User Profile property with REST API:


Hope you find this useful!

Wednesday 1 June 2016

SharePoint Online: Get UserProfile Properties with REST API Batching

In my previous post SharePoint 2013: Get UserProfile Properties with REST APIwe saw how to fetch SharePoint UserProfile properties with the REST API.

The only thing missing in that post was, at the time there was no way to get Multiple UserProfile Properties for a Specific User i.e. if you had an account name of a user and wanted to fetch multiple custom or default UserProfile properties, you could not do that in a single REST call. You would have to resort to either making multiple REST calls using the GetUserProfilePropertyFor function, or you would have to use the JavaScript Client Object Model (JSOM)

When I wrote that post, SharePoint Online did not support REST API batching. Since then, it has been implemented and as a result we can get multiple Custom/OOB User Profile properties in a single REST call.

Here is my code showing how to do it:

Here are some other great resources on SharePoint REST API Batching:

Batch Processing (OData Version 3.0)

Part 1 - SharePoint REST API Batching - Understanding Batching Requests

Make batch requests with the REST APIs

Thanks for reading!

Tuesday 31 May 2016

Identify Office 365 Tenants using a custom logo

I came across something really simple but equally useful recently.

It is quite well known that Office 365 allows you to set a custom image as a logo for your organisation. This logo then appears in the suite bar across the entire tenant.

When working on an Office 365 Development project, we have multiple tenants to take care of. Typically, they are  DEV, TEST, UAT and finally PROD.

When you are navigating between these tenants, a really simple way of telling them apart is to use a custom logo for each tenant!

We as developers might just quickly have a look at the URL to see which tenant we are in. But in many cases, the same tenants are used by non-technical members of the team who might need a clearer indication of which tenant they are in. This can also help in preventing someone accidentally doing something on the wrong tenant.

So here at Content and Code, we might have something like this:

Development Tenant:


Test Tenant:


UAT Tenant:


PROD does not require any special logo as that might confuse end users:


Here is how you set the custom theme and logo for your tenant:

https://support.office.com/en-us/article/Customize-the-Office-365-theme-for-your-organization-8275da91-7a48-4591-94ab-3123a3f79530

Hope you find this useful!

Friday 27 May 2016

Add TermStore Managers and Contributors using CSOM

A new version of CSOM was released today for SharePoint Online. You can find more information about that here: http://dev.office.com/blogs/new-sharepoint-csom-version-released-for-Office-365-may-2016

This version adds the ability to add/retrieve Managers and Contributors to a Term Group in the SharePoint Online Term Store.

Here is a quick code snippet I put together for achieving this:


Once executed, you can see that the Term Group in the Term Store is updated:


Monday 23 May 2016

Minify custom SharePoint themable CSS with Gulp

The ability to create your own themable CSS has been present in SharePoint for a long time:

How to: Make custom CSS files themable in SharePoint 2013

Working with the SharePoint Theming Engine

You can even define custom names/properties in your .spcolor files which can be used in your custom CSS. My colleague Matt Holden has a great post on this here:

Custom .spcolor files for SharePoint Composed Looks

We were using this method in one of our SharePoint Online projects along with Gulp tasks to bundle and minify all our JavaScript/CSS files as per my previous post Simple bundle, minify and upload JS to SharePoint using Gulp

Now, the SharePoint theming engine uses CSS comments to determine the color replacement:

As per Matt's post, the theming engine replaces the values at run-time to the color defined in the ContentAccess1 section in the spcolor file.

For the theming engine to successfully carry out this replacement, the ReplaceColor comment needs to be present in the CSS file we load in SharePoint.

When I minified the Themable.css file using the clean-css gulp plugin, it stripped out all the comments which made the replacement not work:

Then I noticed that the clean-css plugin provides an option to keepSpecialComments when it does the minification. I tired using that but it still did not work as special comments have to start with an exclamation mark: https://github.com/jakubpawlowicz/clean-css#how-to-preserve-a-comment-block

Adding an exclamation mark before the comment was not going to work as that would be invalid syntax for the SharePoint theming engine.

So my final solution was to convert the ReplaceColor comment to a special comment before processing it through the minifier, then letting the minifier do it's thing by minifying the css file but preserving the special comments, and then after the minification, again converting the special comment to a regular comment suitable for the SharePoint theming engine:

Which then gave me the minified CSS along with the required comments preserved:

Thanks for reading!

Monday 2 May 2016

Simple bundle, minify and upload JS to SharePoint using Gulp

I recently started playing around with Gulp and was not really impressed until I came across the gulp-spsave plugin. This plugin will let you upload your JS/CSS files directly to SharePoint right from Visual Studio 2015! This meant that I no longer had to manually upload my JS files to SharePoint or use SharePoint Designer to edit my JS/CSS files!

This got me more interested in Gulp and I started exploring how can I further improve my debugging and build workflow with Gulp. After spending some more time, I came up with a basic workflow which will definitely get you interested in Gulp as a SharePoint/Office 365 Developer!

This is a simple workflow which will look for predefined JavaScript files in your Visual Studio 2015 project. If any of your files change, it will be bundled into a single JavaScript file, minified and uploaded to SharePoint.

Here is my project on GitHub: https://github.com/vman/SP-Simple-Gulp-Demo

The plugins used in this demo are:

gulp-concat : Used to bundle js files.

gulp-uglify : Used to minify the js files

gulp-rename : Used to rename the minified file to .min.js

gulp-spsave : Used to upload files to SharePoint

Here is the file structure of my Visual Studio 2015 project. It is a simple ASP.NET project where I have removed all unnecessary files. Since this is a strictly front-end/UI project, you could also open a folder in Visual Studio as described in this StackOverflow post.


The Scripts folder contains the JS files I will be working on. For demo purposes, I have copied the files from the Core.JavaScriptCustomization project in PnP.

The Output folder is where my output files GulpDemo.js and GulpDemo.min.js will be created. These will also be uploaded to SharePoint.

The GulpFile.js is where all my Gulp tasks will be defined. 

The package.json file is where all the NPM packages required for my tasks will be defined. 

So without further ado, here is the code for my Gulp tasks:


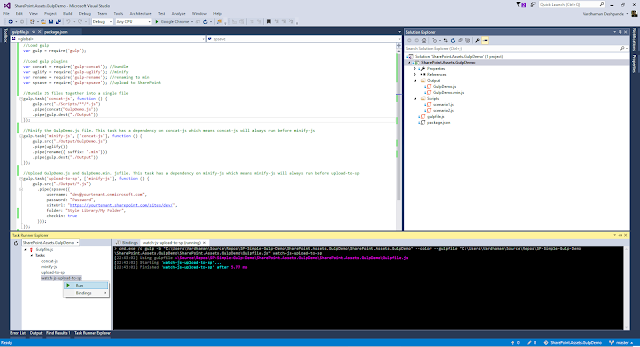
After creating your gulp tasks, you can run them from the Task Runner Explorer window in Visual Studio 2015:


After changing the scenario1.js file, I can see that the concat, minify and upload to sp tasks are triggered as well:


Thanks for reading!

Wednesday 23 March 2016

Search a Taxonomy term in a TermSet using JSOM

Here is some code I put together to search a term within a term set. This is for scenarios when you have a large term set and need to efficiently find a term with a specific label.

Here is a link which describes the exact combinations needed to make this work (Thanks Jose!)
https://msdn.microsoft.com/en-us/library/hh626704%28v=office.12%29.aspx

In this code, I am searching for all terms which start with an "A" in a term set which contains locations from around the world:

Note: I am using JSOM here but this also works with CSOM


Result: