Thursday 16 December 2021

Building a Microsoft Teams bot: Sending custom data from an adaptive card button to the bot

This is the third article in my "Building a Microsoft Teams Bot" series. In this series, I have written down some interesting things I came across while creating a Microsoft Teams Bot app which is now available on AppSource: https://appsource.microsoft.com/en-us/product/office/WA200002297

Click here to see the previous articles in the series: 

Building a Microsoft Teams Bot: Posting an Adaptive Card carousel as a welcome message

Building a Microsoft Teams Bot: Deep linking to a Teams message from an Adaptive Card button

Todays article is around how to pass custom data from Adaptive Cards back to the Teams bot. This can be useful in scenarios when we want to show multiple options to the user in an Adaptive card and when the user selects an option, we want to send that option back to the bot and perform a relevant operation.


To achieve this, we will use the data property of the Adaptive Card Submit action: https://adaptivecards.io/explorer/Action.Submit.html 
This property contains a key value pair of custom data which can be sent back to the bot. 

Here is a sample of how the card json will look when posting it to Teams:

To build this type of card in our bot code, we will iterate over the options and create Adaptive card Submit buttons with the relevant values in the data property:

And finally, when the user clicks on a button, Teams platform will send the corresponding data property back to the bot. This can then be used in the Submit action of the bot to perform a relevant operation.

Hope this was helpful!

Tuesday 16 November 2021

Interactively authenticate Microsoft Graph .NET SDK with Azure Identity library

In this post, we will have a look at the new recommended way of using the Azure Identity library to authenticate to the Microsoft Graph .NET SDK. Since v4 of the Microsoft Graph SDK, using the Azure.Identity library is the preferred way to auth with the Graph over the previous Microsoft.Graph.Auth method. You can read more about it here: https://github.com/microsoftgraph/msgraph-sdk-dotnet/blob/dev/docs/upgrade-to-v4.md#azure-identity

Specifically, we will have a look at Interactive browser based authentication where the user would enter their credentials and the Azure Identity library will fetch the access token based on them.

Before going through the code, let us check out the Azure AD App registration which would be used to authenticate to the Graph API

Since we are going to authenticate from a .NET Desktop console application, we will select Desktop as a platform and add the default redirect URIs. In addition, we will also add http://localhost to the list.

The supported account types can be as per your requirements. I have selected the app to be multi tenant.

Select the Allow public client flows to "Yes":  


Select the needed scopes:


Once all of this in place, we can use the following code to open a browser window and authenticate to the Microsoft Graph once the user enters their credentials:

If this is the first time logging into this tenant, you will need to grant permissions to the app:


Once the authentication happens, you will see a similar message in the browser:


and our console window logs the current access token along with the expiry time and also uses the Graph SDK to get the display name of the current user:


Hope that helps!

Tuesday 9 November 2021

Building a Microsoft Teams Bot: Deep linking to a Teams message from an Adaptive Card button

This is the second article in my "Building a Microsoft Teams Bot" series. In this series, I am planning to write down some interesting things I came across while creating a Microsoft Teams Bot app which is now available on AppSource: https://appsource.microsoft.com/en-us/product/office/WA200002297

Click here to see the previous article in the series: Building a Microsoft Teams Bot: Posting an Adaptive Card carousel as a welcome message

Todays article is around how to create deep links to teams messages from Adaptive cards. This can be useful in scenarios when you want to send users to a specific Teams chat message when they click on an Adaptive Card button:


If you are building the deep link manually, it can be grabbed from the "Copy link" button from the ellipsis menu in a Teams message:


Deep links to personal chats are in a different format compared to channel messages.
 
For Teams messages, the deep link format is:

https://teams.microsoft.com/l/message/{ChannelId}/{messageId}

For personal chats, the deep link format is:

https://teams.microsoft.com/l/message/19:{userAadObjectId}_{botId}@unq.gbl.spaces/{messageId}?context=%7B%22contextType%22:%22chat%22%7D

For bots and messaging extensions, this deep link can be built from parts of the payload sent to the Bot from the Teams platform when the bot is invoked:

Once you have the desired deep link, the next step is to assign it as the URI to an Adaptive Card button:

And that's it! Now you can easily add buttons to your adaptive cards which take the user to specific messages in Teams personal chats or channels. 

Hope this was helpful!

Monday 1 November 2021

Working with MSAL and multiple Azure AD accounts in a React SPA

I came across an interesting scenario recently: I was working with a React SPA which used Azure AD for authenticating users, and it needed to work with multiple accounts logged in simultaneously. Specifically, we were building an Azure AD multi tenant application which needed to login to multiple M365 and Azure tenants and allow the user to manage all tenants at the same time.

The good thing was that MSAL v2 does support working with multiple accounts at the same time. So in this post, let's see how we are able to do that in a React SPA with MSAL js.

Before looking at the code, we would need to create a multi tenant Azure AD app which would be used to sign in to the different tenants. Step by step instructions can be found here: https://docs.microsoft.com/en-us/azure/active-directory/develop/tutorial-v2-javascript-spa#register-your-application


Once this is in place, we can start looking at the code itself. I have take the MSAL React tutorial as the starting point for this code and modified it to work with multiple accounts. If you want to build it from scratch, this would be a good starting point: https://docs.microsoft.com/en-us/azure/active-directory/develop/tutorial-v2-react

The very first thing we would need is to setup the configuration for our app: 
You will notice the authority is set to the /organizations end point. This is because our app is a multi-tenant app which would be used to login to different tenants.

With the config, we will now initiate a PublicClientApplication in the index.tsx file:

Now lets get to the most important App.tsx file: 

There are multiple things happening here. Let's unpack them one by one. 

First, we are using the MSAL react useMsalAuthentication hook to setup the authentication and get the login method which we will use later.

What is also important is the prompt: 'select_account' property in the request which would help us login with a new account when we are already signed in with one account.

The AuthenticatedTemplate and UnauthenticatedTemplate MSAL react components help us display different views when at least one user is logged in or no user is logged in respectively.

Next, lets look at the ProfileContent.tsx component:

Based on the homeId of passed in to this component as a property, we are using the PublicClientApplication.acquireTokenSilent method to first get the access token of the relevant user. 

Once the accessToken is fetched, we are making a call to the Microsoft Graph to get the basic details of the user. We are using the callMsGraph function for this.

The ProfileData component takes in all properties fetched from the graph and displays it.

The handleLogout function uses the PublicClientApplication.logoutRedirect function to log out the specific user.

So after everything is in place, we would be able to work with multiple users logged in simultaneously at the same time.

Hope this helps! 

As always, the code for this post can be found on GitHub: https://github.com/vman/ts-msal-react-tutorial

Monday 12 July 2021

Working with Adaptive Card Universal Actions in a Microsoft Teams Bot

Universal Actions for Adaptive cards are a mechanism to handle user interactions uniformly no matter where the user is accessing the Adaptive Card from. It allows Bot developers to send the same Adaptive Cards to Microsoft Teams, Outlook etc. without having to write redundant client specific code. As the Microsoft docs state:

Universal Actions for Adaptive Cards evolved from developer feedback that even though layout and rendering for Adaptive Cards was universal, action handling was not. Even if a developer wanted to send the same card to different places, they have to handle actions differently. Universal Actions for Adaptive Cards brings the bot as the common backend for handling actions. 

https://docs.microsoft.com/en-us/microsoftteams/platform/task-modules-and-cards/cards/universal-actions-for-adaptive-cards/overview?tabs=mobile

In addition to these user interactions, there are couple of really useful features delivered as part of Universal Actions. They are "User Specific Views" and "Up to date cards"

User specific views:

By using user specific views, different users see different views on the card depending on their identity and the actions they have taken. This was not the case earlier when all users who viewed an Adaptive Card posted in a Teams channel saw the same exact card. Lets see a quick example:

First lets talk about the refresh property. The property contains two important values: action and userIds. When an adaptive card containing a refresh property will load, first the Teams platform will check if the current user viewing the Adaptive Card is present in the userIds property. If they are, then an action will be sent to the bot containing the verb mentioned in the verb property. We will have to write Bot Framework code which handles this call from the Teams platform. As a response to this call, we can return a new adaptive card which will only be visible to the current user. 

All other users viewing the Adaptive card who are not part of the userIds property will keep seeing a shared common view of the base card. 

Up to date cards:

With up to date cards, we can use the Bot Framework message update functionality to update the user specific views in adaptive cards on the fly. This is so that the cards are updated to their latest state without the user having to reload the card.   

Now that we have covered the different moving parts, let's see how we can put all of this together in a code sample for a approving an asset in a Teams channel:

1) A user starts the approval process by sending a command to the bot:


The user starting the approval request is the "Owner" of this asset. When the owner sends an approval request, an adaptive card with a "Approve" button will be shown to everyone in the Team who is not the owner. Where as, the owner will see a view on the card which contains a list of users who have approved the request.

2) Approving the asset and refreshing the Adaptive Card with latest state: 

Any user in the team can click on the approve button to approve the asset. Once they approve, they will be shown a different card.


Owner will always see who approved the card. This will be kept up to date using the message edit mechanism without the need to manually reload the card.


Now we come to the crux of the blog post. Whenever a user will click on the "Approve" button, or and Adaptive Card will load which contains a refresh property with the current user's userId, an adaptiveCard/action request will be sent to our bot. The request will contain information on the action such as the verb and the context in which the action occurred. 

Out bot framework code will have to respond with the correct card depending on the action. 

In the above code, when the approveClicked action occurs, we add the user approving the asset to our persistent storage and return a card to them thanking them for the approval.

When the refreshCard action occurs, it means that a user listed in the userIds property of a card is trying to view the card. So based on the identity of the user, we will return the correct card. This is used to show the owner of the card a list of users who have approved it.

Hope you found the post useful!

Full code sample of this blog post available on GitHub: https://github.com/vman/Universal.Actions

Monday 18 January 2021

Building a Microsoft Teams Bot: Posting an Adaptive Card carousel as a welcome message

In November 2020, I was happy to release my side project "Snooze Bot" as a free app on the Microsoft Teams store: https://appsource.microsoft.com/en-us/product/office/WA200002297 

I had been working on it for a few weeks. The fact that all of us were under lockdown gave me some extra time in the evenings and weekends to focus on learning the Microsoft Teams platform and create an app on it which addressed a gap which I noticed in my day to day use. 

We all get a lot of Teams messages daily and need a way to manage them or come back to them at a later time. Snooze bot helps us do exactly that. It lets us Snooze message which we want to deal with later. When a message is snoozed, we get an option to select the duration after which Snooze Bot should remind us about the message. When the time arrives, the bot will send you personal message in teams reminding about the snoozed message.


If you haven't checked out Snooze Bot yet, feel free to install it and give it a try. I am happy to hear any feedback and potential improvements. 

One of my goals when creating the app was to learn about the Microsoft Teams developer platform and also blog about the interesting things I came across. So in this series of posts, let's outline some Microsoft Teams development concepts which I found really useful. The first one being posting an Adaptive Card carousel as a welcome message when the bot is added by the user.

It's always recommended as a good practice to send a welcome message when the user adds the bot. According to the Microsoft docs: 

In personal contexts, welcome messages set your bot's tone. The message includes a greeting, what the bot can do, and some suggestions for how to interact (for example, “Try asking me about …”). If possible, these suggestions should return stored responses without having to sign in.

Also, sending the welcome message one of the requirements before the app is accepted in AppSource by the validation team.

So we can send a simple chat message from the bot to the user as a welcome message. So why go for an Adaptive Card carousel? This is because adding too much information in a single message can get overwhelming for the user and they might be tempted to just skip it. Also if your bot has a lot of functionality you need a way to efficiently present that information to the user. This is where carousels created by Adaptive Cards some into play:  


So let's have a look at the code which helps us send the welcome message in Snooze Bot

The Adaptive Card json:


First, we need to define the Adaptive cards which will show up in the welcome message. I am storing mine as json files in my solution. The cards contain helpful text and also links to images which show the functionality of Snooze Bot

The Bot:


Next, the actual bot code itself. Since I am using .NET Core for this bot we will need the Adaptive cards nuget package:


And here is the code where we do the following things:

1) Capture the OnMembersAddedAsync event from the Bot Framework
2) Get the Adaptive cards from the json files 
3) Insert the adaptive cards into a Bot Framework carousel and send it to the user

And that's it. Whenever a user will download and install the app, the welcome message will be sent to them introducing your bot and it's funtionality. Hope you found the post useful!

Tuesday 5 January 2021

Microsoft 365 multi-tenant apps: Working with application permissions in Microsoft Graph

Creating multi-tenant (SaaS) apps in Microsoft 365 has been possible for a while now. Azure AD multi tenant apps allow us to host our custom applications in an Azure AD/M365 "home" tenant while enabling the apps to also have access to resources hosted in other tenants. To know more about multi-tenant apps, head over to the Microsoft docs: https://docs.microsoft.com/en-in/azure/active-directory/develop/single-and-multi-tenant-apps

Hosting applications in a home tenant as SaaS has a lot of advantages particularly for ISVs when it comes to product based applications. Users are able to consume the apps directly by signing into them instead of the conventional way of an admin having to deploy the product to the customer tenant first. It makes life easy for the admins as well as they don't have to go through complex deployment scripts and instructions. Moreover, after the application is deployed, new features and bug fixes can be rolled out to the application "on the fly" as opposed to releasing feature packs and hotfixes which again have to be installed manually.

So in this post, we are going to have a look at using the Microsoft Graph API in such apps configured to be multi tenant.

(Multi tenant apps also allow users with personal Microsoft accounts to sign into them but that is a topic for another day! Also, in this post we will only focus on the application permissions i.e. granting permissions to applications without a user context)

Configure an app to be a multi-tenant in the home tenant's Azure AD

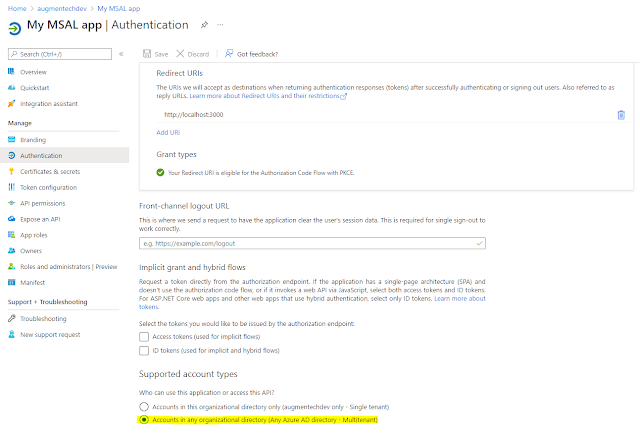
1) When creating a multitenant app registration, make sure that the "Accounts in any organizational directory" is selected. Also, we need to add a redirect url as this will be the url the admin will be redirected to after successfully granting consent to our application. Ideally, this would be the landing page of your application but in the screenshot I am just using the AAD home as an example:


2) Assign required permissions. In this case, we are going to demo the code to get all the Microsoft 365 Groups on the tenant and also the root SharePoint Online site, so selecting the relevant permissions here:


3) Create a client secret and record it along with the client id. We will need this later in our code.


Granting consent to a multi tenant app in other "consumer" tenant

Next, let's have a look at how the multi tenant app hosted in it's home tenant can be granted permission to access resources in other tenants. 

What we will have to do is to construct a url for admin consent which would be unique to our application. An Azure AD admin of the other tenant will need to navigate to the url and then consent to granting the permissions to our app on the tenant. The Azure AD url will have the following structure:

In the link above, replace the client id with the client id of your multi tenant Azure AD app. Also, notice that we are using the /.default static scope which means that all permissions configured in the app will be requested for consent. 

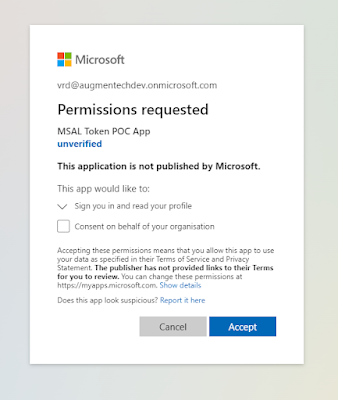
When the admin navigates to this url, they will see the consent prompt:


Once the consent is granted, the multitenant app will have permissions to access the resources on the other tenant. This can be checked by going to:

Azure Active Directory > Enterprise Applications > All applications and searching for our app there.


This confirms that the multi tenant app has permissions on this tenant. Also this process can be repeated on any number of Azure AD/M365 tenants.

Use the Microsoft Graph API to get Microsoft 365 data from the consumer tenant

With everything setup and also the admin consent granted, let's have a look at the Microsoft Graph code to get data from the consumer tenant.

In this code, I am using the .NET SDK for Microsoft Graph found on nuget here:

Microsoft.Graph

And the new preview version of Microsoft.Graph.Auth found here:

Microsoft.Graph.Auth

And finally here is the code to get all the Microsoft 365 Groups and the SharePoint root site url of the consumer tenant. For the sake of simplicity, I am using a .NET Core console application:

And we are able to get the data from the consumer tenant back:


Thanks for reading! Hope this helps.