Showing posts with label Microsoft Azure. Show all posts

Wednesday, 14 September 2022

Partially update documents in Azure Cosmos DB

I have been working with Cosmos DB for a while now and until recently, there was one thing which always annoyed me: When updating a JSON document stored in a container, there was no way to only modify a few selected properties of the document. 

The entire JSON document had to be fetched by the client first, then locally replace the properties to be updated, and then send the entire document back to Cosmos DB and replace the previous version of the document. 

This was always a challenge because first, it added more work for developers and second, there could be concurrency issues if multiple clients could be downloading multiple copies of the document and updating the data and sending back their copy.

But fortunately, now it's possible to partially update a document in Cosmos DB and basically do a PATCH operation while only sending the properties to be changed over the wire. 


So in this post, let's have a look at the different ways in which we can partially update documents in Cosmos DB:

Setting up by creating a Cosmos DB document

First, we will create our sample document using code. I should mention I am using v3.30.1 of Azure Cosmos DB .NET core package from nuget: Microsoft.Azure.Cosmos

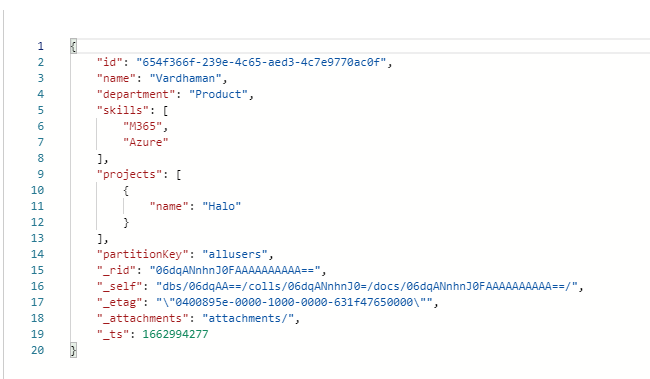
As you can see this is a simple document representing a User object with a few attached properties:


Now in order to only change a few properties in the object, we need to use the Partial document update feature in Azure Cosmos DB 

Update document properties

Now lets have a look at how we can modify and add properties to the User object:

In the code, we are updating an existing property of the document as well as adding a new property. Also, we are only sending the properties to be modified over the wire. 


We can also send both properties in a single operation by adding the operations to the patchOperations array.

Update elements in array


Just like document properties, we can also update single elements in an array in the document. Elements can be updated, added, added at a specific index and also removed from an array:


Update objects and their properties


The properties of a JSON document can themselves be objects as well. The Azure Cosmos DB patch operations can also be used to update properties of specific objects as well as modifying the objects themselves.

Hope this helps! For more details, do have a look at the Microsoft docs for Azure Cosmos DB partial updates: https://docs.microsoft.com/en-us/azure/cosmos-db/partial-document-update

Monday, 1 July 2019

Deploying Azure Function Proxies along with Function Apps

I am working with Azure Function Proxies in my latest project and I have found them to be a really handy tool! With Function Proxies, we can expose endpoints in a Functions App which redirect to other resources in Azure (or anywhere really).

I won't go into much detail describing Proxies, Microsoft docs has some great info already:

"With proxies, you can specify endpoints on your function app that are implemented by another resource. You can use these proxies to break a large API into multiple function apps (as in a microservice architecture), while still presenting a single API surface for clients."
https://docs.microsoft.com/en-us/azure/azure-functions/functions-proxies

In my case, we are working on a front-end app built using TypeScript and React which uses Azure Functions as the back-end. For hosting the front-end, we have turned on the static website hosting for blob storage and then placed the HTML, JS and CSS files in it. Then, used Azure Function Proxies to redirect the endpoints in the Function App to the blob storage URLs of the front-end resources. It's all working quite nicely!

Only speed-bump in this type of architecture is the cold start experienced by serverless resources on the consumption plan. This is not a problem for us right now because this application is a proof of concept for a larger project. (There are other options available as well which include moving the Function App to an App Service Plan or using the Azure Functions Premium plan when it comes out preview. But that is a discussion for another time)

Back to the current post! When I was looking into deploying this application as part of the CI/CD pipeline using Azure DevOps, I was looking for an easy way to deploy the Azure Function Proxy configuration as well. Fortunately, I came across this Microsoft docs article which talks about a file called proxies.json. If this file is found within your Function App, the functions runtime reads it and creates the necessary proxies!

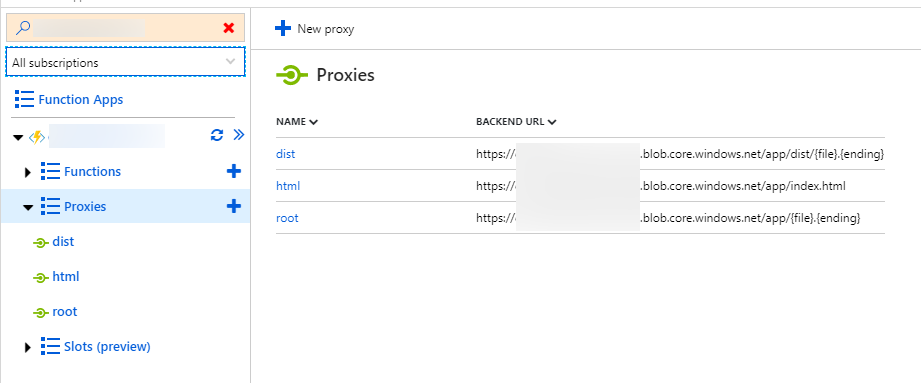
Here is how my proxies.json file looks in Visual Studio. Make sure the file is copied to the output directory:


And once the Functions App is deployed:


This way, if you are deploying and recreating Function Apps with your CI/CD pipeline, you can automate the creation of Function Proxies as well!

Hope you found this post useful.

Monday, 4 March 2019

Create Azure DevOps pipelines for a Microsoft Teams app built with SPFx

In this post, let's walk-through the configuration needed to create Azure DevOps build and release pipelines for a Microsoft Teams solution. 

The solution is built using the SharePoint Framework and will be surfaced in Microsoft Teams as a Tab. 

As the code for the SPFx solution is being hosted in a GitHub repository, I will only focus on the Azure Pipelines configuration. For information on how to work with Azure Repos, see the official Microsoft docs: https://docs.microsoft.com/en-us/sharepoint/dev/spfx/toolchain/implement-ci-cd-with-azure-devops

These are the high level steps we are going to follow:

Build pipeline:


1) Create production package of the SPFx solution (.sppkg)
2) Create a Teams manifest package (.zip) 
3) Publish the SPFx and Teams packages as Artefacts to be consumed from the Release pipeline

Release pipeline:


1) Deploy the SPFx package to the SharePoint Tenant App Catalog (using the Office 365 CLI)
2) Deploy the Teams manifest package to the Microsoft Teams App Catalog (using the Office 365 CLI)

So without further ado, here are the screenshots and scripts to achieve this:

(Click on the images to zoom)

Build pipeline:


Use Node 8.12.0:


npm install:


gulp bundle --ship:


gulp package-solution --ship:


The .sppkg file needs to be copied to staging directory in order to be published to the release pipeline:


Create a .zip file for the teams app catalog and copy it to the staging directory as well:


Publish the .sppkg and .zip files so that they can be consumed from the Release pipeline:


Release pipeline: 


Now to create a new Release Pipeline which will deploy the packages to the respective app catalogs in the tenants.

The Artefacts used will be the .sppkg file and the .zip file for Teams which was published in the previous step:


Overview of tasks in the Release pipeline:


Before moving on to the tasks, we also need to configure some variables to hold the information for the tenants, credentials etc.


The username and password should be for an account with global admin permissions. This is because the Microsoft Graph API (used by the Office 365 CLI) needs this permission to deploy apps to the Microsoft Teams App catalog:
https://docs.microsoft.com/en-us/graph/api/teamsapp-publish?view=graph-rest-1.0#permissions

The TeamsManifestId will be used to check if the app already exists in the Teams App catalog. This can be fetched from the manifest.json file in the teams folder of the SPFx solution:


If you are feeling adventurous, you could look at cracking open the .zip file from the Release pipeline and then grabbing the id on-the-fly instead of having to specify it in a variable.

Next, we will need to use Node (same task as the build pipeline) and install the Office 365 CLI on the Release agent using:

npm install -g office365-cli


Next, we need to deploy the SPFx package to the SharePoint Tenant App Catalog:


Here is the script as a gist:

And lastly, we need to publish the Teams manifest to the Microsoft Teams App Catalog. We will do this using the Office 365 CLI as well. Thanks to Elio and Waldek to get this functionality in the Office 365 CLI at lightning speed!


Here is the script as a gist:

And that's it! You now have build and release pipelines configured to deploy SPFx solutions and Teams apps. The webpart will now be available in SharePoint and the tab will be available in Teams:


 Hope you found this walk-through useful!

Wednesday, 29 August 2018

Create Azure AD App Registration with Azure CLI 2.0

Previously, I have written about creating an Azure AD App registration using the Microsoft Graph API and PowerShell. But since then, the beta endpoint for creating app registrations had stopped working as reported in this GitHub issue: https://github.com/microsoftgraph/microsoft-graph-docs/issues/1365

Fortunately, I have recently discovered a great way to create Azure AD App Registrations using the Azure CLI 2.0. This also includes adding any permissions the app requires on resources e.g. Microsoft Graph, Office 365 SharePoint Online etc. This has not been previously possible with the Azure AD PowerShell Cmdlets.

So in this post, let's go through what is needed to achieve this:

First, you need to have the Azure CLI 2.0 installed on your machine. Follow this link to get it if you haven't already:
https://docs.microsoft.com/en-us/cli/azure/install-azure-cli?view=azure-cli-latest

Once you have the CLI, here is the code to create an Azure AD App Registration including the required permissions:

The JSON in the requiredResourceManifest.json file can be fetched from the manifest of an App registration already created in Azure AD. So the recommendation would be to manually create an App Registration in Azure AD and configure the required permissions. Once you have the right set of permissions, edit the manifest and grab the JSON from the requiredResourceAccess array.

Trusting the App:

Update (5th April 2019):

The Azure CLI now has a command to grant the app permissions on behalf of the admin as well
https://docs.microsoft.com/en-us/cli/azure/ad/app/permission?view=azure-cli-latest#az-ad-app-permission-admin-consent

az ad app permission admin-consent --id [--subscription]

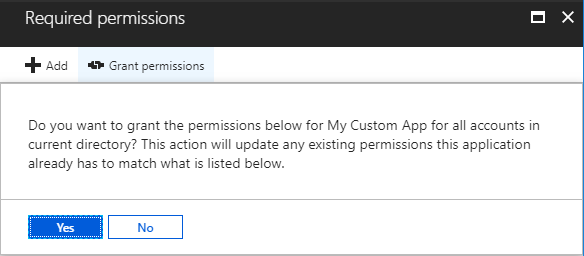
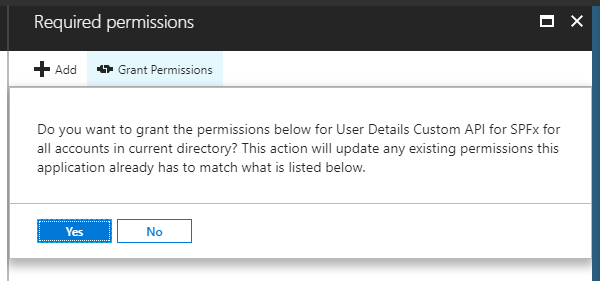
If you still want to use the portal to grant the permissions you can do so as an Admin by going to the app and clicking on the "Grant Permissions" button:


For more possibilities with the Azure CLI 2.0, checkout the reference: https://docs.microsoft.com/en-us/cli/azure/reference-index?view=azure-cli-latest

Monday, 6 August 2018

Sync Azure AD profile properties to SharePoint User Profiles using Azure Durable Functions

Recently, a client had asked us to synchronise user properties from their Azure AD profile to custom properties in their SharePoint UserProfile. This had to be a scheduled process as the data had to be kept up to date as well as it had to cater for any new profiles created in Azure AD/SharePoint.

We decided to use Azure Functions for this given the ease of configuring a timer triggered function (to run on schedule) and also the fact that functions run on a consumption based billing plan. This means that the client would get charged only for when the function executes (oh and also, the first million executions are free every month)

The main challenge we had to overcome was the limitation that an Azure Function has a default timeout of 5 minutes (which can be increased up to 10 minutes at the time of this writing) This means that if we were using a single Azure Function to update SharePoint UserProfile Properties for thousands of users, we were going to hit the timeout sooner or later. 

Fortunately, Durable Functions went GA recently which means that we have a way of managing state in the traditionally "state-less" Azure Functions. With durable functions, we can create an "activity" function to update the SharePoint User Profile properties for a single user. This function can be called in a loop for each user from an "orchestrator" function. Each run of the activity function is treated as a single execution and can be finished in the 5 minute default timeout.

So let's see how this can be done! We are using precompiled C# functions and Visual Studio 2017 to achieve this. Also make sure to have the Durable Functions nuget package installed in your Azure Functions project:
https://www.nuget.org/packages/Microsoft.Azure.WebJobs.Extensions.DurableTask/

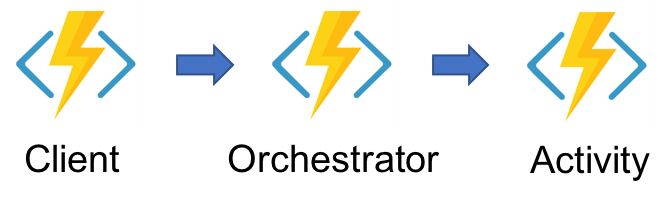
The Durable Function workflow can be categorised into three different types of functions:


1) Client Function


These are standard Azure Functions which can be triggered by external events like timers, HTTP requests, queues etc. The only difference being they have an OrchestrationClient binding which is required to start orchestrations.

In our case, the Client Function is a simple timer triggered function which uses the OrchestrationClient to start a new Orchestration Function with the name O_SyncProfileProperties


2) Orchestrator Function


As the name suggests, the Orchestrator function acts as a coordinator of the Durable Functions workflow. It does the job of starting, stopping and waiting for activity functions and is also in charge of passing data (or state) in between them.

In our case, it calls the A_GetUsersToSync activity function to get the user profiles from Azure AD (using the Microsoft Graph API which is out of scope for this article) and then loops through the users to call the A_UpdateSharePointProfile function for each user


3) Activity Functions


As you might have guessed by now the Activity function is the one which actually does all the heavy lifting. For example, the actual CSOM code which will update the SharePoint UserProfile properties will live in the A_UpdateSharePointProfile activity function:

And that's it! In 3 simple steps, we have a Durable Functions Orchestration set up. For more information on Durable Functions including dos and don'ts, please see the documentation: https://docs.microsoft.com/en-us/azure/azure-functions/durable-functions-overview

Hope you found this post useful!

Monday, 2 July 2018

Using Managed Service Identity with Key Vault from a .NET Azure Function

So Managed Service Identity along with Azure Functions support went GA recently. If you want to read the announcement and also want to get an overview of MSI, head over here: https://blogs.msdn.microsoft.com/appserviceteam/2018/06/26/announcing-general-availability-and-sovereign-cloud-support-of-managed-service-identity-for-app-service-and-azure-functions/

In this post, lets have a look at how easy it is to configure Managed Service Identity for an Azure Function and how it can be used together with Key Vault to secure sensitive information like Client Ids, Client Secrets and Passwords.

For example, when building an Azure Function which will interact with some data in SharePoint Online, we need a way to authenticate the Function with SharePoint. Two common methods used for authentication are 1) By creating an Add-In registration in SharePoint (appregnew.aspx) and 2) By using Azure AD authentication by creating an App Registration in Azure AD.

In both cases, we need to secure the ClientID and ClientSecret for the registration in such a way that only our calling code has access and any non-admin user browsing the Azure Function in the portal is prevented from seeing the sensitive data.  So let's see how we can do that using Managed Service Identity:

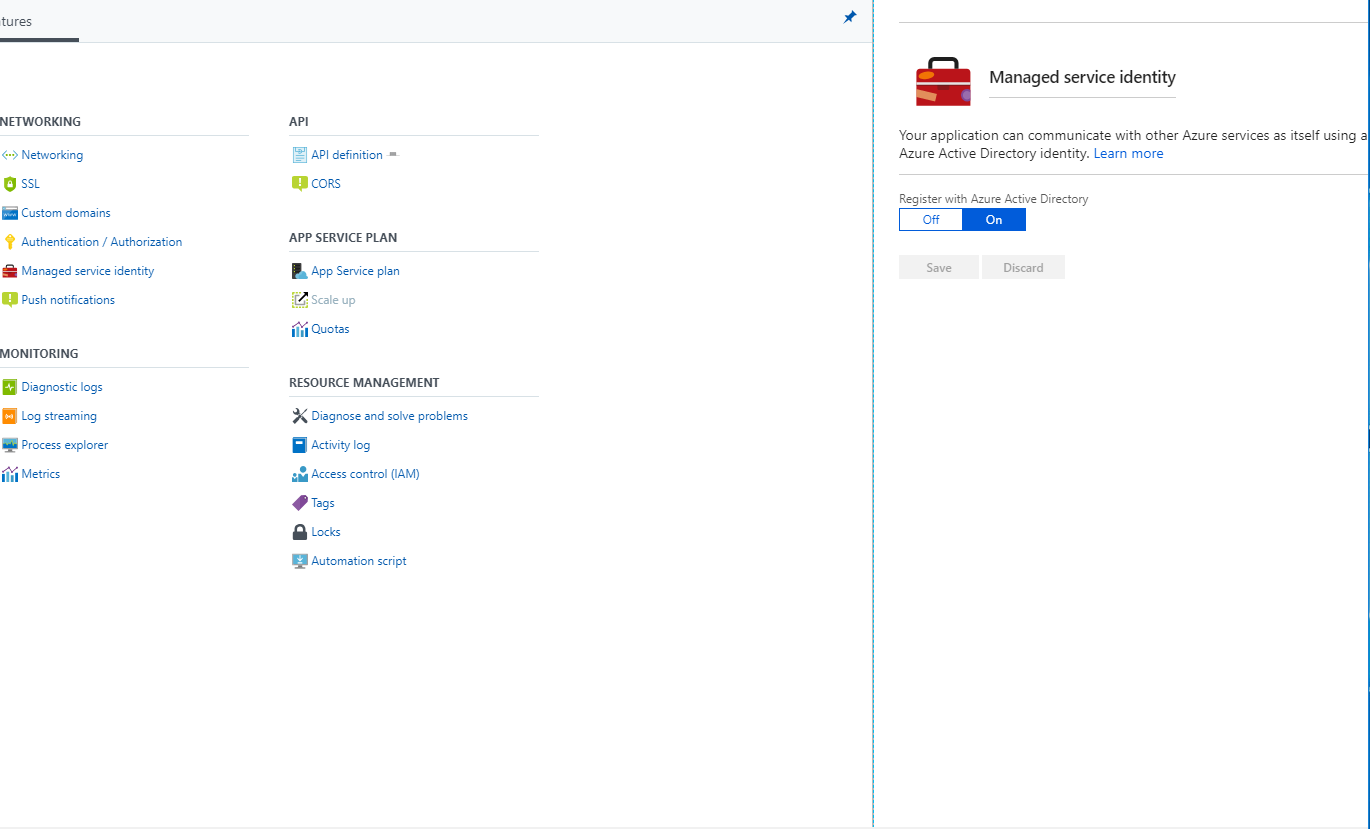
1) They very first thing you need to do is make sure that Managed Service Identity is configured for your Function App. You can do this simply by going to Function App Settings -> Managed Service Identity and ensuring that it is turned ON.


2) Create a Key Vault (or go to an existing one) and create two Secrets with names "ClientID" and "ClientSecret". You can also create additional Secrets relevant to your solution here.


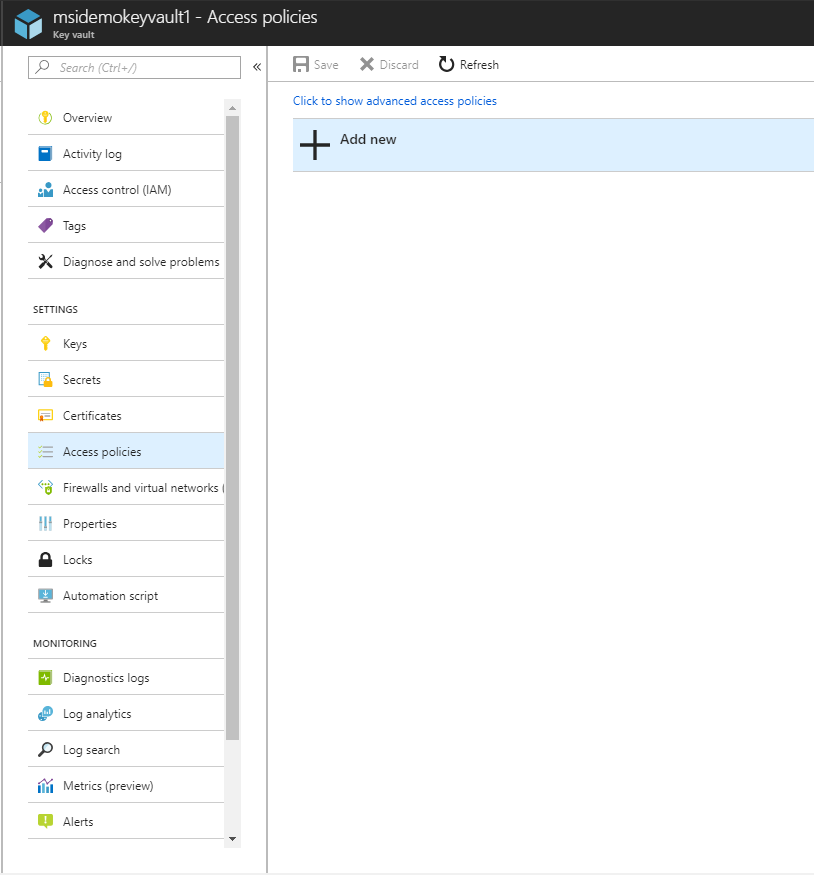
3) Now we want our Azure Function App to have permissions to access the Key Vault. To do this, go to Access Policies -> Add New


4) Select the Function App as the principal and make sure under Secret permissions, it has at least the "Get" permission:


5) That's it in terms of the config! Now let's move on to the code to access the secured Client ID and Secret:

Make sure your Azure Function has the following NuGet packages:

Microsoft.Azure.KeyVault
Microsoft.Azure.Services.AppAuthentication

And here is an HTTP triggered .NET pre-compiled function which fetches the ClientId and ClientSecret from the Key Vault:

That's it! I was really surprised how easy MSI support for Azure Functions makes securing sensitive data. This way, any keys, secrets or passwords used by our solutions can be secured and retrieved without worrying about them getting in the wrong hands!

Quick note on pricing for MSI and Key Vault:

Update (5th August 2018): You can also use MSI when debugging locally. The steps to achieve that are added in this tweet:


Monday, 14 May 2018

SPFx: Calling back to SharePoint from an AAD secured Azure Function on behalf of a user

This post is part of a series where we explore consuming Azure AD secured Azure Functions from SharePoint Framework components. Articles in the series:

1) SharePoint Framework: Calling AAD secured Azure Function on behalf of a user
2) SharePoint Framework: Calling Microsoft Graph API from an AAD secured Azure Function on behalf of a user
3) Calling back to SharePoint from an AAD secured Azure Function on behalf of a user (this post)

In the previous post, we were successfully able to call the Microsoft Graph API from an AAD secured Azure Function and return data back to the SharePoint Framework web part.

Now in this post, lets see how we can make a call back to SharePoint on behalf of the logged in user from the Azure Function. We will only focus on the code in the Azure Function here, to fully understand the set up and auth process, I recommend you check out the previous posts in the series.


Updates to the Azure AD app registration:


In order to make a call back to SharePoint, we will need to add a Client Secret to the Azure AD app registration. Skip this step if you have already done this as part of the previous post.


We will also need to add the Office 365 SharePoint Online permissions scope to the Azure AD app registration. For this post, I am selecting the "Read and write items in all Site Collections" delegated scope. You can select the scope according to the operations you want to perform in SharePoint


Don't forget to grant the permissions again as a subscription admin. This is so that each user does not have to do this individually:


Here is what we are going to do in the code:

When the Azure Function executes, we already have an access token sent by the SharePoint Framework AadHttpClient in the Authorization header. This access token has the "user_impersonation" scope which only allows it to access the Azure Function. It cannot be directly used to call back to SharePoint.

In order to obtain new access token that will work with SharePoint, we will have to request it using the existing access token.

Once this function is called from the SharePoint Framework, we are able to get the data back to the web part:


Thanks for reading!

SPFx: Calling Microsoft Graph API from an AAD secured Azure Function on behalf of a user

This post is part of a series where we explore consuming Azure AD secured Azure Functions from SharePoint Framework components. Articles in the series:

1) SharePoint Framework: Calling AAD secured Azure Function on behalf of a user
2) Calling Microsoft Graph API from an AAD secured Azure Function on behalf of a user (this post)
3) SharePoint Framework: Calling back to SharePoint from an AAD secured Azure Function on behalf of a user

In the previous post, we were successfully able to call an AAD secured Azure Function from a SharePoint Framework web part.

Now once we are in the Function, lets see how to make a call to the Microsoft Graph on behalf of the logged in user. We will only focus on the Azure Function here, to fully understand the set up and auth process, I recommend you check out the previous post.


Updates to the Azure AD app registration:


In order to call the Microsoft Graph, we will need to add a Client Secret to the Azure AD app registration.


We don't need to add any new permission scopes for the purposes of this post as we are going to make a call to the /v1.0/me endpoint which requires the User.Read permission. According to the SPFx docs, if we exchange the SPFx generated token for a MS Graph token, it will automatically have the User.Read.All permission scope.

If you want to do anything beyond this with the Microsoft Graph, you will need to add the relevant permissions scope and grant permissions to it. In the next post, we will see how to do this by granting permissions to the "Office 365 SharePoint Online" permissions scope.

Here is what we are going to do in this post:

When the Azure Function executes, we already have an access token sent by the SharePoint Framework AadHttpClient in the Authorization header. This access token has the "user_impersonation" scope which only allows it to access the Azure Function. It cannot be directly used to call the Microsoft Graph.

In order to obtain new access token that will work with the Microsoft Graph, we will have to request it using the existing access token. Once we have the new token, we are able to make a call to the Microsoft Graph:

Once this function is called from our SharePoint Framework web part, we are able to get data back from the graph:


Thanks for reading!

Thursday, 12 April 2018

Azure Functions: Add a message to a storage queue after a delay

I was looking at a specific problem today dealing with Azure Functions and adding messages to storage queues: I needed my Function to add a message to an output queue in order to trigger another function, but the challenge was, the message should not get added immediately and the second queue trigger function should not fire immediately as well.

We needed a delay between the completion of the first function and execution the second queue triggered function.

A not-so-great way of achieving this would be to add a Thread.Sleep before the message is added to the output queue but we really wanted to avoid that as it would keep the function running and would not be a truly "serverless" way of doing things.

I had a look at the visibilityTimeout setting in the host.json file but turns out it is meant for configuring the delay after which a retry is made when a function fails: https://docs.microsoft.com/en-us/azure/azure-functions/functions-host-json#queues

Fortunately, Jeff Hollan on twitter suggested a nice solution for this which utilised the initialVisibilityDelay property of the CloudQueue.AddMessage function. The great thing is this works seamlessly with Azure Function output bindings so we don't have to use the SDK ourselves.

Here is a sample of how my final code looks and it works pretty great!

Hope you find this useful!

Tuesday, 30 January 2018

Use Flow HTTP Webhook to call Azure Function - Send notification email after PnP provisioning

When using Site Designs and PnP for applying provisioning templates to sites, the order of events is something like this:

  1. When a Communication site or an Office 365 Group connected Team site is created, a Site Design gets applied to it.
  2. The Site Design contains a triggerFlow action which starts a Microsoft Flow (configured to be triggered by an http request).
  3. The flow adds an item to an Azure storage queue which triggers and Azure Function.
  4. The Azure Function contains the PnP template and the code to apply the template to the newly created site.

This approach is described in the guidance here: Calling the PnP provisioning engine from a site script

Now the problem with this sequence of actions is that (as of this time) they are all Asynchronous events i.e. "fire and forget". When the Site Design executes the triggerFlow action, it does not wait for the Flow to complete before showing the success screen to the user. Similarly, after the Flow adds an item to the storage queue, quite understandably, it does not wait for the triggered Azure Function to finish executing before completing its run.

In this sequence of async events, if we want to perform an action like sending a notification email after the provisioning is complete, we have the following options:


Multiple Flows:

Use an output storage queue and in the Azure Function, add an item to it when the provisioning completes. Have another Flow triggered by the output queue, which sends the email. I am not a big fan of this approach as this means managing an output queue as well as a second Flow just for sending the email notification.


Polling:

If we want to avoid creating a second Flow, another option is to use a Do Until action and poll for when messages arrive on the queue. The main drawback of this approach is that we must keep track of different instances of the Flow. If multiple users are creating sites and there are multiple messages arriving on the queue, we want to send the email only after the message of our own site arrives. This is doable using the Flow instance id but a bit too complex for my liking :)

The solution: HTTP Webhook

Fortunately, there is a nice way to handle this. Using the HTTP Webhook action, we can basically wait for the provisioning to complete before returning the control back to the Flow. Since we are in a serverless world here, the Flow will essentially pause here and "wake up" when we want it to.

To use this approach, we have to make a slight modification to the approach suggested in the Microsoft documentation. In this approach, instead of firing the Azure Function with a queue trigger, we will fire it using the HTTP Webhook action. The Function will be configured to execute on HTTP trigger i.e. when an HTTP request is made to an endpoint.

Here is an overview of actions for the Flow:


The Flow starts when the Site Design executes the triggerFlow action:


Now this is where the magic happens. The HTTP Webhook action makes a request to the Azure Function. It passes the call back url as a parameter and then waits. Whenever the Azure Function finishes executing, it is expected to make a request to the call back url. When a request will be received in the call back url, the HTTP Webhook action will finish and the Flow will resume with the data passed back from the Azure Function.


Here is the code for the Azure Function:


Now, it is only matter of parsing the data returned from the Azure function and sending the email:


This way, we can perform actions in the Flow after the PnP template has been successfully applied to the site.

Hope this was helpful!

Wednesday, 24 May 2017

Create Azure AD App Registration with Microsoft Graph API and PowerShell

Update 29 Aug 2018:
This post used the beta endpoint of the Microsoft Graph which no longer seems to be working.

Please check out this post on how to Create an Azure AD App Registration using the Azure CLI 2.0:
https://www.vrdmn.com/2018/08/create-azure-ad-app-registration-with.html

---------------X---------------

In my previous post, we had a look at how to authenticate to the Microsoft Graph API in PowerShell. In this post, lets have a look at how we can use the Microsoft Graph REST API to create an Azure AD App registration.

You need to create an App Registration in Azure AD if you have code which needs to access a service in Azure/Office 365 or if you are using Azure AD to secure your custom application. If you have been working with Azure/Office 365 for a while, chances are that you already know this and have already created a few App Registrations.

I was working on an Office 365 project recently where we had some WebJobs deployed to an Azure Web App. These WebJobs processed some list items in SharePoint Online. So naturally, we needed to use an Azure AD app to grant the WebJobs access to SharePoint Online.

For deploying this application, we were using Azure ARM templates and executing them from PowerShell. With ARM templates, we were able to deploy the Resource Group, App Service Plan, and Web App for the WebJobs. But for creating the App Registration, the two options available to us were the New-​Azure​Rm​AD​Application cmdlet which is part of the Azure Resource Manager PowerShell or the /beta/applications endpoint which is part of the Microsoft Graph API.

We found that the New-​Azure​Rm​AD​Application cmdlet is limited in features compared to the Graph API endpoint. For example, you can create an App registration with the cmdlet but you cannot set which services the app has permissions on. For setting that, you need to use the Microsoft Graph API which has the full breadth of functionality. That is why going forward, the Microsoft Graph should be the natural choice for creating Azure AD app registrations.

The way we are going to create the app registration is by making a POST request to the /beta/applications endpoint. The properties of our Azure AD app such as it's Display Name, Identifier Urls, and Required Permissions will be POSTed in the body of the request as JSON.

(As you have probably noticed already, this endpoint is in beta right now. I will update this post once it is GA)


1) Getting the App Registration properties:


The JSON we will POST will be an object of type application resource. Instead of manually "hand crafting" the JSON, it is recommended to download it from the Azure AD manifest of the app registration. Here is how:

a) Manually create an app in Azure AD by going to Azure AD -> App Registrations -> New application registration 

b) Configure it as required. E.g. Set the display name, Reply Urls, the Required permissions and other properties needed for your app

c) Go to your app -> Click on Manifest and download the JSON


Once you have the required JSON, you can delete the manually created app. Going forward, when deploying to another tenant (or the same tenant again), you can just run the following PowerShell script and won't have to create an app registration manually again.


2) Creating the App Registration with Microsoft Graph API and PowerShell:


Here is the PowerShell script you will need to create the Azure AD App Registration. I should mention that the Directory.AccessAsUser.All scope is needed to execute the /beta/applications endpoint.

After the script is run, we can see that the Azure AD app registration was successfully created:


What is happening in the script is that we are using the Get-MSGraphToken function to get the access token for the Microsoft Graph with ADAL. Then using the token, we are making a POST request to the /beta/applications endpoint. The JSON posted to create the app is pretty self explanatory in terms of displayname, identifier urls and reply urls.

What is really interesting is the requiredResourceAccess property which, at first glance, seems to have some random GUIDs. But this is in fact the Required permissions needed for my app. This JSON specifies that my app needs the following permissions:

1) Office 365 SharePoint Online: Read and write items in all site collections 
2) Windows Azure Active Directory: Sign in and read user profile

Your app might need permissions to different services. Just configure the permissions manually as required and then download the JSON from the Manifest.

After the script is run, when I go to Azure AD, I can see that my app has been created and all required properties have been set:


3) Trusting the app:


We have automated the creation of the application but it still needs to be trusted. Fortunately or unfortunately, it is still a manual process to trust the application. If you want to trust the app for all users in the tenant click on the Grant Permissions button:


Or if your application needs to be trusted by each user individually, you can skip this step. The user will be presented with a consent screen when they land on the application.

4) Troubleshooting with Fiddler:


If you have any errors while running the script, you can use Fiddler to determine the exact error being returned by the Microsoft Graph. I found it really helpful myself:

PowerShell would give me this:


But then I was able to get the real error from Fiddler:


Hope you found this post useful. Thanks for reading!

Monday, 7 November 2016

Introducing: SharePoint Online Public CDN Manager

Update 24th March 2017: This post was updated since the general availability of the Office 365 Public CDN. The SPO CDN Manager now supports the GA version of the Office 365 Public CDN.

The Office 365 Public CDN recently reached General availability. It allows static assets like images, JavaScript, CSS etc. to be hosted in a globally available CDN. Find out more about it here.

With the general availability, the Office 365 PowerShell and SharePoint Online CSOM were also updated with APIs which could be used to manage the Public CDN.

Although the APIs are handy, what was missing was a nice and simple GUI to manage the CDN settings. So I set out to create an app which would give a nice overview of all the CDN settings including folders in the tenant which have been configured as Origins, file types which have been set to be pushed to the CDN and finally a way to enable/disable the CDN.

Introducing the SharePoint Online Public CDN Manager:


Check it out now: https://spocdnmanager.azurewebsites.net/


Checkout the code on GitHub: https://github.com/vman/SPO-CDN-Manager


As you can tell, the SharePoint Online Public CDN Manager can be used to:

1) Add/Remove CDN Origins i.e. SPO Libraries which will be used to store static assets.

2) Add/Remove File types. Which files will be pushed to the CDN.

3) Enable/Disable the CDN on a tenant.

4) Create the default CDN origins specified by the Office 365 Public CDN

The Implementation:


1) It is an MVC app which is Multi Tenant and hosted on the Azure App Service. It uses the March 2017 Release of SharePoint Online CSOM to talk to SharePoint.
https://dev.office.com/blogs/new-sharepoint-csom-version-released-for-Office-365-march-2017

2) For the UI, the Office UI Fabric core styles are used together with the Office UI Fabric JS Components


3) The app requires "Office 365 SharePoint Online" Full Control permissions on all site collections. This is because the CDN is a tenant wide setting and can be modified only by Tenant Administrators or SharePoint Administrators.


The app uses Delegated (User) authentication for every call to SharePoint so that only Tenant/SharePoint Administrators can access the CDN Properties:
So even if a user who is not an Admin lands on the page, they are not able to fiddle with the CDN settings.

Tenant vs Office365Tenant


Something interesting I came across while working on this. There are 2 classes available in CSOM now to manipulate tenant settings:

Microsoft.Online.SharePoint.TenantManagement.Office365Tenant

Microsoft.Online.SharePoint.TenantAdministration.Tenant

Both these classes have the Public CDN properties which can be used to manage the CDN. But the interesting this is that the Tenant class requires the Tenant Administration Url (https://yourtenant-admin.sharepoint.com) to instantiate but the Office365Tenant class can be instantiated by a regular site url in SharePoint Online. (https://yourtenant.sharepoint.com/sites/publishing)

If a regular SharePoint site url is used to instantiate the Tenant class, you get an exception saying:

Current site is not a tenant administration site.

This is why I have used the Office365Tenant class. Checkout the code on GitHub for more details.

Workaround for Internet Explorer "Quirks":


The SPO CDN Manager has been tested on latest version of Chrome, Edge and IE. It works without any issues on Chrome and Edge.

But, to get it working on IE, you will have to add the remote site https://spocdnmanager.azurewebsites.net to IE's trusted sites.

Thanks for reading! Hope you find the SPO CDN Manager useful.