Showing posts with label Gulp. Show all posts

Monday, 29 April 2019

Using Microsoft Rush to manage SPFx projects with library components

If you haven't heard about Rush JS yet, you are probably not alone. In my opinion it's one of the hidden gems of the SPFx ecosystem or even the larger web dev ecosystem for that matter. It's a great open source tool which can be used to manage large repositories (monorepos) containing multiple node/npm projects with dependencies on each other. To know more about Rush, you can visit its website: https://rushjs.io/

In this post, we are specifically going to look at how we can use Rush to manage SPFx repositories containing multiple solutions including SPFx library components, web parts and extensions.

With SPFx library components being introduced in preview in v1.8 and expected to be generally available in v1.9, sooner or later you might find yourself trying to manage large SPFx repositories like this:
(click to zoom)
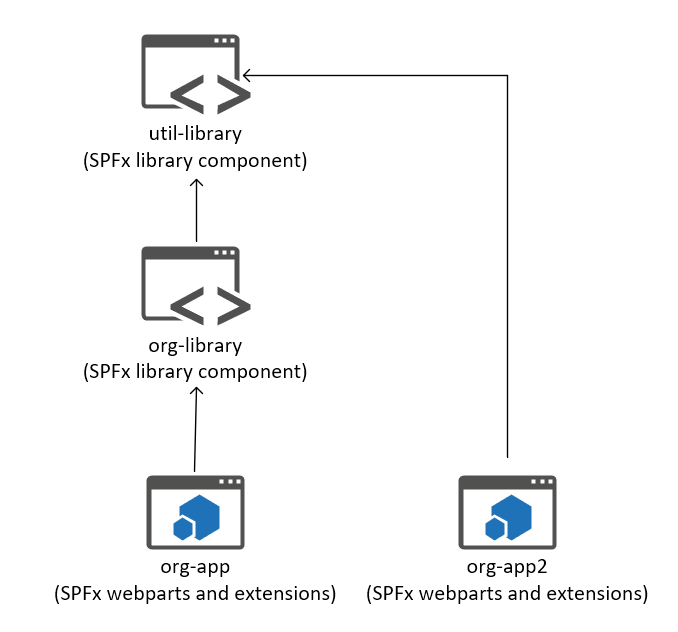
In this repo, there are 4 SPFx solutions: The org-app solution contains SPFx components which depend on org-library which is an SPFx library component. org-library itself depends on another SPFx library component util-library. And finally, another "consumer" solution org-app2 depends directly on util-library

When working in this type of repository, things will get tricky to manage real fast because of the various SPFx solutions, their dependencies on each other, needing to run gulp build or gulp serve multiple times after changing a single file, remembering which consumer projects to update after the libraries have been changed, managing multiple node_modules folders (if not using pnpm) etc. This is where Rush comes in.

If all projects are part of one Rush repository:
  1. You don't have to manage node_modules folders individually for each project. Rush will maintain a common node_modules folder and create symlinks in each project which point to it.
  2. Rush will also create a single lock file for your entire repository and all projects.
  3. You don't have to use npm link to connect your library to consuming webpart packages. Rush handles all the linking and unlinking for you.
  4. When you are working on the library and the consumer components simultaneously, you don't have to run gulp build multiple times. You just need to run "rush build" once. More on this later.
  5. When working on multiple libraries and components with different dependencies, you don't have to keep track of which webpart depends on which library. Rush will do this for you and handle the necessary updates.
  6. Based on your project dependencies, Rush will parallelise builds of projects which do not depend on each other. Thus, reducing build time.
Now before you go converting all your existing repositories to Rush, there are a couple of considerations to think about as well:
  1. Most Rush commands only work with Git repositories. It uses git change tracking to determine which files changed and which repositories to update. So, if you are using TFVC or any other version control system, you might be out of luck. More details on this here: https://github.com/Microsoft/web-build-tools/issues/1250
  2. When working on SharePoint Framework projects in a Rush repository, the local workbench seems to be broken currently. The SPO workbench works. A bug is logged here: https://github.com/SharePoint/sp-dev-docs/issues/3736
Now with all that out of the way, lets create a simple Rush repository with just couple of SPFx components! What we are going to do is create a Rush repository, create an SPFx library component (corporate-library), then create an SPFx webpart component (corporate-apps) and then consume the library component from the webpart. We will then use Rush to build and manage this repository.


First, we need to perform some setup:


This should install rush, convert your root folder to a git repo and a rush repo, and then commit the rush files to git.

Next, we will create the SPFx library component:


Notice we are using the --skip-install flag as we don't want to install the npm packages right now. We will do this with rush later. Select the options as in the following image:


Add the SPFx library component to your git repo:


Next, we will create the SPFx webpart project:


We will again use the --skip-install flag to skip installing the npm packages.

Select the options as per the following image:


Now add the webpart project to your git repo:

Your final solution structure should look like this:


Next, we need to tell Rush that the corporate-apps project has a dependency on the corporate-library project. We will do that by updating the dependencies in the corporate-apps/package.json file


After this, we need to configure Rush to work with our repository and project structure. For this, we need to update the rush.json file in the root folder. 

We can define the node, npm and rush versions we will use for this repository. You can use other package managers like pnpm and yarn with rush as well. For a list of all available options see here: https://rushjs.io/pages/configs/rush_json/

More importantly, we need to define our project folders and package names in this file. This is what Rush uses to find folders corresponding to package names.

By default, the file has a lot of config options and comments, but we only need these values for the demo:


Next, as we are going to use npm as the package manager, we need to delete the common\config\rush\pnpmfile.js file as it is only meant to be used with pnpm.

After this, it is time to install all the npm packages needed by all the projects in our repository. For that we just need to run:


Rush will install all npm packages in the common\temp\node_modules folder and create symlinks in each project to the common folder.

Next, we need to build our repository with:


Due to the dependencies added the corporate-apps/package.json file, Rush will build the library project first and then the consumer project.

Now we can use the code from our library project in our webpart project. Go to the corporate-apps\src\webparts\consumer\ConsumerWebPart.ts and add the following code:

If you run rush build again, you will see that the library project is not updated. This is because rush knows that only the webpart files changed and it should only update the relevant projects. Here is a working demo of the repository:

(click to zoom)

And that's it! You can now build on this to start including multiple SPFx libraries and components to your repository.

Here is an image of a larger Rush repository in action (the same one mentioned at the start of this blog) You can see that depending on the files changes, Rush updates only the required projects.


Also, all your projects in the Rush repository are still standalone SPFx projects. You can navigate to each project's working directory and run gulp build, gulp bundle or gulp package-solution just like you would in normal SPFx projects.

Hope you find this post helpful! Let me know in comments if you feel there is anything I have missed.

Links:

1) The simple Rush repository we built in this post: https://github.com/vman/SPFxRushSimpleDemo
2) Slightly more complex Rush repository: https://github.com/vman/SPFxRushComplexDemo
3) SPFx library component overview: https://docs.microsoft.com/en-us/sharepoint/dev/spfx/library-component-overview
4) Rush website: https://rushjs.io/

Sunday, 14 August 2016

Upload changed display templates to SharePoint using Gulp

Here is a quick tip which might be helpful when working with display templates. A typical SharePoint solution can have a large number of display templates but while working with them, you might me modifying/customizing only one at a time. Here is a quick gulp task I have put together which watches for changes in the HTML file of the display template and uploads only the changed display templates to the Master Page gallery.

Then I just start the watch task and change/save a display template:


Whenever I save an HTML file of my display template, it gets uploaded and checked-in in the Master Page Gallery. That causes a corresponding JS file to get generated automatically so I don't have to worry about managing it. 


If you are maintaining your Display Template JS files in source control, you will have to remember to copy the generated JS file back into your solution. 

Hope this helps you speed up your Display Template development. I have uploaded this project on GitHub here: https://github.com/vman/Gulp.DisplayTemplates

Thanks for reading!


Monday, 18 July 2016

Getting started with TypeScript, Browserify and Gulp in SharePoint

In my previous post Simple bundle, minify and upload JS to SharePoint using Gulp we saw how Gulp tasks can be used to simplify our JavaScript development experience in SharePoint. I am really impressed with Gulp as it has increased my productivity and I don't remember the last time I used SharePoint Designer :)

Now let's see how can we bring TypeScript into the mix. I have been playing around with TypeScript for a while now and here is my basic development workflow:

1) Create a main app.ts file which will contain the primary code for my application or "WebPart". In addition, app.ts will also have import references to any custom or third party modules e.g. jQuery

3) Use tslint to check the quality of my TypeScript

4) Use browserify and tsify to parse my TypeScript file and create a single JavaScript file (app.js) which includes all the dependencies required to run my app.

5) Minify my app.js using gulp-uglify and rename it to app.min.js using gulp-rename

6) Upload the debug and minified files to the Style Library in SharePoint using gulp-spsave

7) Then the JavaScript files can be used any way I like e.g. embed it using a Custom Action or in a Script Editor or a Content Editor WebPart.

Before we begin, if you are using Visual Studio 2015 like me, make sure you have the latest version of Node installed and Visual Studio is configured to use it. Here is an excellent tutorial on how to do this: How to configure Visual Studio 2015 with the latest version of Node.js and NPM

Now let us have a look at the important bits of my solution. I have uploaded the entire solution on GitHub here: https://github.com/vman/MyTypeScript

1) app.ts file:


At the top, the import statements are used to indicate that the code in this file is dependent on these modules. The first being jQuery and the second being my custom User module. Next, we simply create an object of the User class and call it's getDetails and displayDetails methods.

2) User.ts


There is a bit more going on in my User.ts class. Just like my app.ts, the first line indicates, with an import statement, that this file is dependent on the jQuery module. The getDetails function gets the AccountName, DisplayName and Email of the current user from the SharePoint REST API and stores them as properties of the current instance. The  displayDetails function logs the same properties (of the current instance) to the console.

3) package.json


Here is a list of all npm packages used in my solution. Notice the jQuery package, browserify and tsify use it to include jQuery in the final bundle as it is requested by my app.


4) gulpfile.js


And finally, here is my gulpfile.js which does all the heavy lifting:


5) Gulp tasks:


The watch-ts-upload-to-sp task looks for any changes in the .ts files (app.ts and User.ts). If any changes are noticed, it runs the upload-to-sp task.

The upload-to-sp task has dependencies chained up so that the tasks are run in the following order:

1) lint-ts to check the code quality of TypeScript
2) browserify to import all the required modules and create a single app.js bundle file
3) minify-js to create a minified file.
4) Finally, the upload-to-sp task runs to upload the app.js and app.min.js files to the Style Library.

(click to zoom)


A note on Typings:


TypeScript uses TypeScript definition '.d.ts' files to provide intellisense while writing a file. The TypeScript Definition Manager "Typings" is the current recommended approach of including definition files in your project: https://github.com/typings/typings

I have included typings as an NPM package in my solution (have a look my package.json file) and then used the following commands to get the required typings in my project:

Thanks for reading!

Monday, 23 May 2016

Minify custom SharePoint themable CSS with Gulp

The ability to create your own themable CSS has been present in SharePoint for a long time:

How to: Make custom CSS files themable in SharePoint 2013

Working with the SharePoint Theming Engine

You can even define custom names/properties in your .spcolor files which can be used in your custom CSS. My colleague Matt Holden has a great post on this here:

Custom .spcolor files for SharePoint Composed Looks

We were using this method in one of our SharePoint Online projects along with Gulp tasks to bundle and minify all our JavaScript/CSS files as per my previous post Simple bundle, minify and upload JS to SharePoint using Gulp

Now, the SharePoint theming engine uses CSS comments to determine the color replacement:

As per Matt's post, the theming engine replaces the values at run-time to the color defined in the ContentAccess1 section in the spcolor file.

For the theming engine to successfully carry out this replacement, the ReplaceColor comment needs to be present in the CSS file we load in SharePoint.

When I minified the Themable.css file using the clean-css gulp plugin, it stripped out all the comments which made the replacement not work:

Then I noticed that the clean-css plugin provides an option to keepSpecialComments when it does the minification. I tired using that but it still did not work as special comments have to start with an exclamation mark: https://github.com/jakubpawlowicz/clean-css#how-to-preserve-a-comment-block

Adding an exclamation mark before the comment was not going to work as that would be invalid syntax for the SharePoint theming engine.

So my final solution was to convert the ReplaceColor comment to a special comment before processing it through the minifier, then letting the minifier do it's thing by minifying the css file but preserving the special comments, and then after the minification, again converting the special comment to a regular comment suitable for the SharePoint theming engine:

Which then gave me the minified CSS along with the required comments preserved:

Thanks for reading!

Monday, 2 May 2016

Simple bundle, minify and upload JS to SharePoint using Gulp

I recently started playing around with Gulp and was not really impressed until I came across the gulp-spsave plugin. This plugin will let you upload your JS/CSS files directly to SharePoint right from Visual Studio 2015! This meant that I no longer had to manually upload my JS files to SharePoint or use SharePoint Designer to edit my JS/CSS files!

This got me more interested in Gulp and I started exploring how can I further improve my debugging and build workflow with Gulp. After spending some more time, I came up with a basic workflow which will definitely get you interested in Gulp as a SharePoint/Office 365 Developer!

This is a simple workflow which will look for predefined JavaScript files in your Visual Studio 2015 project. If any of your files change, it will be bundled into a single JavaScript file, minified and uploaded to SharePoint.

Here is my project on GitHub: https://github.com/vman/SP-Simple-Gulp-Demo

The plugins used in this demo are:

gulp-concat : Used to bundle js files.

gulp-uglify : Used to minify the js files

gulp-rename : Used to rename the minified file to .min.js

gulp-spsave : Used to upload files to SharePoint

Here is the file structure of my Visual Studio 2015 project. It is a simple ASP.NET project where I have removed all unnecessary files. Since this is a strictly front-end/UI project, you could also open a folder in Visual Studio as described in this StackOverflow post.


The Scripts folder contains the JS files I will be working on. For demo purposes, I have copied the files from the Core.JavaScriptCustomization project in PnP.

The Output folder is where my output files GulpDemo.js and GulpDemo.min.js will be created. These will also be uploaded to SharePoint.

The GulpFile.js is where all my Gulp tasks will be defined. 

The package.json file is where all the NPM packages required for my tasks will be defined. 

So without further ado, here is the code for my Gulp tasks:


After creating your gulp tasks, you can run them from the Task Runner Explorer window in Visual Studio 2015:


After changing the scenario1.js file, I can see that the concat, minify and upload to sp tasks are triggered as well:


Thanks for reading!