Showing posts with label SPFx. Show all posts

Thursday, 15 February 2024

Generate images using Azure OpenAI DALL·E 3 in SPFx

Dall E 3 is the latest AI image generation model coming out of OpenAI. It is leaps and bounds ahead of the previous model Dall E 2. Having explored both, the image quality as well as the adherence to text prompts is much better for Dall E 3. It is now available as a preview in Azure OpenAI Service as well.

Given all this, it is safe to say if you are working on the Microsoft stack and want to generate images with AI, using the Azure OpenAI Dall E 3 model would be the recommended option.

In this post, let's explore the image generation API for Dall E 3 and also how to use it from a SharePoint Framework (SPFx) solution. The full code of the solution is available on GitHub: https://github.com/vman/Augmentech.OpenAI

First, let's build the web api which will wrap the Azure OpenAI API to create images. This will be a simple ASP.NET Core Web API which will accept a text prompt and return the generated image to the client.

To run this code, we will need the following NuGet package: https://www.nuget.org/packages/Azure.AI.OpenAI/1.0.0-beta.13/

Now for calling the API, we will use a standard React based SPFx webpart. The webpart will use Fluent UI controls to grab the text prompt from user and send it to our API.

Hope this helps!

Friday, 4 September 2020

Microsoft Teams messaging extensions using SPFx: Getting the message data with Microsoft Graph

With SPFx 1.11, one of the things possible now is that SharePoint Framework web parts can be exposed as Microsoft Teams messaging extensions. So what are messaging extensions exactly? According to the Teams docs:

"Messaging extensions allow users to interact with your web service through buttons and forms in the Microsoft Teams client. They can search, or initiate actions, in an external system from the compose message area, the command box, or directly from a message. You can then send the results of that interaction back to the Microsoft Teams client, typically in the form of a richly formatted card."

https://docs.microsoft.com/en-us/microsoftteams/platform/messaging-extensions/what-are-messaging-extensions

As a Microsoft 365 Developer, messaging extensions are a great way to invoke custom code right in the Teams client. This opens up the possibility of users interacting with your application right in the context of their conversations without having to leave Teams.

The SPFx docs give a nice overview of how to setup web parts so that they are exposed as compose  extensions. This enables the custom SPFx webpart to be invoked from the "Compose new message" box in Teams: https://docs.microsoft.com/en-us/sharepoint/dev/spfx/build-for-teams-expose-webparts-teams#expose-web-part-as-microsoft-teams-messaging-extension 

In this post, we are going to be talking about SPFx webparts being hosted in task modules which show up in "message actions" i.e. invoking custom code on messages which are already posted in Teams. This could be either in channels or in personal or group chats.

(click to zoom)

Now behind the scenes, when a message action is invoked on a message, we want to get the message context passed to our SharePoint Framework web part. By message context, I mean properties like teams id and channel id in which the action was invoked. If the message action was invoked in a personal chat or a group chat, then we need to know the chat id instead. And finally, we need the data about the message itself e.g. message id, message body, who posted the message etc. so that we can then send the information to our application right from the SPFx webpart.

Now if we were using the Bot Framework to power our message action (and task module), then getting these properties is straightforward as every time the message action is invoked, the Bot Framework sends this information to our messaging endpoint: https://docs.microsoft.com/en-us/microsoftteams/platform/messaging-extensions/how-to/action-commands/create-task-module?tabs=json#example-fetchtask-request

When using SharePoint Framework however, we have to take a longer route. When the message action would be invoked on a Teams message: Although we get the context information like team id, channel id and chat id, all we will get about the message itself is just the id. No other data about the message like the body, user etc will be available. Getting all these other details would be up to us. Let's see how we do that:

Teams app manifest


First, to get the SPFx powered message action working, we need to configure it in the Teams manifest.

Notice that the fetchTask property is set to false. This makes the task module defined in the manifest to be displayed. (If fetchTask is set to true, the Teams will go to the Bot messaging endpoint to get the task module dynamically)

Also notice that the url for a SharePoint Framework Task module is slightly different compared to a Teams tab

SPFx and Microsoft Graph:

Although we won't have the message data directly provided to us in SPFx, we would have all the context information necessary to fetch the data. As part of the microsoftTeams context object, we will have the teamId, channelId, chatId and the parentMessage. We can then use these details along with the Microsoft Graph to get the message details:

Before we go through the code, make sure that the SPFx solution has the Chat.Read permissions on the Microsoft Graph configured in the package-solution.json file. This will allow us to read the Teams messages on behalf of the currently logged in user


And finally, here is the SPFx code to get the message details on which the message action was invoked:

Hope you found the post useful! Here is the SPFx webpart code on GitHub: https://github.com/vman/spfx-teams-message-action

Note:

This approach currently works with Teams messages in personal chats, group chats and top level messages in Teams channels. There seems to be a gap right now where this approach does not work for replies posted to top level teams messages. I have opened up a GitHub issue about this and will post a follow up soon. https://github.com/OfficeDev/microsoft-teams-library-js/issues/398 

Monday, 27 April 2020

SPFx Teams tab: Use react hooks to dynamically handle theme changes

When developing a custom Teams tab with the SharePoint Framework, we want to make sure that the SPFx custom tab (web part) is styled according to the current selected theme.

Also, if the user switches the theme (e.g. from default to dark), we want to make sure that the styling of our SPFx web part also changes without the user having to reload the tab.


Let's see how we can do this. In this post, depending on the Teams theme, we will dynamically add a CSS class to our top level react component. And when the theme changes, we will change this class as well. That will be the scope of this post without going into further details of Styling/CSS.

Also, since I have been exploring React hooks recently, we will be using them in the demo code.

The very first thing we need to do is to make sure that our SPFx tab loads with the currently selected theme when the tab loads for the first time.. This can be achieved with the teamsJS sdk bundled with SPFx:

The theme property will either have the values "default", "dark" or "contrast" (at the time of writing this post). Depending on this property, we can add a CSS class to the top level container of our web part.

Now the important part. When the user updates the theme, we want to fire an event which can be used to set the new theme in our tab. Luckily the teamsJS sdk provides us with a function which can be used to register this event handler:

https://docs.microsoft.com/en-us/microsoftteams/platform/tabs/how-to/access-teams-context#theme-change-handling

With this, we are able to capture the theme update dynamically and update our component state. Next, we also want to change the CSS class of the top container when the theme changes. We will do this by using the useEffect hook again and setting the class depending on the selected theme.

This hook takes in the themeState as a dependency which means that it will run anytime themeState changes. We will use it to update the styleState.

I could have been a bit more clever here and simply updated the class in the registerOnThemeChangeHandler function itself. But I wanted to keep the themeState and styleState separate to have them loosely coupled and also to play around with hooks a bit more ;)

Here is the complete code for the React Functional component:

Hope you found the post useful! As always, the code for this post is available on GitHub: https://github.com/vman/spfx-teams-theme-hooks

Wednesday, 5 February 2020

SPFx: Using React hooks to globally share service scope between components

In my previous posts, I have written quite a few times about SharePoint Framework service scopes (I will add links at the end of the article). In short, Service Scopes are the SPFx implementation of the Service Locator pattern i.e. a single shared "dictionary" where services (either oob SPFx or custom) are registered and can be consumed from any component in the application.

For example, without using service scopes, if we wanted to make a call to the Microsoft Graph (using MSGraphClient) from within a deeply nested react component, either we would have to pass in the SPFx context down all the components in the tree, or maybe a create a custom service which returns the web part context, and then call that service from within our nested component. Or maybe use redux to globally maintain the context in a single state object.

But with all these approaches (there may be more), testing the components would be difficult as they would have a dependency on the SPFx context which is hard to mock. Waldek Mastykarz has a great post on this.

Also, from a maintenance point of view, it could get tricky as almost all our components would start to depend on the entire context and we could easily loose track of which specific service from the context is needed by the component.

Now with my previous posts on service scopes, even though we were removing the dependency on the SPFx context, one issue still remained that the SPFx service scope was still needed to be passed into the component. We were just replacing the SPFx context with the SPFx service scopes. While this was good from a testing point of view, it wasn't great for maintainability.

Fortunately, in the recent versions of SPFx, React 16.8+ was supported which means that we can take advantage of React hooks. Specifically, the useContext hook. This gives us a very straightforward way to store the SPFx service scope in the global react context (which is different to the SPFx context) and then consume it from any component in our application no matter how deeply nested it is.

Let's see how to achieve this. In these code samples, I am using SPFx v1.10 which is the latest version at the time of writing.

1) The Application Context object


First, we need to create the React application context object which will be used to store and consume the service scope. For now I am only storing the serviceScope in the context. Other values can be stored here as well.


2) React Higher Order Component (HOC)


React hooks can only be used from functional components and not classes. With the SPFx generator creating classes by default and hooks being fairly new, I am sure there is a lot of code out there already which use classes and not functional components. Changing all code to use functional components instead of classes is a non-starter.

Fortunately, there is a way to use react hooks with classes by creating a Higher Order Component (HOC) which is a functional component. We can wrap all our class components with this HOC and safely consume the useContext hook from within this component.

(Update: If you are interested in going down the "full hooks" approach and doing away entirely with classes, Garry Trinder has got you covered. He has created a fork which only uses functional components and hooks so we don't need the HOC. If you want to take this approach, check out the code here: https://github.com/garrytrinder/spfx-servicescopes-hooks)


3) SPFx web part 


Next, we update our SPFx webpart to only pass in the serviceScope once to our top level component:


4) Top level React component 


Our top level component will need to be wrapped with the AppContext so that any nested component will be able to consume it. This just needs to be done once on the top level react component. You will notice that the HelloUser child component does not need any props passed in.


5) Child component  


Due to the Higher Order component and the useContext hook, we are able to access the serviceScope property from withing the child component. We can grab the MSGraphClient from the serviceScope and start making calls to the Graph:

And that's it! This way, we can use the React useContext hook to globally share our SPFx service scope.

Hopefully you have found this post helpful! All code is added in the GitHub repo here: https://github.com/vman/spfx-servicescopes-hooks


Also, if you are interested, here are all my previous articles on SPFx service scopes:

SharePoint Framework: Org Chart web part using Office UI Fabric, React, OData batching and Service scopes

Getting the current context (SPHttpClient, PageContext) in a SharePoint Framework Service

Service Locator pattern in SPFx: Using Service Scopes

Service Locator pattern in SPFx: Using nested scopes to work with multiple components

Monday, 2 December 2019

SharePoint Framework Web Part and Property Pane Lifecycles

I was working on a SharePoint Framework webpart, especially on the property pane, and needed to understand when the SPFx WebPart lifecycle methods are executed. Specifically, the order in which they are fired.

I tried searching for this but couldn't find much information, so thought of creating this post as it might be helpful for other who might be looking for it.

The Microsoft docs on these methods/APIs are fairly extensive and they give a good overview of what each method does:
https://docs.microsoft.com/en-us/javascript/api/sp-webpart-base/baseclientsidewebpart?view=sp-typescript-latest#methods
https://docs.microsoft.com/en-us/javascript/api/sp-webpart-base/basewebpart?view=sp-typescript-latest

What is missing though is the order in which these methods are fired. So this post should serve as a nice complement to the docs.

I should mention that this post only focuses on the native SPFx lifecycle methods. If you are creating an SPFx webpart with React for example, the react lifecycle is out of scope for this post as there is loads of information available already on the interwebs.


SPFx webpart method execution order:


When loading the web part on a page, the methods are fired in the following order:


1) protected onAfterDeserialize(deserializedObject: any, dataVersion: Version): TProperties;

2) protected onInit(): Promise<void>;

3) protected render(): void;

4) protected onBeforeSerialize(): void;

When the web part is removed from a page, the methods are fired in the following order:


1) protected onDispose(): void;


SPFx webpart property pane method execution order:


Opening the property pane:

1) protected loadPropertyPaneResources(): Promise<void>

2) protected getPropertyPaneConfiguration(): IPropertyPaneConfiguration;

3) protected onPropertyPaneRendered(): void;

4) protected onPropertyPaneConfigurationStart(): void;


Updating the properties in the property pane:


The SPFx property pane can be set in either the reactive mode or in a non-reactive mode:

"Reactive implies that changes made in the PropertyPane are transmitted to the web part instantly and the user can see instant updates. This helps the page creator get instant feedback and decide if they should keep the new configuration changes or not.

NonReactive implies that the configuration changes are transmitted to the web part only after "Apply" PropertyPane button is clicked."

When in reactive mode, if any property is changed, the methods are fired in the following order:


1) protected onPropertyPaneFieldChanged(propertyPath: string, oldValue: any, newValue: any): void;

2) protected render(): void;

3) protected getPropertyPaneConfiguration(): IPropertyPaneConfiguration;

4) protected onPropertyPaneRendered(): void;

5) protected onPropertyPaneConfigurationComplete(): void;


When in non-reactive mode, if any property is changed, the methods are fired in the following order:


1) protected onPropertyPaneFieldChanged(propertyPath: string, oldValue: any, newValue: any): void;

2) protected getPropertyPaneConfiguration(): IPropertyPaneConfiguration;

3) protected onPropertyPaneRendered(): void;


When in non-reactive mode, after clicking on the "Apply" button, the methods are fired in the following order:

1) protected onAfterPropertyPaneChangesApplied(): void;

2) protected render(): void;

3) protected onPropertyPaneConfigurationComplete(): void;

4) protected onPropertyPaneRendered(): void;


When the property pane is closed by clicking on the "X" button

1) protected onPropertyPaneConfigurationComplete(): void;


Hope you found the post helpful! Let me know if I might have missed any. Would love to update this post in the future.

Monday, 2 September 2019

Create SPFx Library components containing Office UI Fabric React

When using Office UI Fabric React (OUIFR) components in SPFx projects, if you analyse the bundle structure you will notice that OUIFR components take up a lot of space which leads to increased bundle size.

If there are multiple SPFx components loaded on the page which depend on OUIFR components, the size of each bundle will be affected, as by default the OUIFR components are included in each SPFx bundle.

One way to mitigate this issue is to include all your custom components (which depend on OUIFR) into an SPFx library component and then consume the library component from SPFx webparts and extensions. This will make sure that if you have reusable custom components, they won't be loaded multiple times on the page if multiple SPFx webparts (or extensions) are consuming them.

Let's see how to achieve this. We will be working with SPFx 1.9.1 which contains the GA version of Library Components:

1) Create SPFx Library and Consumer component structure


First, make sure you have an SPFx library project as well as a "consumer" SPFx project containing webparts (or extensions). Instructions on how to create this are in the Microsoft docs: https://docs.microsoft.com/en-us/sharepoint/dev/spfx/library-component-tutorial

The code for this post is also available on GitHub if you want to have a look: https://github.com/vman/spfx-lib-components-ouifr


2) Create a new custom react component which internally uses Office UI Fabric React


In the library component project, create a new react component in a new file e.g. ButtonComponent.tsx


Here are the contents of the custom react component:


3) Update the index.ts file


In the index.ts file of the library component, include the new component to be exported:


4) Update config.json


Next, in the config/config.json file of the library component, make sure that the entry point is pointing to /lib/index.js


This step was not necessary in SPFx 1.8.2-plusbeta but seems there is a bug in SPFx 1.9.1. I have created a GitHub issue here:

5) Update the consumer web part


Make sure that the library component is referenced in the consumer webpart e.g. through npm link or by using a monorepo manager like rush or lerna.

More details on using npm link in this in the Microsoft docs: https://docs.microsoft.com/en-us/sharepoint/dev/spfx/library-component-tutorial

And finally, in your consumer SPFx react webpart, you can reference the custom component:


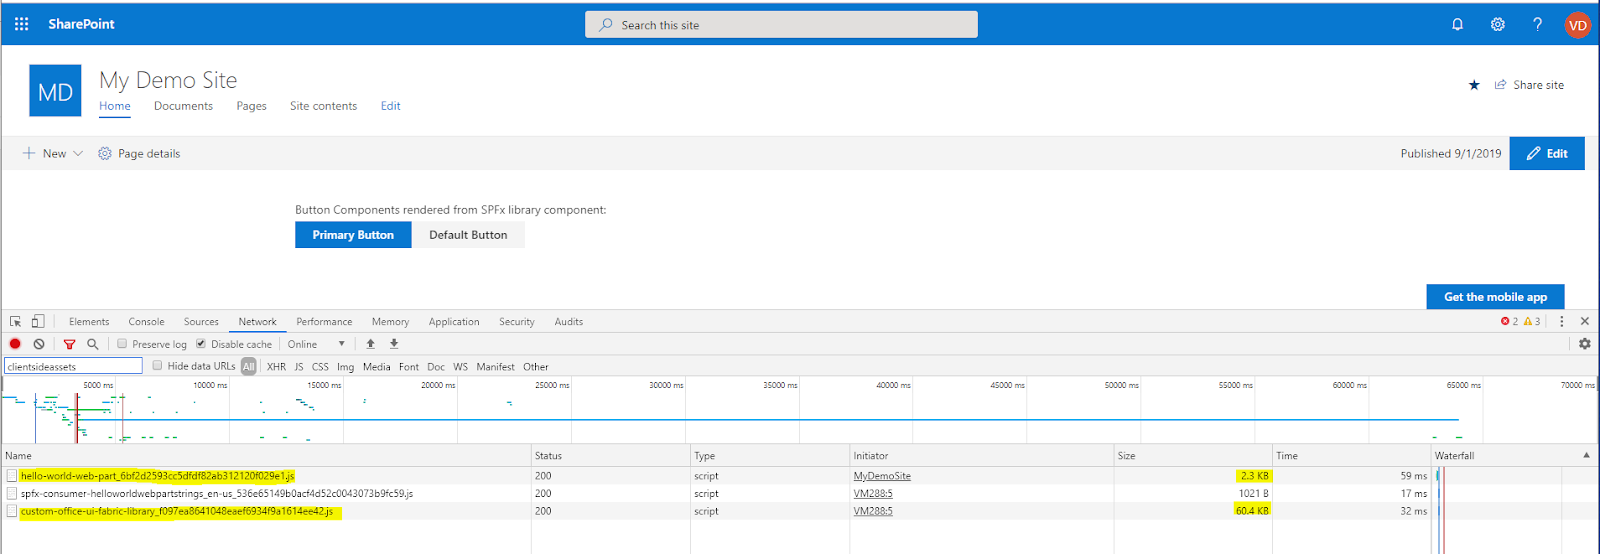
When you deploy both the SPFx packages in the app catalog and then add them on a page, you will see different bits of code being loaded separately:


And that's it! Sample repo on GitHub: https://github.com/vman/spfx-lib-components-ouifr

Monday, 29 April 2019

Using Microsoft Rush to manage SPFx projects with library components

If you haven't heard about Rush JS yet, you are probably not alone. In my opinion it's one of the hidden gems of the SPFx ecosystem or even the larger web dev ecosystem for that matter. It's a great open source tool which can be used to manage large repositories (monorepos) containing multiple node/npm projects with dependencies on each other. To know more about Rush, you can visit its website: https://rushjs.io/

In this post, we are specifically going to look at how we can use Rush to manage SPFx repositories containing multiple solutions including SPFx library components, web parts and extensions.

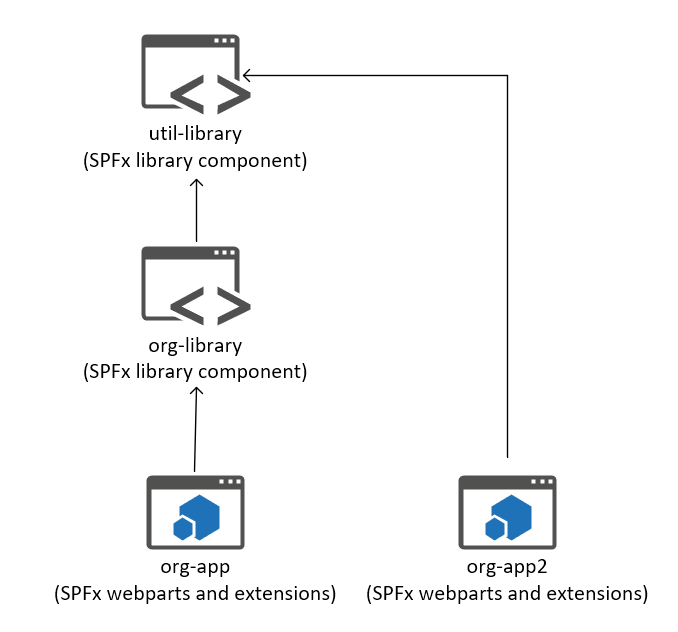
With SPFx library components being introduced in preview in v1.8 and expected to be generally available in v1.9, sooner or later you might find yourself trying to manage large SPFx repositories like this:
(click to zoom)

In this repo, there are 4 SPFx solutions: The org-app solution contains SPFx components which depend on org-library which is an SPFx library component. org-library itself depends on another SPFx library component util-library. And finally, another "consumer" solution org-app2 depends directly on util-library

When working in this type of repository, things will get tricky to manage real fast because of the various SPFx solutions, their dependencies on each other, needing to run gulp build or gulp serve multiple times after changing a single file, remembering which consumer projects to update after the libraries have been changed, managing multiple node_modules folders (if not using pnpm) etc. This is where Rush comes in.

If all projects are part of one Rush repository:
  1. You don't have to manage node_modules folders individually for each project. Rush will maintain a common node_modules folder and create symlinks in each project which point to it.
  2. Rush will also create a single lock file for your entire repository and all projects.
  3. You don't have to use npm link to connect your library to consuming webpart packages. Rush handles all the linking and unlinking for you.
  4. When you are working on the library and the consumer components simultaneously, you don't have to run gulp build multiple times. You just need to run "rush build" once. More on this later.
  5. When working on multiple libraries and components with different dependencies, you don't have to keep track of which webpart depends on which library. Rush will do this for you and handle the necessary updates.
  6. Based on your project dependencies, Rush will parallelise builds of projects which do not depend on each other. Thus, reducing build time.
Now before you go converting all your existing repositories to Rush, there are a couple of considerations to think about as well:
  1. Most Rush commands only work with Git repositories. It uses git change tracking to determine which files changed and which repositories to update. So, if you are using TFVC or any other version control system, you might be out of luck. More details on this here: https://github.com/Microsoft/web-build-tools/issues/1250
  2. When working on SharePoint Framework projects in a Rush repository, the local workbench seems to be broken currently. The SPO workbench works. A bug is logged here: https://github.com/SharePoint/sp-dev-docs/issues/3736
Now with all that out of the way, lets create a simple Rush repository with just couple of SPFx components! What we are going to do is create a Rush repository, create an SPFx library component (corporate-library), then create an SPFx webpart component (corporate-apps) and then consume the library component from the webpart. We will then use Rush to build and manage this repository.


First, we need to perform some setup:


This should install rush, convert your root folder to a git repo and a rush repo, and then commit the rush files to git.

Next, we will create the SPFx library component:


Notice we are using the --skip-install flag as we don't want to install the npm packages right now. We will do this with rush later. Select the options as in the following image:


Add the SPFx library component to your git repo:


Next, we will create the SPFx webpart project:


We will again use the --skip-install flag to skip installing the npm packages.

Select the options as per the following image:


Now add the webpart project to your git repo:

Your final solution structure should look like this:


Next, we need to tell Rush that the corporate-apps project has a dependency on the corporate-library project. We will do that by updating the dependencies in the corporate-apps/package.json file


After this, we need to configure Rush to work with our repository and project structure. For this, we need to update the rush.json file in the root folder. 

We can define the node, npm and rush versions we will use for this repository. You can use other package managers like pnpm and yarn with rush as well. For a list of all available options see here: https://rushjs.io/pages/configs/rush_json/

More importantly, we need to define our project folders and package names in this file. This is what Rush uses to find folders corresponding to package names.

By default, the file has a lot of config options and comments, but we only need these values for the demo:


Next, as we are going to use npm as the package manager, we need to delete the common\config\rush\pnpmfile.js file as it is only meant to be used with pnpm.

After this, it is time to install all the npm packages needed by all the projects in our repository. For that we just need to run:


Rush will install all npm packages in the common\temp\node_modules folder and create symlinks in each project to the common folder.

Next, we need to build our repository with:


Due to the dependencies added the corporate-apps/package.json file, Rush will build the library project first and then the consumer project.

Now we can use the code from our library project in our webpart project. Go to the corporate-apps\src\webparts\consumer\ConsumerWebPart.ts and add the following code:

If you run rush build again, you will see that the library project is not updated. This is because rush knows that only the webpart files changed and it should only update the relevant projects. Here is a working demo of the repository:

(click to zoom)

And that's it! You can now build on this to start including multiple SPFx libraries and components to your repository.

Here is an image of a larger Rush repository in action (the same one mentioned at the start of this blog) You can see that depending on the files changes, Rush updates only the required projects.


Also, all your projects in the Rush repository are still standalone SPFx projects. You can navigate to each project's working directory and run gulp build, gulp bundle or gulp package-solution just like you would in normal SPFx projects.

Hope you find this post helpful! Let me know in comments if you feel there is anything I have missed.

Links:

1) The simple Rush repository we built in this post: https://github.com/vman/SPFxRushSimpleDemo
2) Slightly more complex Rush repository: https://github.com/vman/SPFxRushComplexDemo
3) SPFx library component overview: https://docs.microsoft.com/en-us/sharepoint/dev/spfx/library-component-overview
4) Rush website: https://rushjs.io/

Monday, 11 February 2019

Debugging a Microsoft Teams Tab built with SharePoint Framework

With SPFx 1.7, the ability to build Microsoft Teams tabs with SharePoint Framework was released in preview. It's not just a SharePoint page hosted in a teams tab, it's aware of the context information around the current user, team, channel, tab etc. and is also able to interact with the team.

Here is the Microsoft docs article about it, have a read if you haven't already:
https://docs.microsoft.com/en-us/sharepoint/dev/spfx/web-parts/get-started/using-web-part-as-ms-teams-tab

The article walks us through the process of building and publishing a production package of an SPFx solution so that it can be used as a SPFx webpart as well as a tab in Microsoft Teams.

In this post, we will go through the process of actually debugging the solution when it is being built. During development, when we make changes to the TypeScript code, we don't want to publish a production package to the App Catalog every time to test our changes.

The ideal development flow for me is to upload the SPFx package once to the App Catalog on the dev tenant, run gulp serve and when changes are made to the code, they should immediately be available to test as a Microsoft Teams tab.

To achieve this, first you will need to create an SPFx 1.7 solution as described in the docs, then update the webpart code to make sure that the microsoftTeams.Context is available to consume.

(Note: Make sure to use the SPFx v1.7.0 and not SPFx v1.7.1 which is the latest version at the time of writing this article. There is a bug in the latest version which does not create the teams folder automatically through the generator. More details here)

Now here is where the process deviates. Instead of creating the production package with the --ship flag, we will create a development package with:

gulp bundle

and then

gulp package-solution

After which you should see the console screen similar to this:


Getting the warning which says that the scripts (Client Site Assets) will not be packaged with the solution is important as we want them to be referenced from the local dev machine.

Next, we will upload and deploy the package to the tenant app catalog as usual:


Notice that the scripts will be loaded from localhost.

Next we need to make the scripts available from localhost. For that, we will run:

gulp serve


Now we need to upload the teams package which will make the SPFx webpart available in teams as a Tab.

This process is exactly similar to how it's done in the Microsoft docs article:
https://docs.microsoft.com/en-us/sharepoint/dev/spfx/web-parts/get-started/using-web-part-as-ms-teams-tab#packaging-and-deploying-your-web-part-as-a-microsoft-teams-tab

We make sure that side loading of apps is enabled on Teams, then go to any Team > Ellipsis > Manage Team >  Apps > Upload a custom app > Upload the Zip file.

Then go to a channel in the Team > The plus button (+) > Add a tab > Select your app > Save

That's it! You Teams tab is now loading the scripts from localhost:


Make sure gulp serve is still running and then you can test by changing something in the code and press the reload tab button. The tab should be updated with the new code.

You can also test in the Teams Desktop client. Just make sure that the "Developer Preview" option is enabled:


Thanks to petkir for this tip!

After this, your SPFx tab should load in on the Teams Desktop client as well:


Hope this helps!

Wednesday, 12 December 2018

Code Splitting in SharePoint Framework Part 2: Optimizing the SharePoint Starter Kit

I was having a look at the SharePoint Starter Kit recently and I have to say it's a very useful collection of sample SPFx webparts, extensions and other modern SharePoint building blocks. You should check it out if you haven't already.

While I was looking at the different components, I noticed something interesting: When I created a production package and observed the minified JavaScript files, the file-sizes were bigger than expected.

(Note that these are just the sizes when the files are extracted on the file system. When they are included in a package and loaded on SharePoint pages, they will be compressed so their sizes would be smaller. The image is just to help compare the file-sizes after the optimisations)


So I started having a closer look at the SPFx components and noticed a few interesting things:

1) @pnp/sp: 


As expected, many of the components were using the @pnp/sp package but each component was statically importing it. This meant that each component will have a copy of @pnp/sp in its individual bundle:

The solution was to implement code splitting and separate out @pnp/sp into it's own file:

This approach has two benefits:
  • All components share the same @pnp/sp bundle
  • The @pnp/sp code is loaded dynamically on the page only when required

2) @pnp/spfx-property-controls


The @pnp/spfx-property-controls package is great when it comes to having pre-created custom controls to use in the SPFx webpart property pane.

One thing worth noting though is that the property pane is loaded much less frequently than the webpart code itself. The property pane is used only to configure the webpart so the code is only needed then and not when the web part loads normally on the page.

To further optimize the webpart bundles, we can separate out the property pane code (including the components from the @pnp/spfx-property-controls package) and load it on the page dynamically only when the property pane is loaded.

So instead of statically importing the property pane components like this:

We could dynamically import them:

This would also mean that the property pane custom controls will be split into their own JavaScript bundles and multiple webparts using the same type of control will share the code:


This is particularly helpful with controls like `PropertyFieldCollectionData` which is more than 700kb in uncompressed format!

After implementing both these changes, we can see that the file sizes have been considerably reduced:


Also important to note is not only the filesize reduction, the main benefit of this approach is that there is no duplicate code in the components.

I have submitted a Pull Request with these changes to the SP Starter Kit GitHub repo if you want to checkout the code:
https://github.com/SharePoint/sp-starter-kit/pull/216

Here is a link if you want to checkout the official Microsoft docs on dynamic loading of packages:
https://docs.microsoft.com/en-us/sharepoint/dev/spfx/dynamic-loading

Thanks for reading!

Thursday, 31 August 2017

Introducing spfx-extensions-cli: A command line tool to manage SPFx extensions

I have just published a CLI tool to view and manage SharePoint Framework extensions:
https://www.npmjs.com/package/spfx-extensions-cli

More details in the package README.

Code is available on GitHub. Feel free to play around and submit any feedback:
https://github.com/vman/spfx-extensions-cli


Thursday, 27 July 2017

Simultaneously run multiple versions of the SPFx Yeoman generator with npx

This is a topic which has been discussed quite a lot since the launch of the SharePoint Framework. The SPFx Yeoman generator is recommended to be installed globally, but what if a new version is released and I want to try out the new version without uninstalling my globally installed generator? 

Waldek Mastykarz has a great post on the issue and suggests some solutions as well. Have a look at his post if you haven't already: Why you should consider installing the SharePoint Framework Yeoman generator locally

In this post, lets have a look at how we can use npx to provide a solution to this problem.

If you haven't heard about npx yet, it is the hot new member of the node ecosystem. Check out the introduction post by Kat Marchán:

In short, npx can be used to run npm packages directly from the command line without having to install them globally or locally.

From the intro post:

Calling npx <command> when <command> isn’t already in your $PATH will automatically install a package with that name from the npm registry for you, and invoke it. When it’s done, the installed package won’t be anywhere in your globals, so you won’t have to worry about pollution in the long-term.

This means that when we run the SharePoint Framework generator through npx, it will be as if it is running from a global install. After the SPFx solution is created, you will not find the generator installed either locally or globally. It has served it's purpose of generating us a solution and is no longer needed. 


Run different versions of the SPFx Yeoman generator in different folders: 


Now lets actually use npx to create two different SPFx solutions using two different versions of the SharePoint Framework Yeoman generator. We will use the latest version of the generator and the very first version of the generator which was part of SPFx Drop 1.

I am using the following command throughout the post to list the top level global packages:


I have done a global install for gulp already. This is to keep things simple as we only want to use npx for the SharePoint Framework generator. If we wanted to take things to the next level, we could use gulp through npx as well.

Now, let's go ahead and install npx globally:


After it's installed successfully, lets have a look at our global packages again:


As you can see, neither the SharePoint Framework generator, nor Yeoman itself is installed globally. This makes us free to use any version of the generator we want. Let's use the latest version, which at the time of this writing is 1.1.0

First, I am going to create a new folder named "latest" and navigate to it. Then run the following:


By specifying the -p (package) flag we run the yeoman (yo) and SPFx generator (@microsoft/generator-sharepoint) packages through npx. 

After that, we run the SharePoint Framework generator by running  -- yo @microsoft/sharepoint


Now let's run gulp serve to launch the workbench. As mentioned before, since we have already installed gulp globally, we don't have to install it again.


Now let's see the real power of npx. We will navigate to another folder and use Drop1 of the SharePoint Framework generator to create an SPFx solution.

I have created another folder called drop1. Lets navigate to it and run the following using npx:


As you have probably noticed already, the only difference in this and the previous npx command is that we are using the version numbered 0.0.65 of the generator and not the latest. This was the version of the generator when Drop 1 of the SharePoint Framework landed back in August 2016.


You will notice immediately that there are some differences in the wizard. It asks me whether to create a new folder for the solution or use the current folder. It also defaults to creating a web part and does not ask me whether I want to create an extension. This is obvious given that extensions were not part of the first drop. 

After running gulp serve, we can see the Drop 1 workbench running:


That's it! We have used two different versions of the generator to create two different solutions without having to install the generator on our machine!

Using a new version of the SPFx generator when an older version is already installed globally:


If you have been closely following the post, you know what's coming next. 

Let's say we already have a version of the generator installed globally. Now a newer version of the SPFx generator is released and we want to try it out immediately. All we have to do is use npx to run the latest version. We would be able to create a new SPFx solution with the latest generator and still keep our old generator installed globally!

The magic is described in the npx package description

If a full specifier is included, or if --package is used, npx will always use a freshly-installed, temporary version of the package. This can also be forced with the --ignore-existing flag.

This is good news because we want to have control over which generator version is used by npx to create our solution.

Here is how the process will look:


I already have the Drop 1 (0.0.65) version of the generator installed globally. Next, we are running npx and specifying it to use the latest version of the generator.

After the command is run, we are presented with the wizard which gives us the option of creation an SPFx extension. This option was not available with Drop 1 which means that the latest generator is being used to create our solution.

This is how we can use npx to explicitly specify the generator version and ignore the globally installed generator!

Where does npx store the packages?


If we navigate to our npm-cache folder, we will see that npx stores all the versions of the package in the cache. Here, we see that the @microsoft/sp-build-web package was used in both versions of the generator, hence both versions are being stored in the cache:


That's it! Hope you have enjoyed this post as much as I have enjoyed writing it :)