Showing posts with label TypeScript. Show all posts

Wednesday, 12 December 2018

Code Splitting in SharePoint Framework Part 2: Optimizing the SharePoint Starter Kit

I was having a look at the SharePoint Starter Kit recently and I have to say it's a very useful collection of sample SPFx webparts, extensions and other modern SharePoint building blocks. You should check it out if you haven't already.

While I was looking at the different components, I noticed something interesting: When I created a production package and observed the minified JavaScript files, the file-sizes were bigger than expected.

(Note that these are just the sizes when the files are extracted on the file system. When they are included in a package and loaded on SharePoint pages, they will be compressed so their sizes would be smaller. The image is just to help compare the file-sizes after the optimisations)


So I started having a closer look at the SPFx components and noticed a few interesting things:

1) @pnp/sp: 


As expected, many of the components were using the @pnp/sp package but each component was statically importing it. This meant that each component will have a copy of @pnp/sp in its individual bundle:

The solution was to implement code splitting and separate out @pnp/sp into it's own file:

This approach has two benefits:
  • All components share the same @pnp/sp bundle
  • The @pnp/sp code is loaded dynamically on the page only when required

2) @pnp/spfx-property-controls


The @pnp/spfx-property-controls package is great when it comes to having pre-created custom controls to use in the SPFx webpart property pane.

One thing worth noting though is that the property pane is loaded much less frequently than the webpart code itself. The property pane is used only to configure the webpart so the code is only needed then and not when the web part loads normally on the page.

To further optimize the webpart bundles, we can separate out the property pane code (including the components from the @pnp/spfx-property-controls package) and load it on the page dynamically only when the property pane is loaded.

So instead of statically importing the property pane components like this:

We could dynamically import them:

This would also mean that the property pane custom controls will be split into their own JavaScript bundles and multiple webparts using the same type of control will share the code:


This is particularly helpful with controls like `PropertyFieldCollectionData` which is more than 700kb in uncompressed format!

After implementing both these changes, we can see that the file sizes have been considerably reduced:


Also important to note is not only the filesize reduction, the main benefit of this approach is that there is no duplicate code in the components.

I have submitted a Pull Request with these changes to the SP Starter Kit GitHub repo if you want to checkout the code:
https://github.com/SharePoint/sp-starter-kit/pull/216

Here is a link if you want to checkout the official Microsoft docs on dynamic loading of packages:
https://docs.microsoft.com/en-us/sharepoint/dev/spfx/dynamic-loading

Thanks for reading!

Monday, 8 October 2018

Code Splitting in SharePoint Framework (SPFx)

Code splitting is not a new concept to TypeScript/React/Webpack developers. In short, it is a optimisation technique which allows us to split our application bundle into smaller bundles and load them on-demand only when required.

E.g. when a React component or a third party package is only needed when the user clicks on a certain button, then there is no need to load in on the first page load. It can be fetched on-demand when the button is pressed. This reduces the amount of data fetched over the wire on first page load, thus improving performance and user experience. This can be particularly helpful in large applications with many third party packages and components.

In this post let's have a look at how to do code splitting in the SharePoint Framework. As an example, I am going to use an SPFx web part created using React but the code splitting approach can be used with other frameworks/libraries as well.

We are going to have a look at two scenarios where code splitting can really help:

1) Loading a React Component on-demand (where we load the DetailsList component from Office UI Fabric)

2) Loading a third party package on-demand (where we load the infamous-for-its-large-size moment js)

So to begin with, here is my render method of a React component created by default by the SPFx yeoman generator:

I have edited it to show only 2 buttons. This component will be our "main" component which will load other components and third party packages when a user clicks on the relevant button.

Load a React Component on-demand: 


The _loadDocumentsClicked function will fire when the user clicks on the Load Documents button. The DetailsList component is defined in a file called DetailsListComponent.tsx which is in the same folder as the main component.

Once the import function fetches the DetailsList component class, we create an an instance of the class and use ReactDom to insert the component to the detailsContainer div in our main component. 

Load a third party package (moment js) on-demand:


Similarly, the _loadMomentClicked function will fire when the load moment js button is clicked. it will fetch the moment package and then assign the value of moment().calendar() to a property in the current component's state.

And here is the code in action on a modern SharePoint page:

(click to zoom)

What is also important to note is that the bundle will be loaded only if it was not loaded earlier. The import function is smart enough to determine if the bundle is already downloaded and it does not request it again.

Hope you found this useful!

As always, the code for this is available on GitHub: https://github.com/vman/SPFxCodeSplitting

Friday, 7 July 2017

Including only required Babel polyfills with Webpack

If you are using something like Object.assign or Promises in your ES6/TypeScript code, you will sooner or later come across the fact that IE11 does not support them natively. In such cases, the natural way forward is to include a polyfill to get them working.

Babel has a polyfill library based on core js which has polyfills for a lot of such ES6/ES2015 features.

But you don't want to include the entire polyfill library in your application if you are only using a couple of polyfills.

Here is a handy way to include just the polyfills you need using webpack:

1) Add babel-polyfill to your dev dependencies:


2) And then include the required polyfills in your webpack config:


This will make sure that only the polyfills you need are included in your webpack bundle.

More info here:
https://github.com/zloirock/core-js#commonjs
https://babeljs.io/docs/usage/polyfill/

Hope you find this useful!


Friday, 12 May 2017

Getting the current context (SPHttpClient, PageContext) in a SharePoint Framework Service

I have briefly written about building SPFx services (using ServiceScopes) in my previous post, SharePoint Framework: Org Chart web part using Office UI Fabric, React and OData batching

In this post, lets have a more in-depth look at how to actually get the current SharePoint context in your service, without passing it in explicitly.

All the code used in this post is available on GitHub: https://github.com/vman/SPFx-Service-Context-Demo


Building an SPFx service using ServiceScopes:


Suppose you want to create a service which you want to call from multiple SPFx webparts. The idea is that the code of your service should load on the page only once even if multiple web parts using the same service are added to the page. There is already some great information out there on building such kind of service in SPFx so I won't repeat it here. Have a look:

Share data through a SharePoint Framework service

Building shared code in SharePoint Framework - revisited

I myself have been working on building an SPFx service as an npm package and then using it in a webpart:
https://github.com/vman/SPFx-Service

But before you go ahead and start using ServiceScopes to build your SPFx service, have a read through this Tech Note from the SPFx team:
https://github.com/SharePoint/sp-dev-docs/wiki/Tech-Note:-ServiceScope-API

To summarise, it is recommended to consider other alternatives first before using ServiceScopes. Other alternatives include explicitly passing in dependencies like SPHttpClient in the constructor of your service, or if your service has multiple dependencies, then build a class which has all the dependencies as properties and then pass an object of the class to your service's constructor.

While these recommendations would work in some scenarios, they might not be viable in all conditions. If you are building your service as an npm package, passing in the current context every time you want to use the service might be very burdensome. Ideally, your service should be able to determine all the information about the current context on its own. So lets have a look in this post on how do to that.

Quick note before moving ahead: Building library packages in SPFx is currently not available but it is on the roadmap. It would be nice to see the "build a library" option in the SPFx Yeoman generator. The UserVoice link for this request is here: https://sharepoint.uservoice.com/forums/329220-sharepoint-dev-platform/suggestions/19224202-add-support-for-library-packages-in-the-sharepoint

In this post, to keep things simple, I am going to build my service in the same package as my SPFx webpart. The idea is to demonstrate the concept of using ServiceScopes to get the current context. It would work exactly the same if the service was part of a different SPFx package. If you want to have a look at how this works, have a look at my github repo here: https://github.com/vman/SPFx-Service


Getting the current context in an SPFx service:


Now that you have decided to build an SPFx service using ServiceScopes, lets have a look at how to get the current context in your service without passing it in explicitly.

First, you need to build a service which accepts a ServiceScope object in the constructor. This is the only dependency your service will need. Also, you will not need to explicitly pass in this dependency. SharePoint Framework will handle this for you.

Here is my code for the service:

Now lets have a look at what is going on in the code:

First, we are importing the SPHttpClient class from the @microsoft/sp-http package and the PageContext class from the @microsoft/sp-page-context package.

These classes expose their own ServiceKeys, so in the constructor of our service, we are using those keys to grab an instance of these classes. These instances of classes will already be initialised thanks to the ServiceScope.whenFinished and ServiceScope.consume methods. We can then use the instances in the methods of our class.

Using the current web url to initialise PnP-JS-Core :


Just as an example, you could use the initialised PageContext object to get the current web url and pass it to the PnP JS library. This can be useful if you want to get lists in the current web:


Consuming the service:


Now you have built your service, it is time to consume it from your SPFx web part. It is very straightforward, you just have to instantiate an object of your class using the ServiceScope.consume method and your are good to go. I am using async/await just to keep things simple, but using Promise.then will also work here:


Have a look at the complete code in this post here: https://github.com/vman/SPFx-Service-Context-Demo

Thanks for reading! Hope you have found this post helpful.

Friday, 28 April 2017

Error handling in SPFx when using TypeScript Async/Await

This is a quick follow up post to my previous post Using TypeScript async/await to simplify your SharePoint Framework code.

Since publishing my previous post, some folks have asked how would the error handling work when using async/await in SharePoint Framework. So decided to make this short how-to post.

At first glance, it is really straightforward, you essentially have to wrap your code in a try..catch block and the typescript compiler does the rest.

But there is something interesting here. Under the hood, SharePoint Framework uses the fetch API to make http requests. MDN has some great info on the fetch API if you haven't seen it already: https://developer.mozilla.org/en-US/docs/Web/API/Fetch_API

What would be surprising for some (including me) is that the fetch API rejects the promise only when network errors occur. A "404 Not found" is considered as valid response and the Promise is resolved.

E.g. If you make a get request to a SharePoint list which does not exist, the fetch API (and the SharePoint Framework) will actually resolve your Promise.

A fetch() promise will reject with a TypeError when a network error is encountered, although this usually means permission issues or similar — a 404 does not constitute a network error, for example. An accurate check for a successful fetch() would include checking that the promise resolved, then checking that the Response.ok property has a value of true.

https://developer.mozilla.org/en-US/docs/Web/API/Fetch_API/Using_Fetch#Checking_that_the_fetch_was_successful

There has also been some discusson on this on the SharePoint Framewok GitHub repo:
https://github.com/SharePoint/sp-dev-docs/issues/184

This is why, in addition to a try..catch block, you have to also check the Response.ok property of the returned Response. Here is the basic code you need to handle errors when using async/await:


What you can also do is, since the fetch API returns promises, you can use chaining to detect if the Response.ok property is false. Have a look at this post: Handling Failed HTTP Responses With fetch()

Update 6th May 2017: Here is a slightly more complex example where I have built a service with a custom get method which also handles errors for you:

And here is how to consume the service from your SPFx webpart:

Here is the GitHub repository for the service if you are interested:
https://github.com/vman/SPFx-Fetcher


Hope you find this useful!

Tuesday, 25 April 2017

Using TypeScript async/await to simplify your SPFx code

I recently learned about the Async/Await functionality in TypeScript and I was really surprised how easily you can simplify your code with it. Using Async/Await, you can get rid of spaghetti code as well as long chains of Promises and callbacks in your asynchronous functions.

The Async/Await functionality has been around since TypeScript 1.7 but back then it was only available for the ES6/ES2016 runtime. Since TypeScript 2.1, async/await works for ES5 and ES3 runtimes as well, which is very good news. I am kicking myself that I did not start using it sooner.

As with anything new I learn, I have tried to apply it to SharePoint as well to see how I can improve my development experience. Turns out using async/await can really make your SharePoint Framework code simpler and more readable. Lets have a look at some examples and compare between using Promises and Async/Await in your code.

Also, an important thing to note is that although I am making comparisons between using Promises and using async/await, ultimately the aync/await code is downleveled to using Promises by the typescript compiler. If the runtime does not have a native Promise object, we should make sure we have the right polyfills available.

The comparison here is more around code readability and conciseness.

All the code I am using is running inside a SharePoint Framework webpart. So, when you see the 'this' keyword in the code, it refers to my SPFx webpart which inherits from the BaseClientSideWebPart class. Since I am calling the code from inside my webpart, I have access to 'this'.

Here is my import statements for the code:


Simple example using Promises and 'then' callbacks:


Same code using async/await:


Here is a slightly more complex example with code which accepts an array of SharePoint login names and uses the batching framework to get the user profile properties of each user in the array.

You will need the IPerson interface for this:


Complex example using Promises and 'then' callbacks:


Same code using async/await:


As you can see, there is significantly less callbacks when using async/await and the code is also a lot more readable.

Hope you found this post useful. Thanks for reading!


Monday, 23 January 2017

Working with the REST API in SharePoint Framework (SPFx)

The SharePoint Framework reached GA recently. You can see the release notes here: https://github.com/SharePoint/sp-dev-docs/wiki/Release-Notes-GA

One of these changes from the preview versions was how REST requests are handled when talking to SharePoint. Lets have a look at what changed and also see some code samples I created when tinkering around with the latest changes.

Before that, you should know that I have also updated my previous SPFx REST API related posts for the SPFx GA version. If you are interested, you can have a look here:

Batch REST requests in SharePoint Framework (SPFx) using SPHttpClientBatch

Making a POST request to SharePoint from an SPFx webpart

1) SPHttpClient, SPHttpClientConfiguration and the '@microsoft/sp-http' package


The HttpContext and all REST API related operations are part of the @microsoft/sp-http package.

The class SPHttpClient has inbuilt get and post methods which make it really easy to query SharePoint. The methods automatically add headers such as ODataVersion and Request Digest which are needed when making a REST call to SharePoint.

The SPHttpClientConfiguration class can be used to either let default headers be set on the REST request or it also allows you to override certain headers if needed. Lets have a look at this:

2) GET requests


Making GET requests to SharePoint is really easy when you specify the SPHttpClientConfiguration as SPHttpClientConfigurations.v1. It sets the following headers to your REST request. You don't have to set any headers manually.

consoleLogging = true;
jsonRequest = true;
jsonResponse = true;
defaultSameOriginCredentials = true;
defaultODataVersion = ODataVersion.v4;
requestDigest = true

First, you will need to import the required modules from the @microsoft/sp-http package as mentioned earlier:

Then use this code to make a GET request to SharePoint. The following code makes 3 different requests to SharePoint. The first one gets the current web, the second one gets the current user from the User Information List and the third one gets the current user properties from the User Profile Service:


3) POST requests


For making a POST request, you have to use the SPHttpClient.post method. I have a separate post around this. Check it out here: http://www.vrdmn.com/2016/08/making-post-request-to-sharepoint-from.html


4) Calling SharePoint Search REST API with OData Version 3


With the preview SPFx versions, the default OData Version attached with each SPFx REST request was 4. This caused the calls to the SharePoint Search REST Api to fail and return a "500 Internal Server Error" as the search API would only work with Odata Version 3.0.

The issue is discussed on GitHub SPFx repo here: https://github.com/SharePoint/sp-dev-docs/issues/44

As a result of that, SPFx now provides you a way to override the default headers sent with the REST request:

Thanks for reading! All the code for this, as always, is on GitHub: https://github.com/vman/SPFx-REST-Operations

Tuesday, 13 September 2016

SharePoint Framework: Org Chart web part using Office UI Fabric, React, OData batching and Service scopes

Here is a SharePoint Framework web part I have put together to show an organisation chart for the current user: 

Code is available on GitHub as part of the SharePoint Framework client-side web part samples & tutorials: https://github.com/SharePoint/sp-dev-fx-webparts/tree/master/samples/react-organisationchart


(click to zoom)

1) For getting the Manager and the Reports of the current user, the ExtendedManagers and DirectReports user profile properties are used.


2) Uses the OrgChart CSS directly from the Office UI Fabric: http://dev.office.com/fabric/OrgChart (Not the Office UI Fabric React components which are still in progress)


The Office UI Fabric CSS is bundled together with the web part and not referenced externally. In the OrganisationChart.module.scss:

Thanks to my colleague and buddy Paul Ryan for this tip.

3) The REST API calls are made with the HttpClient belonging to the current ServiceScope. No need to pass web part properties or the web part context. 


4) The Managers and DirectReports are fetched by registering a mapping of the UserProfileService class in the current ServiceScope


5) OData Batching is used to get details (Photos, Titles, Profile Urls) of all DirectReports in a single call. (Similarly, if more than one Manager exists in the ExtentedManagers property, details of all users are fetched in a single batch call)


More on OData Batching in my previous post: Batch REST requests in SPFx using the ODataBatch preview

Hope you find this useful!

Saturday, 27 August 2016

SharePoint Framework: Validating properties in the Web part property pane

Yup, you read it right. Validations can be added to the properties in the web part property pane of an SPFx webpart. The validation function can be Synchronous as well as Asynchronous. 

This means that we can immediately determine whether a property is valid or we can make an HTTP request (e.g. to SharePoint) and then determine if a property is valid depending on the response.

In the following code, I have added a validation to the title property to make sure that it is not the same as the SharePoint site title. Also, I have added a validation to the description property making sure that it is not less than 10 characters. 


The code is pretty straightforward. This code should be placed inside your Web part class:

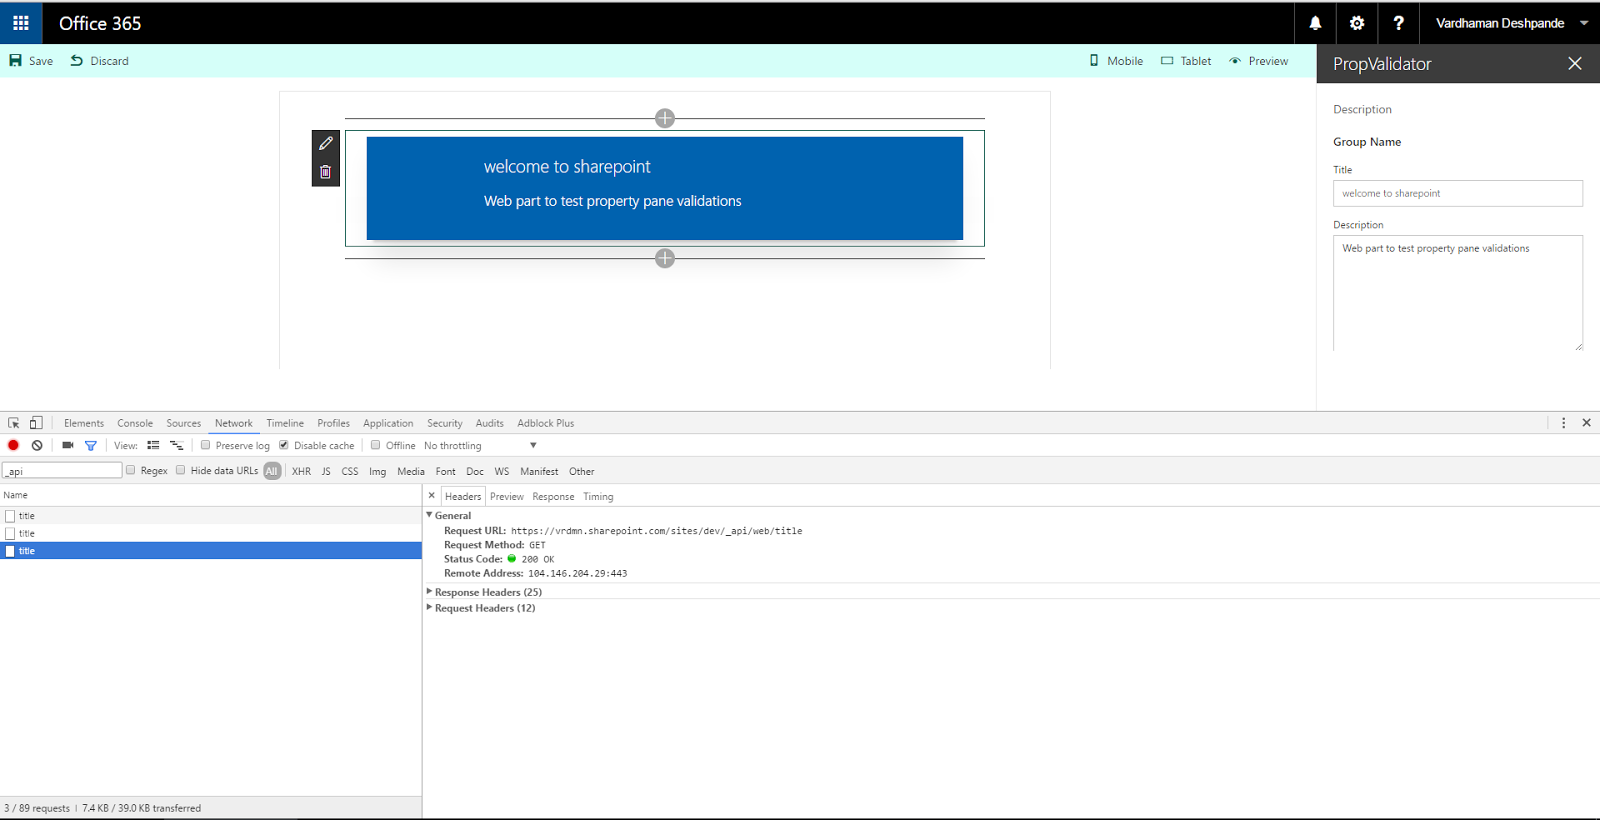
As you can see from the code, the _validateTitleAsync function fires when the title property is edited. It makes a GET request to SharePoint to get the title of the web:


The code for this post is located here: https://github.com/vman/SPFx-Web-part-property-validator

The complete Web part class with the property pane editor is here:
https://github.com/vman/SPFx-Web-part-property-validator/blob/master/src/webparts/propValidator/PropValidatorWebPart.ts

While working on this post, I have discovered two possible issues with the way property pane validations currently work in the SharePoint Framework. I have posted them here if you are interested:

1) Rename IPropertyPaneTextFieldProps.onGetErrorMessage to IPropertyPaneTextFieldProps.GetValidationMessage

2) When property pane is in Non-Reactive mode, the validation function should only fire when clicked on "Apply"


Thanks for reading!

Monday, 22 August 2016

Making a POST request to SharePoint from an SPFx webpart

In this post, let's see how to make an HTTP POST request from an SharePoint Framework (SPFx) web part. There are lots of posts out already which show you how to make a GET request so I will not cover that here. It is fairly straightforward once you understand all the moving parts.

Import the necessary modules in your SPFx webpart code:

Now, the code which makes a POST request to create a list:

And my "Developer workbench" list is created:


Hope this helps.

Monday, 18 July 2016

Getting started with TypeScript, Browserify and Gulp in SharePoint

In my previous post Simple bundle, minify and upload JS to SharePoint using Gulp we saw how Gulp tasks can be used to simplify our JavaScript development experience in SharePoint. I am really impressed with Gulp as it has increased my productivity and I don't remember the last time I used SharePoint Designer :)

Now let's see how can we bring TypeScript into the mix. I have been playing around with TypeScript for a while now and here is my basic development workflow:

1) Create a main app.ts file which will contain the primary code for my application or "WebPart". In addition, app.ts will also have import references to any custom or third party modules e.g. jQuery

3) Use tslint to check the quality of my TypeScript

4) Use browserify and tsify to parse my TypeScript file and create a single JavaScript file (app.js) which includes all the dependencies required to run my app.

5) Minify my app.js using gulp-uglify and rename it to app.min.js using gulp-rename

6) Upload the debug and minified files to the Style Library in SharePoint using gulp-spsave

7) Then the JavaScript files can be used any way I like e.g. embed it using a Custom Action or in a Script Editor or a Content Editor WebPart.

Before we begin, if you are using Visual Studio 2015 like me, make sure you have the latest version of Node installed and Visual Studio is configured to use it. Here is an excellent tutorial on how to do this: How to configure Visual Studio 2015 with the latest version of Node.js and NPM

Now let us have a look at the important bits of my solution. I have uploaded the entire solution on GitHub here: https://github.com/vman/MyTypeScript

1) app.ts file:


At the top, the import statements are used to indicate that the code in this file is dependent on these modules. The first being jQuery and the second being my custom User module. Next, we simply create an object of the User class and call it's getDetails and displayDetails methods.

2) User.ts


There is a bit more going on in my User.ts class. Just like my app.ts, the first line indicates, with an import statement, that this file is dependent on the jQuery module. The getDetails function gets the AccountName, DisplayName and Email of the current user from the SharePoint REST API and stores them as properties of the current instance. The  displayDetails function logs the same properties (of the current instance) to the console.

3) package.json


Here is a list of all npm packages used in my solution. Notice the jQuery package, browserify and tsify use it to include jQuery in the final bundle as it is requested by my app.


4) gulpfile.js


And finally, here is my gulpfile.js which does all the heavy lifting:


5) Gulp tasks:


The watch-ts-upload-to-sp task looks for any changes in the .ts files (app.ts and User.ts). If any changes are noticed, it runs the upload-to-sp task.

The upload-to-sp task has dependencies chained up so that the tasks are run in the following order:

1) lint-ts to check the code quality of TypeScript
2) browserify to import all the required modules and create a single app.js bundle file
3) minify-js to create a minified file.
4) Finally, the upload-to-sp task runs to upload the app.js and app.min.js files to the Style Library.

(click to zoom)


A note on Typings:


TypeScript uses TypeScript definition '.d.ts' files to provide intellisense while writing a file. The TypeScript Definition Manager "Typings" is the current recommended approach of including definition files in your project: https://github.com/typings/typings

I have included typings as an NPM package in my solution (have a look my package.json file) and then used the following commands to get the required typings in my project:

Thanks for reading!