Showing posts with label Office UI Fabric. Show all posts

Monday, 2 September 2019

Create SPFx Library components containing Office UI Fabric React

When using Office UI Fabric React (OUIFR) components in SPFx projects, if you analyse the bundle structure you will notice that OUIFR components take up a lot of space which leads to increased bundle size.

If there are multiple SPFx components loaded on the page which depend on OUIFR components, the size of each bundle will be affected, as by default the OUIFR components are included in each SPFx bundle.

One way to mitigate this issue is to include all your custom components (which depend on OUIFR) into an SPFx library component and then consume the library component from SPFx webparts and extensions. This will make sure that if you have reusable custom components, they won't be loaded multiple times on the page if multiple SPFx webparts (or extensions) are consuming them.

Let's see how to achieve this. We will be working with SPFx 1.9.1 which contains the GA version of Library Components:

1) Create SPFx Library and Consumer component structure


First, make sure you have an SPFx library project as well as a "consumer" SPFx project containing webparts (or extensions). Instructions on how to create this are in the Microsoft docs: https://docs.microsoft.com/en-us/sharepoint/dev/spfx/library-component-tutorial

The code for this post is also available on GitHub if you want to have a look: https://github.com/vman/spfx-lib-components-ouifr


2) Create a new custom react component which internally uses Office UI Fabric React


In the library component project, create a new react component in a new file e.g. ButtonComponent.tsx


Here are the contents of the custom react component:


3) Update the index.ts file


In the index.ts file of the library component, include the new component to be exported:


4) Update config.json


Next, in the config/config.json file of the library component, make sure that the entry point is pointing to /lib/index.js


This step was not necessary in SPFx 1.8.2-plusbeta but seems there is a bug in SPFx 1.9.1. I have created a GitHub issue here:

5) Update the consumer web part


Make sure that the library component is referenced in the consumer webpart e.g. through npm link or by using a monorepo manager like rush or lerna.

More details on using npm link in this in the Microsoft docs: https://docs.microsoft.com/en-us/sharepoint/dev/spfx/library-component-tutorial

And finally, in your consumer SPFx react webpart, you can reference the custom component:


When you deploy both the SPFx packages in the app catalog and then add them on a page, you will see different bits of code being loaded separately:
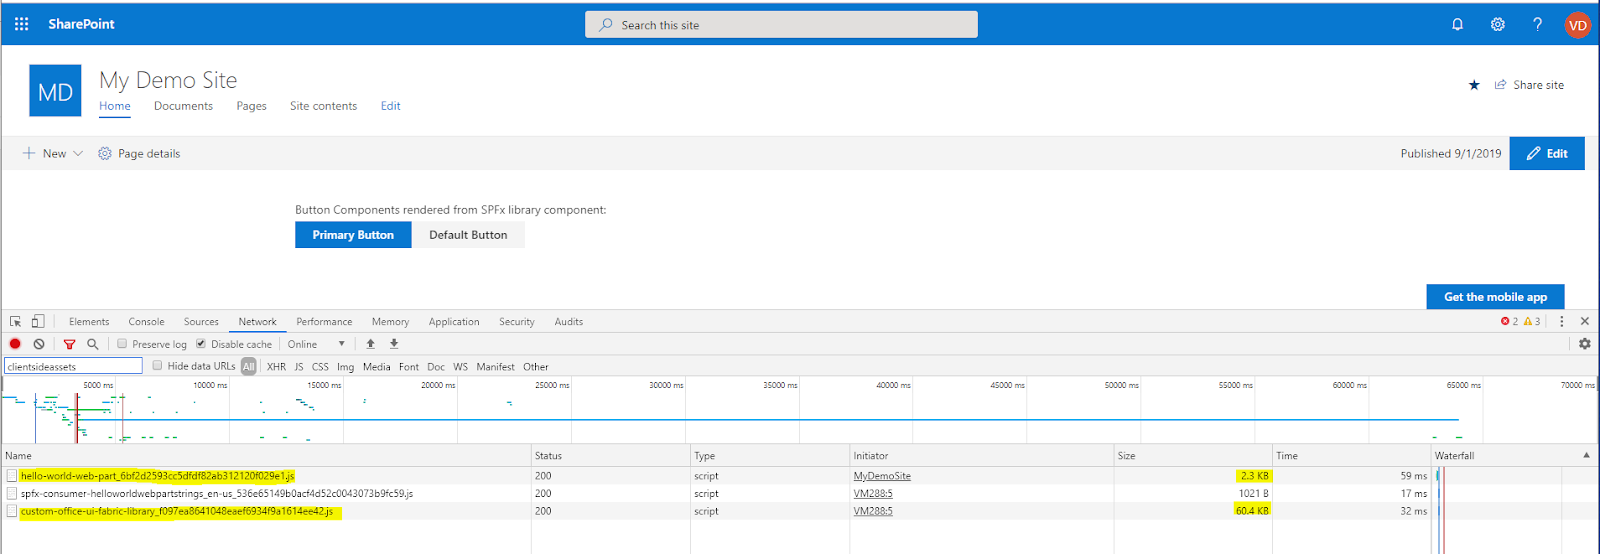


And that's it! Sample repo on GitHub: https://github.com/vman/spfx-lib-components-ouifr

Monday, 7 November 2016

Introducing: SharePoint Online Public CDN Manager

Update 24th March 2017: This post was updated since the general availability of the Office 365 Public CDN. The SPO CDN Manager now supports the GA version of the Office 365 Public CDN.

The Office 365 Public CDN recently reached General availability. It allows static assets like images, JavaScript, CSS etc. to be hosted in a globally available CDN. Find out more about it here.

With the general availability, the Office 365 PowerShell and SharePoint Online CSOM were also updated with APIs which could be used to manage the Public CDN.

Although the APIs are handy, what was missing was a nice and simple GUI to manage the CDN settings. So I set out to create an app which would give a nice overview of all the CDN settings including folders in the tenant which have been configured as Origins, file types which have been set to be pushed to the CDN and finally a way to enable/disable the CDN.

Introducing the SharePoint Online Public CDN Manager:


Check it out now: https://spocdnmanager.azurewebsites.net/


Checkout the code on GitHub: https://github.com/vman/SPO-CDN-Manager


As you can tell, the SharePoint Online Public CDN Manager can be used to:

1) Add/Remove CDN Origins i.e. SPO Libraries which will be used to store static assets.

2) Add/Remove File types. Which files will be pushed to the CDN.

3) Enable/Disable the CDN on a tenant.

4) Create the default CDN origins specified by the Office 365 Public CDN

The Implementation:


1) It is an MVC app which is Multi Tenant and hosted on the Azure App Service. It uses the March 2017 Release of SharePoint Online CSOM to talk to SharePoint.
https://dev.office.com/blogs/new-sharepoint-csom-version-released-for-Office-365-march-2017

2) For the UI, the Office UI Fabric core styles are used together with the Office UI Fabric JS Components


3) The app requires "Office 365 SharePoint Online" Full Control permissions on all site collections. This is because the CDN is a tenant wide setting and can be modified only by Tenant Administrators or SharePoint Administrators.


The app uses Delegated (User) authentication for every call to SharePoint so that only Tenant/SharePoint Administrators can access the CDN Properties:
So even if a user who is not an Admin lands on the page, they are not able to fiddle with the CDN settings.

Tenant vs Office365Tenant


Something interesting I came across while working on this. There are 2 classes available in CSOM now to manipulate tenant settings:

Microsoft.Online.SharePoint.TenantManagement.Office365Tenant

Microsoft.Online.SharePoint.TenantAdministration.Tenant

Both these classes have the Public CDN properties which can be used to manage the CDN. But the interesting this is that the Tenant class requires the Tenant Administration Url (https://yourtenant-admin.sharepoint.com) to instantiate but the Office365Tenant class can be instantiated by a regular site url in SharePoint Online. (https://yourtenant.sharepoint.com/sites/publishing)

If a regular SharePoint site url is used to instantiate the Tenant class, you get an exception saying:

Current site is not a tenant administration site.

This is why I have used the Office365Tenant class. Checkout the code on GitHub for more details.

Workaround for Internet Explorer "Quirks":


The SPO CDN Manager has been tested on latest version of Chrome, Edge and IE. It works without any issues on Chrome and Edge.

But, to get it working on IE, you will have to add the remote site https://spocdnmanager.azurewebsites.net to IE's trusted sites.

Thanks for reading! Hope you find the SPO CDN Manager useful.

Tuesday, 13 September 2016

SharePoint Framework: Org Chart web part using Office UI Fabric, React, OData batching and Service scopes

Here is a SharePoint Framework web part I have put together to show an organisation chart for the current user: 

Code is available on GitHub as part of the SharePoint Framework client-side web part samples & tutorials: https://github.com/SharePoint/sp-dev-fx-webparts/tree/master/samples/react-organisationchart


(click to zoom)

1) For getting the Manager and the Reports of the current user, the ExtendedManagers and DirectReports user profile properties are used.


2) Uses the OrgChart CSS directly from the Office UI Fabric: http://dev.office.com/fabric/OrgChart (Not the Office UI Fabric React components which are still in progress)


The Office UI Fabric CSS is bundled together with the web part and not referenced externally. In the OrganisationChart.module.scss:

Thanks to my colleague and buddy Paul Ryan for this tip.

3) The REST API calls are made with the HttpClient belonging to the current ServiceScope. No need to pass web part properties or the web part context. 


4) The Managers and DirectReports are fetched by registering a mapping of the UserProfileService class in the current ServiceScope


5) OData Batching is used to get details (Photos, Titles, Profile Urls) of all DirectReports in a single call. (Similarly, if more than one Manager exists in the ExtentedManagers property, details of all users are fetched in a single batch call)


More on OData Batching in my previous post: Batch REST requests in SPFx using the ODataBatch preview

Hope you find this useful!