Showing posts with label Azure Active Directory. Show all posts

Monday, 19 December 2022

Building a Microsoft Teams app: Posting a message to Teams on behalf of the current user

If you are building a Teams app and want to integrate with Teams channel messages, this post will be helpful to you. Specifically, we will be looking at posting a Teams channel message, from the app, on behalf of the currently logged in user.  For example, there could be a scenario where an event occurs within the Teams app and as a result a message needs to be posted to a Teams channel but instead of it coming from a bot, it needs to be posted by the logged in user's account.

Let's see how this can be done. 

1. Azure AD app and Permissions

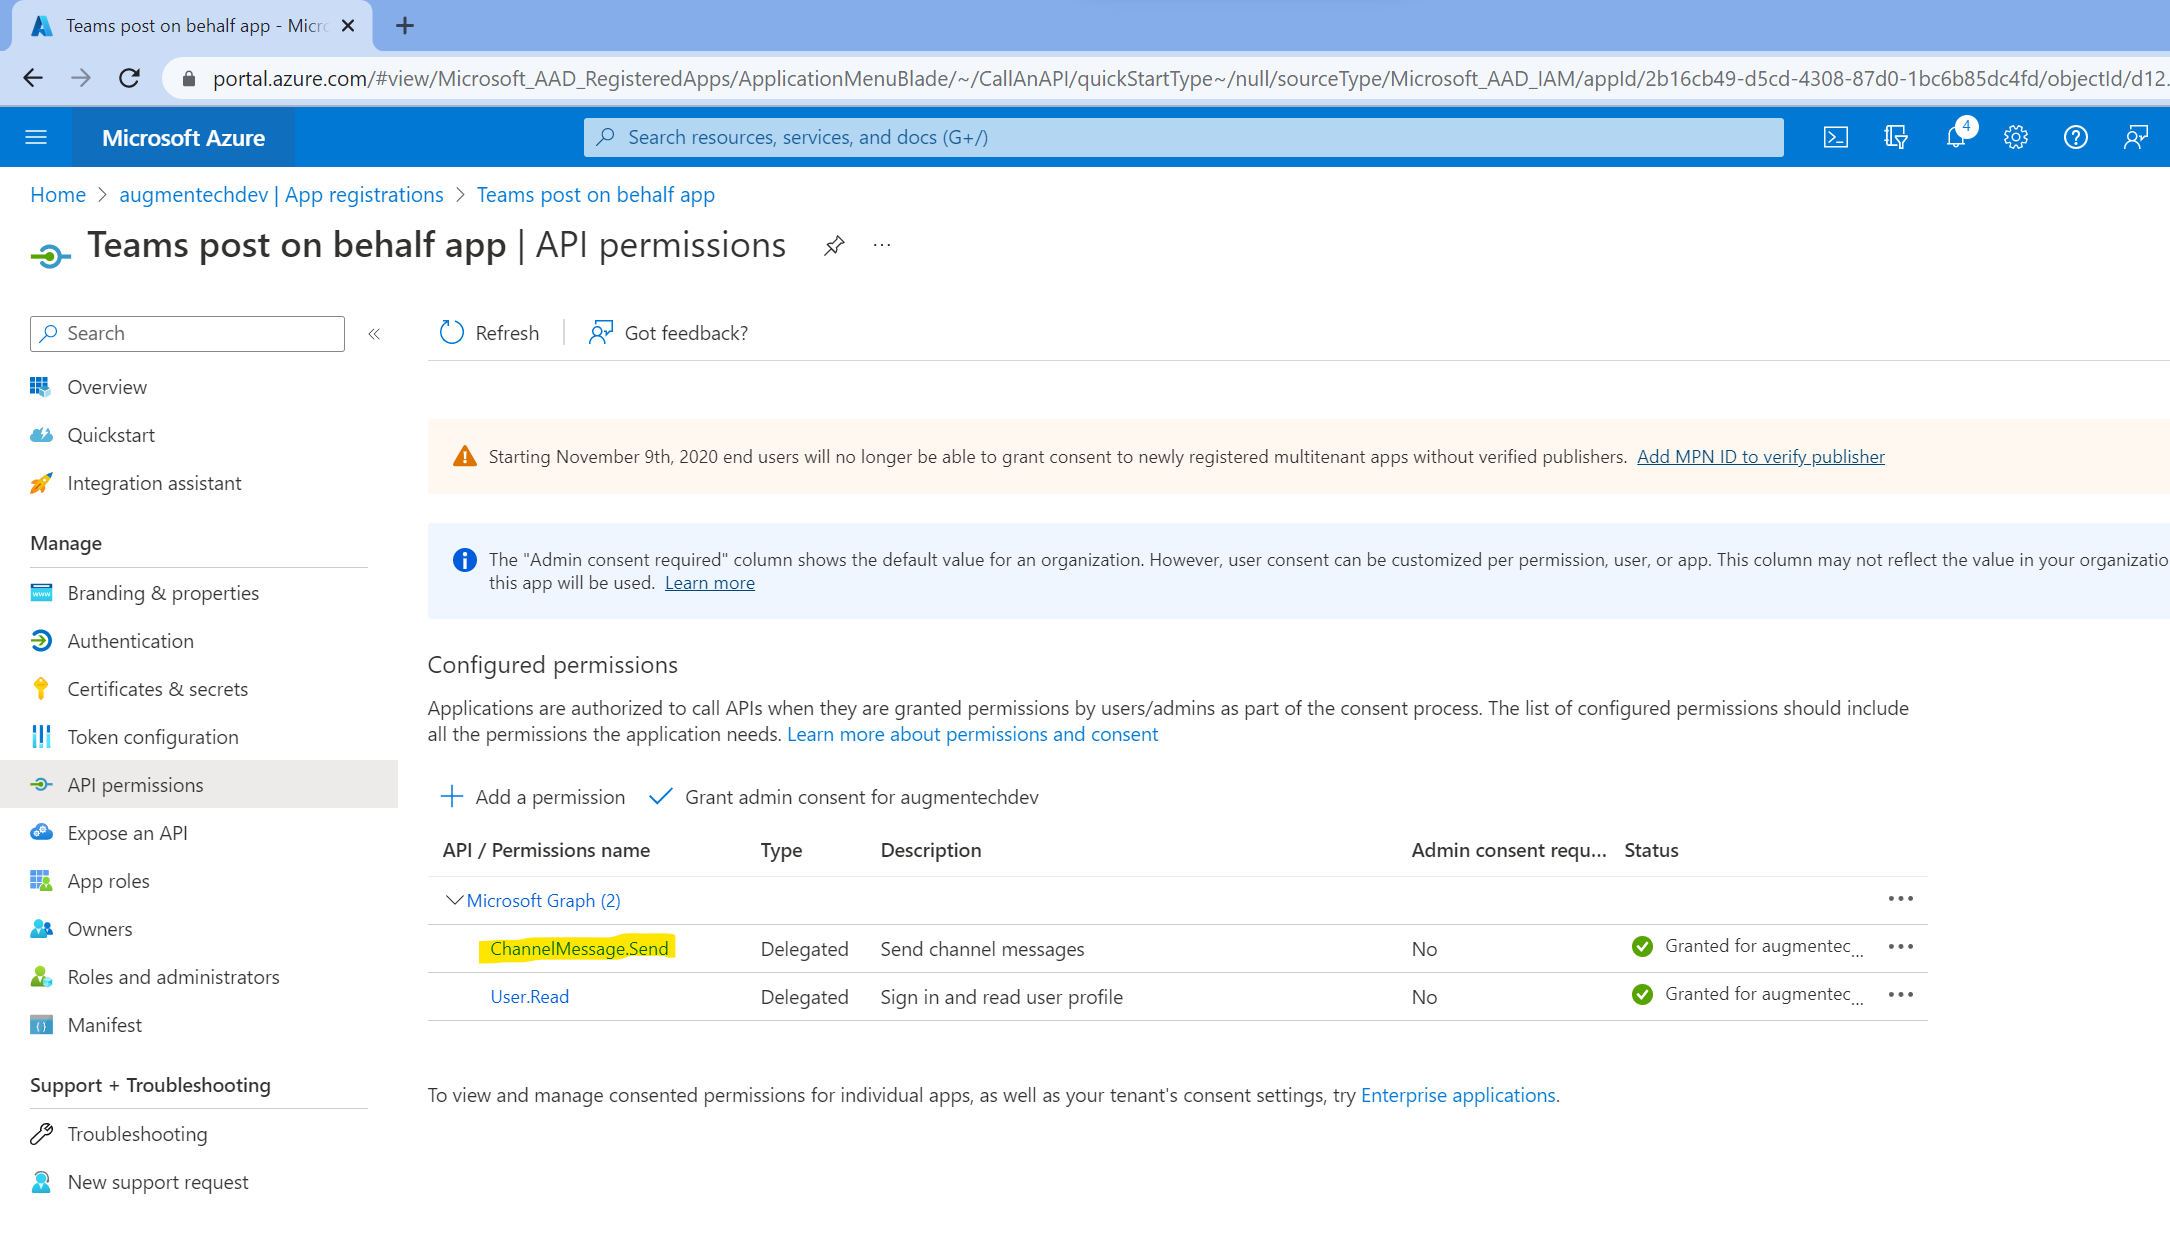
First thing we need is an Azure AD app setup with the Microsoft Graph ChannelMessage.Send delegated permission. This permission is needed for posting messages to Teams using the current user credentials.

I should mention setting up the right permissions is part of a larger configuration in the Azure AD app needed for Single Sign On (SSO) setup in Teams app. You can see the full configuration here: Register your tab app with Azure AD - Teams | Microsoft Learn 


2. Current user's id token from Teams JS SDK v2 

Once the permissions are setup, we need to setup our frontend so that it can grab the current user's id token from Microsoft Teams. More info on Azure AD id tokens here: Microsoft identity platform ID tokens - Microsoft Entra | Microsoft Learn 

Although this token is available from Teams JS SDK v2, it cannot itself be used to make graph calls. We need to exchange it for a Microsoft Graph access token. For this we will send the id token to our backend:

3. Getting Microsoft Graph delegated access token and posting message to Teams

It is recommended to do the token exchange as well as any further Graph calls from the backend of your app instead passing the Graph access token back to the frontend and making the calls from there:

In the code we first graph the id token from the Authorization header, then exchange the id token for a Microsoft Graph access token, then finally we are able to make a Graph call to post a message to Teams as the current user.


Hope this helps!

Tuesday, 5 January 2021

Microsoft 365 multi-tenant apps: Working with application permissions in Microsoft Graph

Creating multi-tenant (SaaS) apps in Microsoft 365 has been possible for a while now. Azure AD multi tenant apps allow us to host our custom applications in an Azure AD/M365 "home" tenant while enabling the apps to also have access to resources hosted in other tenants. To know more about multi-tenant apps, head over to the Microsoft docs: https://docs.microsoft.com/en-in/azure/active-directory/develop/single-and-multi-tenant-apps

Hosting applications in a home tenant as SaaS has a lot of advantages particularly for ISVs when it comes to product based applications. Users are able to consume the apps directly by signing into them instead of the conventional way of an admin having to deploy the product to the customer tenant first. It makes life easy for the admins as well as they don't have to go through complex deployment scripts and instructions. Moreover, after the application is deployed, new features and bug fixes can be rolled out to the application "on the fly" as opposed to releasing feature packs and hotfixes which again have to be installed manually.

So in this post, we are going to have a look at using the Microsoft Graph API in such apps configured to be multi tenant.

(Multi tenant apps also allow users with personal Microsoft accounts to sign into them but that is a topic for another day! Also, in this post we will only focus on the application permissions i.e. granting permissions to applications without a user context)

Configure an app to be a multi-tenant in the home tenant's Azure AD

1) When creating a multitenant app registration, make sure that the "Accounts in any organizational directory" is selected. Also, we need to add a redirect url as this will be the url the admin will be redirected to after successfully granting consent to our application. Ideally, this would be the landing page of your application but in the screenshot I am just using the AAD home as an example:


2) Assign required permissions. In this case, we are going to demo the code to get all the Microsoft 365 Groups on the tenant and also the root SharePoint Online site, so selecting the relevant permissions here:


3) Create a client secret and record it along with the client id. We will need this later in our code.


Granting consent to a multi tenant app in other "consumer" tenant

Next, let's have a look at how the multi tenant app hosted in it's home tenant can be granted permission to access resources in other tenants. 

What we will have to do is to construct a url for admin consent which would be unique to our application. An Azure AD admin of the other tenant will need to navigate to the url and then consent to granting the permissions to our app on the tenant. The Azure AD url will have the following structure:

In the link above, replace the client id with the client id of your multi tenant Azure AD app. Also, notice that we are using the /.default static scope which means that all permissions configured in the app will be requested for consent. 

When the admin navigates to this url, they will see the consent prompt:


Once the consent is granted, the multitenant app will have permissions to access the resources on the other tenant. This can be checked by going to:

Azure Active Directory > Enterprise Applications > All applications and searching for our app there.


This confirms that the multi tenant app has permissions on this tenant. Also this process can be repeated on any number of Azure AD/M365 tenants.

Use the Microsoft Graph API to get Microsoft 365 data from the consumer tenant

With everything setup and also the admin consent granted, let's have a look at the Microsoft Graph code to get data from the consumer tenant.

In this code, I am using the .NET SDK for Microsoft Graph found on nuget here:

Microsoft.Graph

And the new preview version of Microsoft.Graph.Auth found here:

Microsoft.Graph.Auth

And finally here is the code to get all the Microsoft 365 Groups and the SharePoint root site url of the consumer tenant. For the sake of simplicity, I am using a .NET Core console application:

And we are able to get the data from the consumer tenant back:


Thanks for reading! Hope this helps.

Wednesday, 24 June 2020

Using .NET Standard CSOM and MSAL.NET for App-Only auth in SharePoint Online

So after long last, the .NET Standard version of SharePoint Online CSOM was released yesterday! The official announcement can be found here: https://developer.microsoft.com/en-us/microsoft-365/blogs/net-standard-version-of-sharepoint-online-csom-apis/

One of the key differences compared to the .NET Framework CSOM was that the authentication is completely independent of CSOM library now. Previously, there were native classes like SharePointOnlineCredentials which were used for auth, but they have been removed now.

Since .NET Standard CSOM now uses OAuth for authentication, it's up to the developer to get an access token and pass it along with the call to SharePoint Online. The CSOM library does not care how the access token was fetched. 

So in this post, let's have a look at getting an Application authentication (aka App-Only) access token using MSAL.NET and use it with the new .NET Standard CSOM to get data from SharePoint Online.

When making app-only calls to SharePoint Online, we can either use an Azure AD app registration (with the Client Certificate) or we can use SharePoint App-Only authentication created via the AppRegNew.aspx and AppInv.aspx pages. (There are other workarounds available but that would be out of scope for this post) I go into more details about this in my previous post: Working with Application Permissions (App-Only Auth) in SharePoint Online and the Microsoft Graph

The recommended approach is to go with an Azure AD App Registration and the Client Certificate approach so that is what we will be using. To do that, first we will need to create an App Registration in the Azure AD portal and configure it with the Certificate, SPO API permissions etc. Here is a detailed walk-through on this in the Microsoft docs: https://docs.microsoft.com/en-us/sharepoint/dev/solution-guidance/security-apponly-azuread 

Let's have a look at a few important bits of my Azure AD app registration:

The certificate:


The consented SharePoint permissions:


Once the Azure AD App Registration is configured correctly, we can start looking at the code. 

We will be using a .NET Core 3.1 Console app project for this along with the following nuget packages:


And finally, here is the code which uses MSAL.NET to get the access token and attaches it to the .NET Standard CSOM requests going to SharePoint:


Note: Make sure that you are using the right way to access the certificate as per your scenario. Here, for demo purposes, I have installed the certificate to my local machine and I am accessing it from there. In production scenarios, it's recommended to store the certificate in Azure Key Vault. More details here

And when I run the code, I am able to get the title of my SharePoint site back:
 

Hope you found this post useful! I am very glad .NET CSOM Standard is finally available and we are able to use it .NET Core projects going forward. This is going to make things so much easier!

Thursday, 5 March 2020

Office 365 CLI: Grant admin consent to specific scopes using Microsoft identity platform (AAD v2)

The Office 365 CLI is great tool for a variety of scenarios. Specifically, I find it super useful for CI/CD and automation. Since there is no official Microsoft Graph Azure DevOps task yet, the Office 365 CLI comes to the rescue when we want to make a call to the Graph from an Azure DevOps pipeline. Most recently, I was using it to deploy a Teams app when I noticed something interesting.

As I was calling the Office CLI from an automated script, I could not use the default deviceCode flow to login as there was no user interaction possible. So the other options were to use the username/password flow or use a custom certificate. I chose the former as it was very convenient and I could store the password securely in a Azure DevOps secret variable.

Now before using the Office CLI on a tenant, we need to consent to the AAD multi-tenant app used internally for authenticating to Office 356 services. This app is called "PnP Office 365 Management Shell" and the consent process is also described in the docs here: https://pnp.github.io/office365-cli/user-guide/connecting-office-365/

If this consent hasn't happened yet, we get the following error:

Error: AADSTS65001: The user or administrator has not consented to use the application with ID '31359c7f-bd7e-475c-86db-fdb8c937548e' named 'PnP Office 365 Management Shell'. Send an interactive authorization request for this user and resource.

If we go ahead with the default consent experience, we are presented with this screen where the CLI AAD app requests a large number of permissions on the tenant:


Now in my case, I did not need all the scopes the CLI was requesting. I only needed AppCatalog.ReadWrite.All to deploy my Teams app.

So that got me thinking, one of the benefits of using the Microsoft identity platform (also called AAD v2) is that apps can request consent to specific scopes:

With the Microsoft identity platform endpoint, you can ignore the static permissions defined in the app registration information in the Azure portal and request permissions incrementally instead, which means asking for a bare minimum set of permissions upfront and growing more over time as the customer uses additional app features. To do so, you can specify the scopes your app needs at any time by including the new scopes in the scope parameter when requesting an access token - without the need to pre-define them in the application registration information.
https://docs.microsoft.com/en-us/azure/active-directory/azuread-dev/azure-ad-endpoint-comparison#incremental-and-dynamic-consent

So armed with this knowledge, I tested whether I could request (and grant) only AppCatalog.ReadWrite.All to the PnP Office 365 Management Shell app.

Turns out it is indeed possible by going to this URL in a browser as an admin:

You will notice that in the client_id param, we are specifying the client id of the PnP Office 365 Management Shell app and in the scope param, we are only requesting the needed scope i.e. AppCatalog.ReadWrite.All


This time, we are presented with a significantly reduced scopes for consent. Notice only the "Read and write to all app catalogs" permission is present along with the couple of default permissions.

After granting the consent and then navigating to Azure AD -> Enterprise Applications -> All applications ->  PnP Office 365 Management Shell -> Permissions, you will see that only the requested scope was granted:


This way, you can only request the scopes you need and also include multiple scopes by separating them with a space

Automating the consent:


If you are like me and would like to automate the consent process as well, that is possible by using the Azure CLI:

00000003-0000-0000-c000-000000000000 is the Application ID of the Microsoft Graph resource in AAD. This will be the same for all tenants.

Hope you found the post useful!

Wednesday, 2 January 2019

Working with Application Permissions (App-Only Auth) in SharePoint Online and the Microsoft Graph

When working with SharePoint Online or the Microsoft Graph, there are many scenarios in which we need to read or write data without a user context. It might be a scheduled process, or it might be an operation that requires elevated permissions. In such scenarios, it is quite common for the solution to use "Application permissions" (a.k.a App-Only Authentication). This lets the solution have its own identity which can be used to grant the required permissions.

When working with Application permissions in Office 365, there are a lot of moving pieces to deal with like Client Ids, Client Secrets, Azure AD App Registrations, Certificates, Add-In Registrations, AppRegNew.aspx, AppInv.aspx etc.

What I want to do in this post is to explore different options for configuring and granting application permissions. There are a few combinations possible with the different moving pieces. My aim in this post is to explore them and determine which combination might be suitable for certain scenarios. We will also see some sample code which demonstrates how to authenticate with SPO and the Microsoft Graph using the different authentication options.

Here is a table I have put together which summarises the different options for working with applications permissions in SPO and the Microsoft Graph API. We will go through each on them in detail.


1) Interact with data from SharePoint Online with an Azure AD App Registration


If your solution uses an Azure AD App Registration created from the Azure AD portal and you want to read or write data to SharePoint Online:

You will need to use a Client Id and Certificate. Have a look at this link for details on how to create an AAD App Registration as well as the certificate: https://docs.microsoft.com/en-us/sharepoint/dev/solution-guidance/security-apponly-azuread

If you try to use a Client Id and Client Secret created through AAD portal you will get the following error:

Microsoft.SharePoint.Client.ServerUnauthorizedAccessException: 'Access denied. You do not have permission to perform this action or access this resource.'

You will also get the "Access Denied" error if you try to write to the User Profile service. Reading from the User Profile service will work. If your solution needs write User Profile service access, your only option would be to use an Add-In registration (see the next section). Writing to the SPO Taxonomy Service will not work either through AAD App Registration or Add-In Registration. Read operations will work. See notes at the end of this post.

Here is some sample code to demo how to use a Client Id and Certificate with the AAD App Registration. You will need the SharePointPnPCoreOnline NuGet package:


2) Interact with data from SharePoint Online with a SharePoint Add-In Registration:


If your solution uses a SharePoint Add-In Registration (created through the /_layouts/15/AppRegNew.aspx page) and you want to read/write data to SharePoint Online:

You will need a Client Id and Client Secret created through the /_layouts/15/AppRegNew.aspx page and permissions granted from the /_layouts/15/AppInv.aspx page

See this link for details on how to create as well as assign permissions to the Add-In Registration:
https://docs.microsoft.com/en-us/sharepoint/dev/solution-guidance/security-apponly-azureacs

Here is a sample of how to use the Add-In registration to interact with data from SharePoint. You will need the SharePointPnPCoreOnline NuGet package.


3) Interact with data from the Microsoft Graph with an Azure AD App Registration


If your solution needs to interact with the Microsoft Graph, the only option is to have an Azure AD App Registration. However, within the Azure AD App Registration you can either use a Client Id, Client Secret pair or you can use the Client Id, Certificate pair as well.

1) Using a Client Id and Certificate:


The process to create the AAD App Registration and Certificate is exactly the same as described above in section 1. Only difference would be that instead of selecting SharePoint Online permissions, the App Registration will have to be granted the relevant permission to the Microsoft Graph.

Once that is done, here is the sample code to use the Client Id and Certificate to get data from the Microsoft Graph:


2) Using a Client Id and Client Secret:

The only change in this approach is using a Client Secret (Password) instead of a certificate. See this link to see how to generate a client secret for the AAD App Registration:
https://docs.microsoft.com/en-us/azure/active-directory/develop/howto-create-service-principal-portal#get-application-id-and-authentication-key

Once you have the Client Id and Client Secret, you can use the sample code to get data from the Microsoft Graph:


In conclusion: 


Considering all factors, I would personally go with one of these two options:

If the solution is strictly going to deal with SharePoint Online data and not any other part of Office 365, you might want to consider the SharePoint Add-In Registration approach with a Client Id and Client Secret. That way you don't have to mess around with certificates. But remember that in the future if the same solution is going to read/write data from the Microsoft Graph, you might have to create another App Registration in Azure AD.

Another option would be to use an Azure AD App Registration with a Client Id and a Certificate. This allows us to interact with most of Office 365 data (including SharePoint Online and the Microsoft Graph) without maintaining separate applications. The caveats to this approach being the added complication of generating and managing certificates and also the fact that writing data to SharePoint Online Taxonomy and User Profile will not work (Reading data will be possible)

Notes:

1) Writing to the SPO Taxonomy Service with Application Permissions does not work from either AAD Portal or Add-In Registration. Read operations work. See more details here:
https://docs.microsoft.com/en-us/sharepoint/dev/solution-guidance/security-apponly#what-are-the-limitations-when-using-app-only

2) For the purpose of this post, I have only considered Azure AD v1.0 endpoint as we are only concerned with organisational accounts and not personal accounts.
https://docs.microsoft.com/en-gb/azure/active-directory/develop/azure-ad-endpoint-comparison

3) Technically, Add-In registrations created from the AppRegNew.aspx page are also registered in Azure AD. They are not visible through the AAD portal but you can list them via PowerShell.

4) It is also possible to create an App Registration in Azure AD and then use the AppInv.aspx page in SharePoint Online to assign it SharePoint specific permissions. You can also use this approach to assign a client secret which never expires to the Add-In registration. For more details on this, you can see this post by the very talented Sergei Sergeev https://spblog.net/post/2018/08/24/SharePoint-lifehacks-create-SharePoint-app-registration-with-client-secret-which-never-expires

It would be great if we can get some confirmation from Microsoft about this approach being supported/recommended. But even then, we will have to manage the SharePoint permissions in a different location than the Microsoft Graph permissions.

Hope you've found the post helpful!

Wednesday, 29 August 2018

Create Azure AD App Registration with Azure CLI 2.0

Previously, I have written about creating an Azure AD App registration using the Microsoft Graph API and PowerShell. But since then, the beta endpoint for creating app registrations had stopped working as reported in this GitHub issue: https://github.com/microsoftgraph/microsoft-graph-docs/issues/1365

Fortunately, I have recently discovered a great way to create Azure AD App Registrations using the Azure CLI 2.0. This also includes adding any permissions the app requires on resources e.g. Microsoft Graph, Office 365 SharePoint Online etc. This has not been previously possible with the Azure AD PowerShell Cmdlets.

So in this post, let's go through what is needed to achieve this:

First, you need to have the Azure CLI 2.0 installed on your machine. Follow this link to get it if you haven't already:
https://docs.microsoft.com/en-us/cli/azure/install-azure-cli?view=azure-cli-latest

Once you have the CLI, here is the code to create an Azure AD App Registration including the required permissions:

The JSON in the requiredResourceManifest.json file can be fetched from the manifest of an App registration already created in Azure AD. So the recommendation would be to manually create an App Registration in Azure AD and configure the required permissions. Once you have the right set of permissions, edit the manifest and grab the JSON from the requiredResourceAccess array.

Trusting the App:

Update (5th April 2019):

The Azure CLI now has a command to grant the app permissions on behalf of the admin as well
https://docs.microsoft.com/en-us/cli/azure/ad/app/permission?view=azure-cli-latest#az-ad-app-permission-admin-consent

az ad app permission admin-consent --id [--subscription]

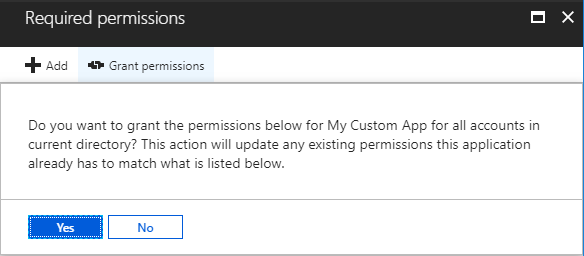
If you still want to use the portal to grant the permissions you can do so as an Admin by going to the app and clicking on the "Grant Permissions" button:


For more possibilities with the Azure CLI 2.0, checkout the reference: https://docs.microsoft.com/en-us/cli/azure/reference-index?view=azure-cli-latest

Monday, 6 August 2018

Sync Azure AD profile properties to SharePoint User Profiles using Azure Durable Functions

Recently, a client had asked us to synchronise user properties from their Azure AD profile to custom properties in their SharePoint UserProfile. This had to be a scheduled process as the data had to be kept up to date as well as it had to cater for any new profiles created in Azure AD/SharePoint.

We decided to use Azure Functions for this given the ease of configuring a timer triggered function (to run on schedule) and also the fact that functions run on a consumption based billing plan. This means that the client would get charged only for when the function executes (oh and also, the first million executions are free every month)

The main challenge we had to overcome was the limitation that an Azure Function has a default timeout of 5 minutes (which can be increased up to 10 minutes at the time of this writing) This means that if we were using a single Azure Function to update SharePoint UserProfile Properties for thousands of users, we were going to hit the timeout sooner or later. 

Fortunately, Durable Functions went GA recently which means that we have a way of managing state in the traditionally "state-less" Azure Functions. With durable functions, we can create an "activity" function to update the SharePoint User Profile properties for a single user. This function can be called in a loop for each user from an "orchestrator" function. Each run of the activity function is treated as a single execution and can be finished in the 5 minute default timeout.

So let's see how this can be done! We are using precompiled C# functions and Visual Studio 2017 to achieve this. Also make sure to have the Durable Functions nuget package installed in your Azure Functions project:
https://www.nuget.org/packages/Microsoft.Azure.WebJobs.Extensions.DurableTask/

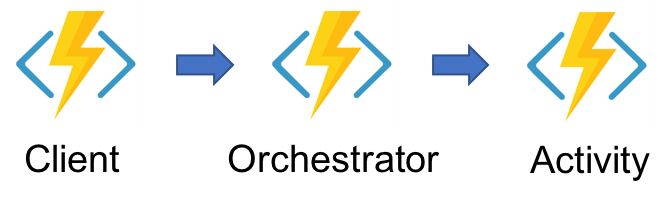
The Durable Function workflow can be categorised into three different types of functions:


1) Client Function


These are standard Azure Functions which can be triggered by external events like timers, HTTP requests, queues etc. The only difference being they have an OrchestrationClient binding which is required to start orchestrations.

In our case, the Client Function is a simple timer triggered function which uses the OrchestrationClient to start a new Orchestration Function with the name O_SyncProfileProperties


2) Orchestrator Function


As the name suggests, the Orchestrator function acts as a coordinator of the Durable Functions workflow. It does the job of starting, stopping and waiting for activity functions and is also in charge of passing data (or state) in between them.

In our case, it calls the A_GetUsersToSync activity function to get the user profiles from Azure AD (using the Microsoft Graph API which is out of scope for this article) and then loops through the users to call the A_UpdateSharePointProfile function for each user


3) Activity Functions


As you might have guessed by now the Activity function is the one which actually does all the heavy lifting. For example, the actual CSOM code which will update the SharePoint UserProfile properties will live in the A_UpdateSharePointProfile activity function:

And that's it! In 3 simple steps, we have a Durable Functions Orchestration set up. For more information on Durable Functions including dos and don'ts, please see the documentation: https://docs.microsoft.com/en-us/azure/azure-functions/durable-functions-overview

Hope you found this post useful!

Monday, 2 July 2018

Using Managed Service Identity with Key Vault from a .NET Azure Function

So Managed Service Identity along with Azure Functions support went GA recently. If you want to read the announcement and also want to get an overview of MSI, head over here: https://blogs.msdn.microsoft.com/appserviceteam/2018/06/26/announcing-general-availability-and-sovereign-cloud-support-of-managed-service-identity-for-app-service-and-azure-functions/

In this post, lets have a look at how easy it is to configure Managed Service Identity for an Azure Function and how it can be used together with Key Vault to secure sensitive information like Client Ids, Client Secrets and Passwords.

For example, when building an Azure Function which will interact with some data in SharePoint Online, we need a way to authenticate the Function with SharePoint. Two common methods used for authentication are 1) By creating an Add-In registration in SharePoint (appregnew.aspx) and 2) By using Azure AD authentication by creating an App Registration in Azure AD.

In both cases, we need to secure the ClientID and ClientSecret for the registration in such a way that only our calling code has access and any non-admin user browsing the Azure Function in the portal is prevented from seeing the sensitive data.  So let's see how we can do that using Managed Service Identity:

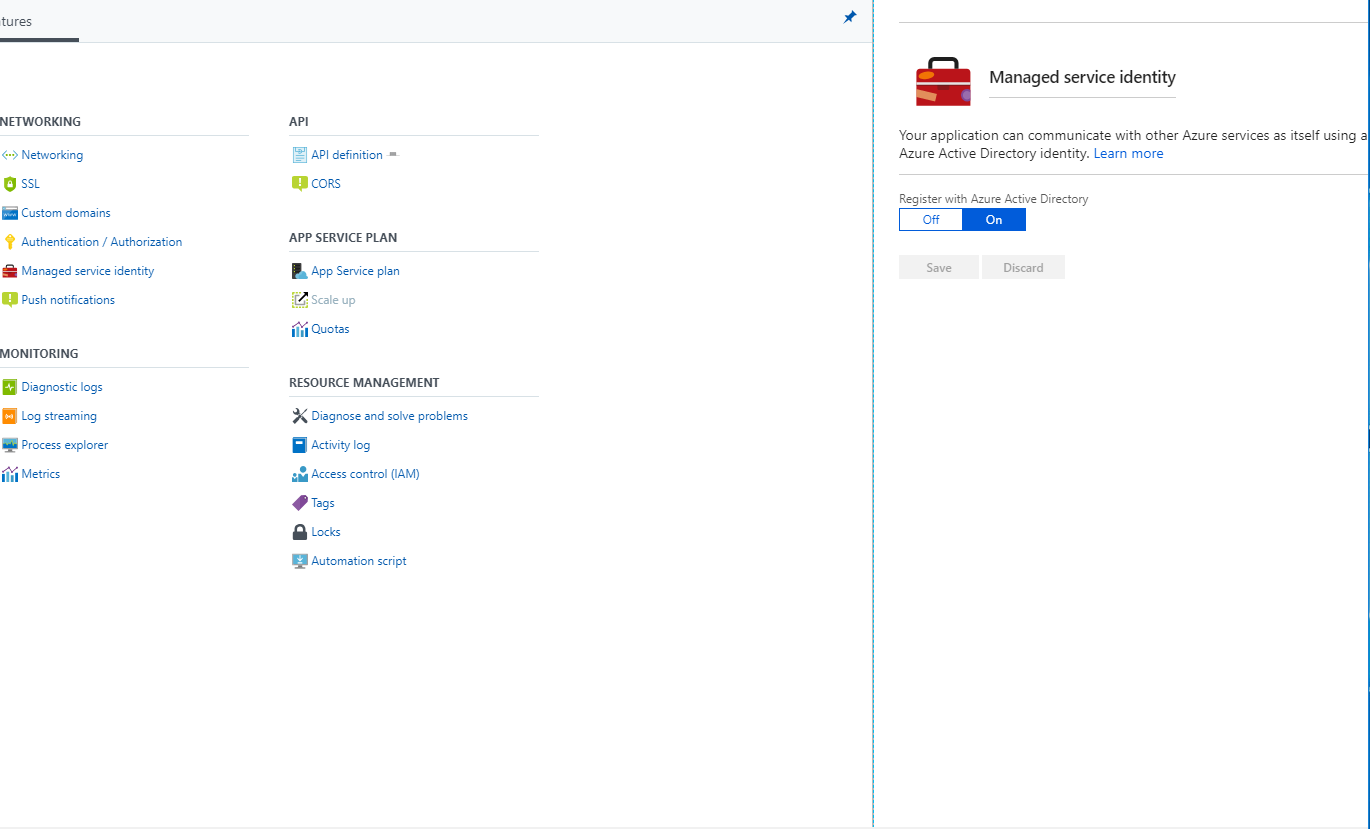
1) They very first thing you need to do is make sure that Managed Service Identity is configured for your Function App. You can do this simply by going to Function App Settings -> Managed Service Identity and ensuring that it is turned ON.


2) Create a Key Vault (or go to an existing one) and create two Secrets with names "ClientID" and "ClientSecret". You can also create additional Secrets relevant to your solution here.


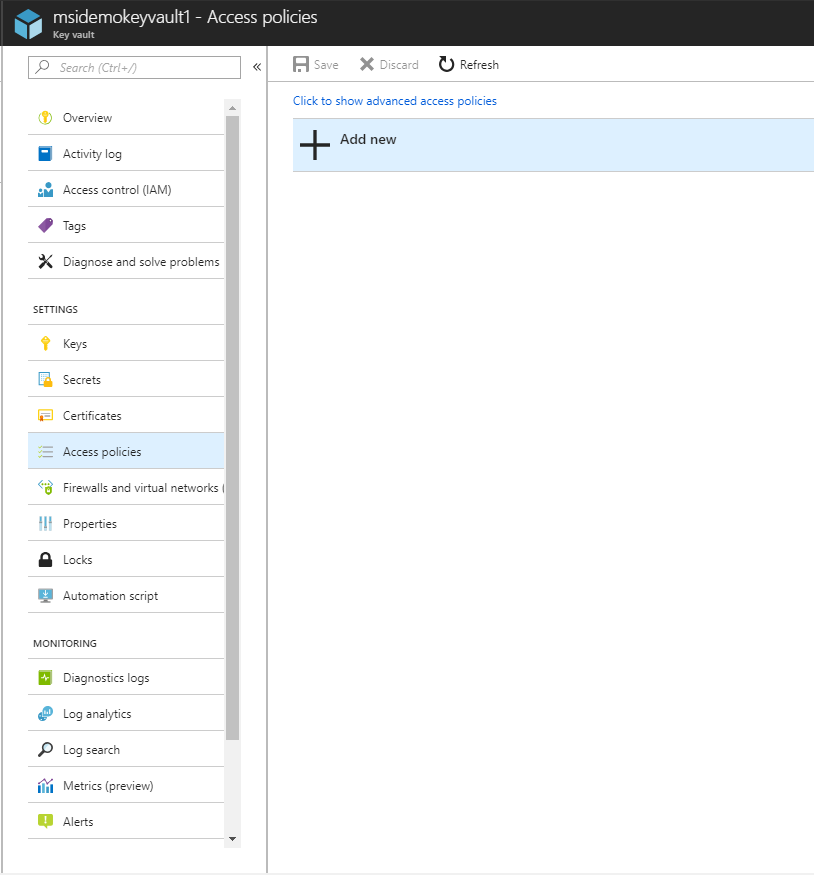
3) Now we want our Azure Function App to have permissions to access the Key Vault. To do this, go to Access Policies -> Add New


4) Select the Function App as the principal and make sure under Secret permissions, it has at least the "Get" permission:


5) That's it in terms of the config! Now let's move on to the code to access the secured Client ID and Secret:

Make sure your Azure Function has the following NuGet packages:

Microsoft.Azure.KeyVault
Microsoft.Azure.Services.AppAuthentication

And here is an HTTP triggered .NET pre-compiled function which fetches the ClientId and ClientSecret from the Key Vault:

That's it! I was really surprised how easy MSI support for Azure Functions makes securing sensitive data. This way, any keys, secrets or passwords used by our solutions can be secured and retrieved without worrying about them getting in the wrong hands!

Quick note on pricing for MSI and Key Vault:

Update (5th August 2018): You can also use MSI when debugging locally. The steps to achieve that are added in this tweet:


Monday, 14 May 2018

SPFx: Calling back to SharePoint from an AAD secured Azure Function on behalf of a user

This post is part of a series where we explore consuming Azure AD secured Azure Functions from SharePoint Framework components. Articles in the series:

1) SharePoint Framework: Calling AAD secured Azure Function on behalf of a user
2) SharePoint Framework: Calling Microsoft Graph API from an AAD secured Azure Function on behalf of a user
3) Calling back to SharePoint from an AAD secured Azure Function on behalf of a user (this post)

In the previous post, we were successfully able to call the Microsoft Graph API from an AAD secured Azure Function and return data back to the SharePoint Framework web part.

Now in this post, lets see how we can make a call back to SharePoint on behalf of the logged in user from the Azure Function. We will only focus on the code in the Azure Function here, to fully understand the set up and auth process, I recommend you check out the previous posts in the series.


Updates to the Azure AD app registration:


In order to make a call back to SharePoint, we will need to add a Client Secret to the Azure AD app registration. Skip this step if you have already done this as part of the previous post.


We will also need to add the Office 365 SharePoint Online permissions scope to the Azure AD app registration. For this post, I am selecting the "Read and write items in all Site Collections" delegated scope. You can select the scope according to the operations you want to perform in SharePoint


Don't forget to grant the permissions again as a subscription admin. This is so that each user does not have to do this individually:


Here is what we are going to do in the code:

When the Azure Function executes, we already have an access token sent by the SharePoint Framework AadHttpClient in the Authorization header. This access token has the "user_impersonation" scope which only allows it to access the Azure Function. It cannot be directly used to call back to SharePoint.

In order to obtain new access token that will work with SharePoint, we will have to request it using the existing access token.

Once this function is called from the SharePoint Framework, we are able to get the data back to the web part:


Thanks for reading!

SPFx: Calling Microsoft Graph API from an AAD secured Azure Function on behalf of a user

This post is part of a series where we explore consuming Azure AD secured Azure Functions from SharePoint Framework components. Articles in the series:

1) SharePoint Framework: Calling AAD secured Azure Function on behalf of a user
2) Calling Microsoft Graph API from an AAD secured Azure Function on behalf of a user (this post)
3) SharePoint Framework: Calling back to SharePoint from an AAD secured Azure Function on behalf of a user

In the previous post, we were successfully able to call an AAD secured Azure Function from a SharePoint Framework web part.

Now once we are in the Function, lets see how to make a call to the Microsoft Graph on behalf of the logged in user. We will only focus on the Azure Function here, to fully understand the set up and auth process, I recommend you check out the previous post.


Updates to the Azure AD app registration:


In order to call the Microsoft Graph, we will need to add a Client Secret to the Azure AD app registration.


We don't need to add any new permission scopes for the purposes of this post as we are going to make a call to the /v1.0/me endpoint which requires the User.Read permission. According to the SPFx docs, if we exchange the SPFx generated token for a MS Graph token, it will automatically have the User.Read.All permission scope.

If you want to do anything beyond this with the Microsoft Graph, you will need to add the relevant permissions scope and grant permissions to it. In the next post, we will see how to do this by granting permissions to the "Office 365 SharePoint Online" permissions scope.

Here is what we are going to do in this post:

When the Azure Function executes, we already have an access token sent by the SharePoint Framework AadHttpClient in the Authorization header. This access token has the "user_impersonation" scope which only allows it to access the Azure Function. It cannot be directly used to call the Microsoft Graph.

In order to obtain new access token that will work with the Microsoft Graph, we will have to request it using the existing access token. Once we have the new token, we are able to make a call to the Microsoft Graph:

Once this function is called from our SharePoint Framework web part, we are able to get data back from the graph:


Thanks for reading!

Monday, 19 February 2018

SPFx: Calling AAD secured Azure Function on behalf of a user with AadHttpClient

This post is part of a series where we explore consuming Azure AD secured Azure Functions from SharePoint Framework components. Articles in the series:

1) SharePoint Framework: Calling AAD secured Azure Function on behalf of a user (this post)
2) Calling Microsoft Graph API from an AAD secured Azure Function on behalf of a user
3) SharePoint Framework: Calling back to SharePoint from an AAD secured Azure Function on behalf of a user

Recently, after long last, the support for easily calling Azure AD secured custom APIs was released in the latest version of the SharePoint Framework (v1.6). Here are the details if you want to learn more: https://docs.microsoft.com/en-us/sharepoint/dev/spfx/use-aadhttpclient

In this post, let's have a look at how to secure our custom API (Azure Function) with Azure AD and then call the custom API from within a SharePoint Framework web part on behalf of the currently logged in user. We will be able to get the current user identity/claims in the custom API to know which user made the call to the Azure Function.


So let's quickly jump into how we are going to achieve this:

1) Create an Azure AD app registration


Go to Azure AD > App registrations > New application registration and create a new app registration. I am calling my app "User Details Custom API for SPFx"


By default the app registration will have the Sign in and read user profile scope on the Windows Azure Active Directory API. For the purpose of this post, those permissions are enough for us. We don't need to modify anything here right now.

Click on Properties and copy the App ID URI of the app registration. We will need this later in the SharePoint Framework web part.

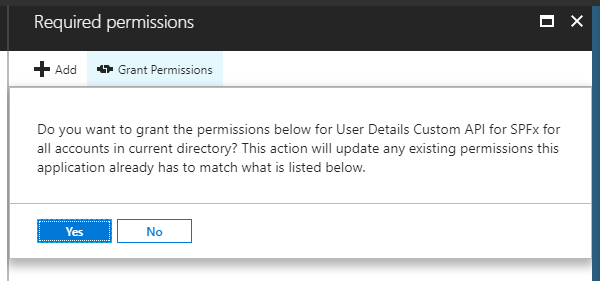
As a subscription admin, Grant permissions to the App registration for all users so that each user does not have to do this individually:


2) Create an Azure Function App and configure it


Go to App Services > Add > Function App and create a new Azure Function App which we will use to host our Azure Function


Once the Function App is created, we need to secure it with our Azure AD app registration.

Go to Function App > Platform Features > Authentication / Authorization


In the Authentication / Authorization pane, for "Action to take when request is not authenticated" select "Log in with Azure Active Directory".

For Authentication Provider, click on Azure AD > Advanced and for Client ID, paste the Client ID (Application ID) of our Azure AD app registration we created earlier.

In Allowed Token Audiences, add the App ID URI of the app registration we copied in Step 1


Click Ok and Save the Configuration.

Go to Function App > Platform Features > CORS and add the SharePoint Online domain from which your SPFx webpart will make a call to the Azure Function.


Click on Save.

3) Create the Azure Function


Now let's actually create the Azure Function which we will deploy to the Function App as our custom API.

Using Visual Studio 2017, I have created a precompiled .NET Framework Azure Function project. As we are going to use this function as an API, I have selected an Http Triggered function:

Notice that the Authorization level for the function itself is set to Anonymous. This is because we are using Azure AD at the Function App level to secure it.

All this function does is returns the claims of the current authenticated user in JSON format.

Publish the function to the Azure Function App we created earlier.

4) Create the SharePoint Framework web part


Before going ahead with this step, make sure you have the latest version of the SharePoint Framework yeoman generator (1.6 at the time of this writing) This page should contain all the current versions of the generator, npm and node supported by the SharePoint Framework: https://docs.microsoft.com/en-us/sharepoint/dev/spfx/set-up-your-development-environment

Once you have all the latest packages, create the SPFx web part with yo @microsoft/sharepoint


To keep it simple, I am making it a tenant scoped solution with no JavaScript framework.

5) Request permissions for the SPFx web part


Once the SPFx web part solution is created, navigate to the config/package-solution.json file and add the webApiPermissionRequests property:

The resource will be the name of the Azure AD app registration we used to secure our Azure Function and the scope will be user_impersonation as we want to make a call on behalf of the current user.

As of SPFx 1.6 release, we also have to add the User.Read permission for "Windows Azure Active Directory" as reported in this issue: https://github.com/SharePoint/sp-dev-docs/issues/2473

6) Using AadHttpClient to call the custom Azure Function


Now in your SPFx webpart, include the following imports:

and the code to use the AadHttpClient to make a request to your custom Azure Function:

To display the table properly, add the following to the .scss file of your web part:


7) Installing and running the SPFx package 


Since we are going to run the SPFx solution in debug mode, we will run the commands without the --ship or --production switch. This will enable us to debug the solution locally.

Run the following commands to build and package your solution:

gulp build

gulp bundle

gulp package-solution

Start local debugging with

gulp serve --nobrowser

Now, upload the .sppkg file from the sharepoint/solution folder to the App Catalog:


Select the checkbox and Click on Deploy.

8) Granting permissions using the SPO Admin API management page


After deploying the package to the app catalog, as a SharePoint Administrator, navigate to the new SharePoint Online Admin centre and go to the API management section. You will notice the permissions we requested from the solution package can be approved from here. 

Approve the permissions before moving to the next step


9) Add web part to page


Now go to any modern page and add your web part to it. Since we have deployed a tenant scoped solution, no need to install it individually on each site.


The current user identity and claims coming through will be what we have sent from the Azure Function!

Hope this helps :) As always, the code from this post is available on GitHub: https://github.com/vman/spfx-azure-function-custom-api

Wednesday, 24 May 2017

Create Azure AD App Registration with Microsoft Graph API and PowerShell

Update 29 Aug 2018:
This post used the beta endpoint of the Microsoft Graph which no longer seems to be working.

Please check out this post on how to Create an Azure AD App Registration using the Azure CLI 2.0:
https://www.vrdmn.com/2018/08/create-azure-ad-app-registration-with.html

---------------X---------------

In my previous post, we had a look at how to authenticate to the Microsoft Graph API in PowerShell. In this post, lets have a look at how we can use the Microsoft Graph REST API to create an Azure AD App registration.

You need to create an App Registration in Azure AD if you have code which needs to access a service in Azure/Office 365 or if you are using Azure AD to secure your custom application. If you have been working with Azure/Office 365 for a while, chances are that you already know this and have already created a few App Registrations.

I was working on an Office 365 project recently where we had some WebJobs deployed to an Azure Web App. These WebJobs processed some list items in SharePoint Online. So naturally, we needed to use an Azure AD app to grant the WebJobs access to SharePoint Online.

For deploying this application, we were using Azure ARM templates and executing them from PowerShell. With ARM templates, we were able to deploy the Resource Group, App Service Plan, and Web App for the WebJobs. But for creating the App Registration, the two options available to us were the New-​Azure​Rm​AD​Application cmdlet which is part of the Azure Resource Manager PowerShell or the /beta/applications endpoint which is part of the Microsoft Graph API.

We found that the New-​Azure​Rm​AD​Application cmdlet is limited in features compared to the Graph API endpoint. For example, you can create an App registration with the cmdlet but you cannot set which services the app has permissions on. For setting that, you need to use the Microsoft Graph API which has the full breadth of functionality. That is why going forward, the Microsoft Graph should be the natural choice for creating Azure AD app registrations.

The way we are going to create the app registration is by making a POST request to the /beta/applications endpoint. The properties of our Azure AD app such as it's Display Name, Identifier Urls, and Required Permissions will be POSTed in the body of the request as JSON.

(As you have probably noticed already, this endpoint is in beta right now. I will update this post once it is GA)


1) Getting the App Registration properties:


The JSON we will POST will be an object of type application resource. Instead of manually "hand crafting" the JSON, it is recommended to download it from the Azure AD manifest of the app registration. Here is how:

a) Manually create an app in Azure AD by going to Azure AD -> App Registrations -> New application registration 

b) Configure it as required. E.g. Set the display name, Reply Urls, the Required permissions and other properties needed for your app

c) Go to your app -> Click on Manifest and download the JSON


Once you have the required JSON, you can delete the manually created app. Going forward, when deploying to another tenant (or the same tenant again), you can just run the following PowerShell script and won't have to create an app registration manually again.


2) Creating the App Registration with Microsoft Graph API and PowerShell:


Here is the PowerShell script you will need to create the Azure AD App Registration. I should mention that the Directory.AccessAsUser.All scope is needed to execute the /beta/applications endpoint.

After the script is run, we can see that the Azure AD app registration was successfully created:


What is happening in the script is that we are using the Get-MSGraphToken function to get the access token for the Microsoft Graph with ADAL. Then using the token, we are making a POST request to the /beta/applications endpoint. The JSON posted to create the app is pretty self explanatory in terms of displayname, identifier urls and reply urls.

What is really interesting is the requiredResourceAccess property which, at first glance, seems to have some random GUIDs. But this is in fact the Required permissions needed for my app. This JSON specifies that my app needs the following permissions:

1) Office 365 SharePoint Online: Read and write items in all site collections 
2) Windows Azure Active Directory: Sign in and read user profile

Your app might need permissions to different services. Just configure the permissions manually as required and then download the JSON from the Manifest.

After the script is run, when I go to Azure AD, I can see that my app has been created and all required properties have been set:


3) Trusting the app:


We have automated the creation of the application but it still needs to be trusted. Fortunately or unfortunately, it is still a manual process to trust the application. If you want to trust the app for all users in the tenant click on the Grant Permissions button:


Or if your application needs to be trusted by each user individually, you can skip this step. The user will be presented with a consent screen when they land on the application.

4) Troubleshooting with Fiddler:


If you have any errors while running the script, you can use Fiddler to determine the exact error being returned by the Microsoft Graph. I found it really helpful myself:

PowerShell would give me this:


But then I was able to get the real error from Fiddler:


Hope you found this post useful. Thanks for reading!

Monday, 22 May 2017

Authenticating to the Microsoft Graph API in PowerShell

In this post, lets have a look at how we can authenticate to the Microsoft Graph REST API through PowerShell. There are a few examples already available online but either they refer to old endpoints or they present the user with a login prompt to enter a username and password before authentication.

A few other examples ask for a client id to be submitted with the authentication request. You can get this client id when you register a new app in Azure AD. But what if you don't want to create an app registration? You already have a username and password, so creating a new Azure AD application just for authentication seems redundant.

Fortunately, there is way to authenticate to the Microsoft Graph API without any login prompts and without the need to create an explicit Azure AD application.

To avoid using any login prompts, we will use the AuthenticationContext.AquireToken method from the Active Directory Authentication Library (ADAL).

To avoid creating a new Client Id and Azure AD application, we will use a well know Client Id reserved for PowerShell: 1950a258-227b-4e31-a9cf-717495945fc2 This is a hard coded GUID known to Azure AD already.

Here are the steps we are going to do:

1) Make sure we have the username and password of a user in Azure AD
2) Use the username, password and PowerShell client id to get an access token from ADAL.
2) Use the access token to call the Microsoft Graph REST API.

Before going ahead, make sure you have the Microsoft.IdentityModel.Clients.ActiveDirectory.dll on your machine. If you have been working with Office 365/Azure PowerShell, chances are you have this already. If not, you can get it from a number of places. You can use the Azure Resource Manager PowerShell cmdlets to get a hold of it: https://docs.microsoft.com/en-us/powershell/azure/install-azurerm-ps?view=azurermps-4.0.0 or you can use nuget to download it: https://www.nuget.org/packages/Microsoft.IdentityModel.Clients.ActiveDirectory

And here is the PowerShell script to authenticate the Microsoft Graph:


Running this script gets the current user from the /v1.0/me endpoint:


Thanks for reading!