Showing posts with label Microsoft Graph. Show all posts

Thursday, 18 December 2025

Custom AI Agents: Use the Copilot Retrieval API for grounding on SharePoint Content

If you’re building a custom AI agent (Copilot Studio, Agents SDK, or your own app) and you want permission-trimmed content from SharePoint without managing your own vector store, then the Microsoft 365 Copilot Retrieval API is a great solution. 

It’s part of the broader Copilot APIs surface in Microsoft Graph, designed to reuse the same “in-tenant” grounding behavior that Microsoft 365 Copilot uses. To know more about the Copilot APIs have a look at the Microsoft docs: Microsoft Learn

So in this post, lets deep dive into the Copilot Retrieval API:


On a high level, we’ll:

  • Decide when to use Retrieval API vs “normal” Graph CRUD/search

  • Configure the minimum delegated permissions for SharePoint grounding

  • Call the Retrieval endpoint with dataSource=sharePoint

  • Scope results to specific sites using KQL filterExpression

  • Use the returned extracts + URLs as grounding context for your LLM

Prereqs

  • A Microsoft 365 Copilot license for each user calling Copilot APIs (this is separate from standard Graph CRUD usage).

  • Your app uses delegated auth (application permissions aren’t supported for this API).

  • Microsoft Entra app registration with delegated Graph permissions: Files.Read.All + Sites.Read.All (required together for SharePoint/OneDrive retrieval).

  • Familiarity with the Copilot APIs model (Copilot APIs are REST under Microsoft Graph and use standard Graph auth).

1) Pick The Right Tool: Retrieval vs Graph

Use Microsoft Graph CRUD when you need to read/update SharePoint data (lists, drives, items, etc.). 

Use the Copilot Retrieval API when you need ranked text content (snippets) to ground an LLM response, while keeping content in place and respecting permissions/sensitivity labels.

A good heuristic:

  • “Give me the document metadata / file bytes” → Graph sites/drives/items

  • “Answer using the most relevant parts of our HR policies” → Retrieval API

2) Set Delegated Permissions

The Retrieval API is delegated-only. That’s intentional: the service retrieves snippets from content the calling user can access, permission-trimmed at query time.

Minimum permissions for SharePoint grounding:

  • Files.Read.All

  • Sites.Read.All 


3) Test Quickly In Graph Explorer

Fastest way to validate your tenant + permissions is Graph Explorer.

Click path: Graph Explorer → Sign in → Modify permissions → Consent → Run query


4) Call Retrieval For SharePoint (With Site Scoping)

Here’s the core call. You provide:

  • queryString (single sentence, up to 1,500 chars)

  • dataSource = sharePoint

  • optional filterExpression (KQL) to scope sites

  • optional resourceMetadata

  • maximumNumberOfResults (1–25) 

Change these values:
  • queryString: the user’s natural-language question

  • filterExpression: one site, or multiple sites using OR

  • resourceMetadata: only the metadata fields you want returned

  • maximumNumberOfResults: keep within 1–25

Minimal working example

Run the PowerShell call above and expect a response with retrievalHits[], each containing:

  • webUrl

  • extracts[] with text + relevanceScore

  • optional resourceMetadata and sensitivityLabel

Troubleshooting

  • 403 / access denied: confirm the signed-in user has a Copilot license (Copilot APIs require it).

  • No results: remove filterExpression first, then add it back (KQL path scoping is easy to over-constrain).

  • 400 bad request: maximumNumberOfResults must be 1–25, and queryString has constraints (single sentence, 1,500 chars).

  • Trying application permissions: not supported—switch to delegated auth.

  • Using /beta in production: move to v1.0 (beta can change and isn’t supported for production).

Notes

  • The Retrieval API is built to avoid “DIY RAG plumbing” (export/crawl/index/vector DB) while still honoring Microsoft 365 security and compliance boundaries.

  • Use filterExpression with path:"<site url>" to keep grounding tight (single site or multiple sites with OR).

  • You typically pass the returned extracts.text + webUrl into your model prompt, and keep the URLs as citations in your UI.

Wrapping up

The Copilot Retrieval API is the most pragmatic way to pull permission-trimmed SharePoint grounding content into your own agents without building or hosting a parallel index. Once you can reliably retrieve relevant extracts, everything else becomes “just orchestration” around your model and UX.

Hope this helps!

Saturday, 11 October 2025

Getting started: Declarative Agents with TypeSpec for Microsoft 365 Copilot

Declarative agents let you add focused skills to Microsoft 365 Copilot without spinning up servers or long-running code. Compared to Copilot Studio agents (full or Lite), which are great for UI-first orchestration and built-in connectors, declarative agents are repo-friendly, schema-driven artifacts you version, review, and ship like code. 

You describe instructions and capabilities in TypeSpec and the M365 Agents toolkit compiles that into a manifest and handles provisioning.

So in this post, we’ll use the TypeSpec starter in the Microsoft 365 Agents Toolkit and light up a couple of built-in capabilities.


On a high level, we’ll:

  • Install the Microsoft 365 Agents Toolkit and TypeSpec bits. 

  • Scaffold a Declarative Agent (TypeSpec) project in VS Code. 

  • Add capabilities (OneDrive/SharePoint search + People + Code Interpreter). 

  • Provision and test the agent from the toolkit.

Prereqs

  • Microsoft 365 tenant (Developer or test tenant recommended) and permission to create app registrations.

  • Visual Studio Code with Microsoft 365 Agents Toolkit extension. 

  • TypeSpec for Microsoft 365 Copilot (installed automatically by the toolkit starter). 


1) Create a TypeSpec Declarative Agent

  1. Open VS Code.

  2. From the sidebar, open Microsoft 365 Agents ToolkitCreate a New Agent/AppDeclarative AgentStart with TypeSpec for Microsoft 365 Copilot.

  3. Name it (e.g., ContosoFinder) and choose the default folder.

  4. In the Lifecycle pane, select Provision to create the Azure AD app and resources in your tenant.


2) Understand the project

The starter includes:

  • main.tsp (your agent definition)

  • Build scripts that compile TypeSpec → agent manifest JSON

  • Toolkit tasks for Provision, Deploy, Publish 


3) Add core capabilities in TypeSpec

Open main.tsp and define instructions plus capabilities. Here’s a compact example that enables OneDrive/SharePoint, People, and CodeInterpreter for simple Python math/CSV ops:

Change these values: title, instructions text, conversation starters, search resultLimit, and Code Interpreter timeout as needed. Capability names/params align with the built-in catalog.

4) Build & validate

  • In the Agents Toolkit Lifecycle pane: select Provision which will start the build, validate and deploy process.

5) Test in Microsoft 365 Copilot (tenant)

  • Once the Provisioning succeeds

  • Try prompts like:

    • “Find my last 5 QBR files” → You should see a list of SharePoint/OneDrive files with links.

    • “Who are my peers?” → The agent returns people details from the Graph.

    • “Summarize this CSV and plot top 3 values” → Code Interpreter runs Python and returns a brief summary + chart image. 


Notes

  • Prefer built-in capabilities (Search, People, OneDrive/SharePoint, Teams Messages, WebSearch, Code Interpreter) before adding custom APIs. They’re simpler and tenant-aware.

  • When you need external systems, add an API plugin to your declarative agent via TypeSpec; plugins are actions inside declarative agents (not standalone in Copilot).

  • Great learning paths: the “Build your first declarative agent using TypeSpec” module and recent open labs/samples. 

Wrapping up

With TypeSpec, declarative agents become a clean, versionable artifact you can build, validate, and ship from VS Code. Start with built-in capabilities, keep instructions focused, and only plug external APIs when the scenario demands it. 

Hope this helps!

Monday, 9 December 2024

Search SharePoint and OneDrive files in natural language with OpenAI function calling and Microsoft Graph Search API

By now, we have seen "Chat with your documents" functionality being introduced in many Microsoft 365 applications. It is typically built by combining Large Language Models (LLMs) and vector databases. 

To make the documents "chat ready", they have to be converted to embeddings and stored in vector databases like Azure AI Search. However, indexing the documents and keeping the index in sync are not trivial tasks. There are many moving pieces involved. Also, many times there is no need for "similarity search" or "vector search" where the search is made based on meaning of the query. 

In such cases, a simple "keyword" search can do the trick. The advantage of using keyword search in Microsoft 365 applications is that the Microsoft Search indexes are already available as part of the service. APIs like the Microsoft Graph Search API and the SharePoint Search REST API give us "ready to consume" endpoints which can be used to query documents across SharePoint and OneDrive. Keeping these search indexes in sync with the changes in the documents is also handled by the Microsoft 365 service itself.

So in this post, let's have a look at how we can combine OpenAI's gpt-4o Large Language Model with Microsoft Graph Search API to query SharePoint and OneDrive documents in natural language. 

On a high level we will be using OpenAI function calling to achieve this. Our steps are going to be:

1. Define an OpenAI function and make it available to the LLM.  


2. During the course of the chat, if the LLM thinks that to respond to the user, it needs to call our function, it will respond with the function name along with the parameters.

3. Call the Microsoft Graph Search API based on the parameters provided by the LLM.

4. Send the results returned from the Microsoft Graph back to the LLM to generate a response in natural language.

So let's see how to achieve this. In this code I have used the following nuget packages:

https://www.nuget.org/packages/Azure.AI.OpenAI/2.1.0

https://www.nuget.org/packages/Microsoft.Graph/5.64.0

The first thing we will look at is our OpenAI function definition:

In this function we are informing the LLM that if needs to search any files as part of providing the responses, it can call this function. The function name will be returned in the response and the relevant parameter will be provided as well. Now let's see how our orchestrator function looks:

There is a lot to unpack here as this function is the one which does the heavy lifting. This code is responsible for handling the chat with OpenAI, calling the MS Graph and also responding back to the user based on the response from the Graph. 

Next, let's have a look at the code which calls the Microsoft Graph based on the parameters provided by the LLM. 

Before executing this code, you will need to have created an App registration. Here is how to do that: https://learn.microsoft.com/en-us/azure/active-directory/develop/quickstart-register-app 

Since we are calling the Microsoft Graph /search endpoint with delegated permissions, the app registration will need a minimum of the User.Read and Files.Read.All permissions granted. https://learn.microsoft.com/en-us/graph/api/search-query?view=graph-rest-1.0&tabs=http

This code get the parameters sent from the LLM and uses the Microsoft Graph .NET SDK to call the /search endpoint and fetch the files based on the searchQuery properties. Once the files are returned, their summary value is concatenated into a string and returned to the orchestrator function so that it can be sent again to the LLM. 

Finally, lets have a look at our CallOpenAI function which is responsible for talking to the Open AI chat api.
 
This code defines the Open AI function which will be included in our Chat API calls. Also, the user's search query is sent to the API to determine if the function needs to be called. This function is also called again after the response from the Microsoft Graph is fetched. At that time, this function contains the details fetched from the Graph to generate an output in natural language. This way, we can use Open AI function calling together with Microsoft Graph API to search files in SharePoint and OneDrive.

Hope this helps!

Thursday, 19 October 2023

Chat with your user directory using OpenAI functions and Microsoft Graph

Ever since OpenAI function calling was released, I have been incredibly fascinated by it. To me, it is as big a game changer as ChatGPT itself. 

With function calling, we are no longer limited by the data which was used to train the Large Language Model (LLM). We can call out to external APIs, protected company data and other business specific APIs and use the data to supplement the responses from the LLM. 

To know more about function calling specifically with the Azure OpenAI service, check out the Microsoft docs: https://learn.microsoft.com/en-us/azure/ai-services/openai/how-to/function-calling

In this post, let's have a look at how we can leverage OpenAI function calling to chat with our user directory and search for users in natural language. To make this possible we will use the Microsoft Graph to do the heavy lifting. 

This is what we want to achieve: The user asks a question about the people directory in natural language, the LLM is able to transform the question to code which the Microsoft Graph understands and the LLM is again able to transform the response from the Microsoft Graph back to natural language.


On a high level, our approach can be summarised as follows:

1. Define the OpenAI functions and make them available to the LLM 


2. During the course of the chat, if the LLM thinks that to respond to the user, it needs to call our function, it will respond with the function name along with the parameters to be sent to function.

3. Call the Microsoft Graph user search API based on the parameters provided by the LLM.

4. Send the results returned from the Microsoft Graph back to the LLM to generate a response in natural language.

Alright, let's now look at the code. In this code sample I have used the following nuget packages:

https://www.nuget.org/packages/Azure.AI.OpenAI/1.0.0-beta.6/

https://www.nuget.org/packages/Microsoft.Graph/5.30.0/

https://www.nuget.org/packages/Azure.Identity/1.10.2/

The very first thing we will look at is our function definition:

In this function we are informing the LLM that if needs to search any users as part of providing the responses, it can call this function. The function name will be returned in the response and the relevant parameters will be provided as well. 

The enums in the officeLocation and department parameter will instruct the LLM to only return those values even if user asks a slightly different variation in their question. We can see an example of this in the gif above. Even if the question asked contains words like "devs" and "NY", the LLM is able to determine and use the terms "Engineering" and "New York" instead.

Next, let's see how our orchestrator looks. I have added comments to each line where relevant:

There is a lot to unpack here as this function is the one which does the heavy lifting. This code is responsible for handling the chat with OpenAI, calling the MS Graph and also responding back to the user based on the response from the Graph.

Next, let's have a look at the code which calls the Microsoft Graph based on the parameters provided by the LLM. 

Before executing this code, you will need to have created an App registration with a clientId and clientSecret. Here is how to do that: https://learn.microsoft.com/en-us/azure/active-directory/develop/quickstart-register-app

Since we are calling the Microsoft Graph /users endpoint with application permissions, the app registration will need a minimum of the User.Read.All application permission granted.
https://learn.microsoft.com/en-us/graph/api/user-list?view=graph-rest-1.0&tabs=http 

This code get the parameters sent from the LLM and uses the Microsoft Graph .NET SDK to call the /users/search endpoint and fetch the users based on the officeLocation, department or jobTitle properties.

Once the users are returned, their displayName value is concatenated into a string and returned to the orchestrator function so that it can be sent again to the LLM.

Finally, lets have a look at our CallChatGPT function which is responsible for talking to the Open AI chat api. 

This function defines the Open AI function which will be included in our Chat API calls. Also, the user's question is sent to the API to determine if the function needs to be called. This function is also called again after the response from the Microsoft Graph is fetched. At that time, this function contains the details fetched from the Graph to generate an output in natural language. 

This way, we can use Open AI function calling together with Microsoft Graph API to chat with your user directory. 

Monday, 19 December 2022

Building a Microsoft Teams app: Posting a message to Teams on behalf of the current user

If you are building a Teams app and want to integrate with Teams channel messages, this post will be helpful to you. Specifically, we will be looking at posting a Teams channel message, from the app, on behalf of the currently logged in user.  For example, there could be a scenario where an event occurs within the Teams app and as a result a message needs to be posted to a Teams channel but instead of it coming from a bot, it needs to be posted by the logged in user's account.

Let's see how this can be done. 

1. Azure AD app and Permissions

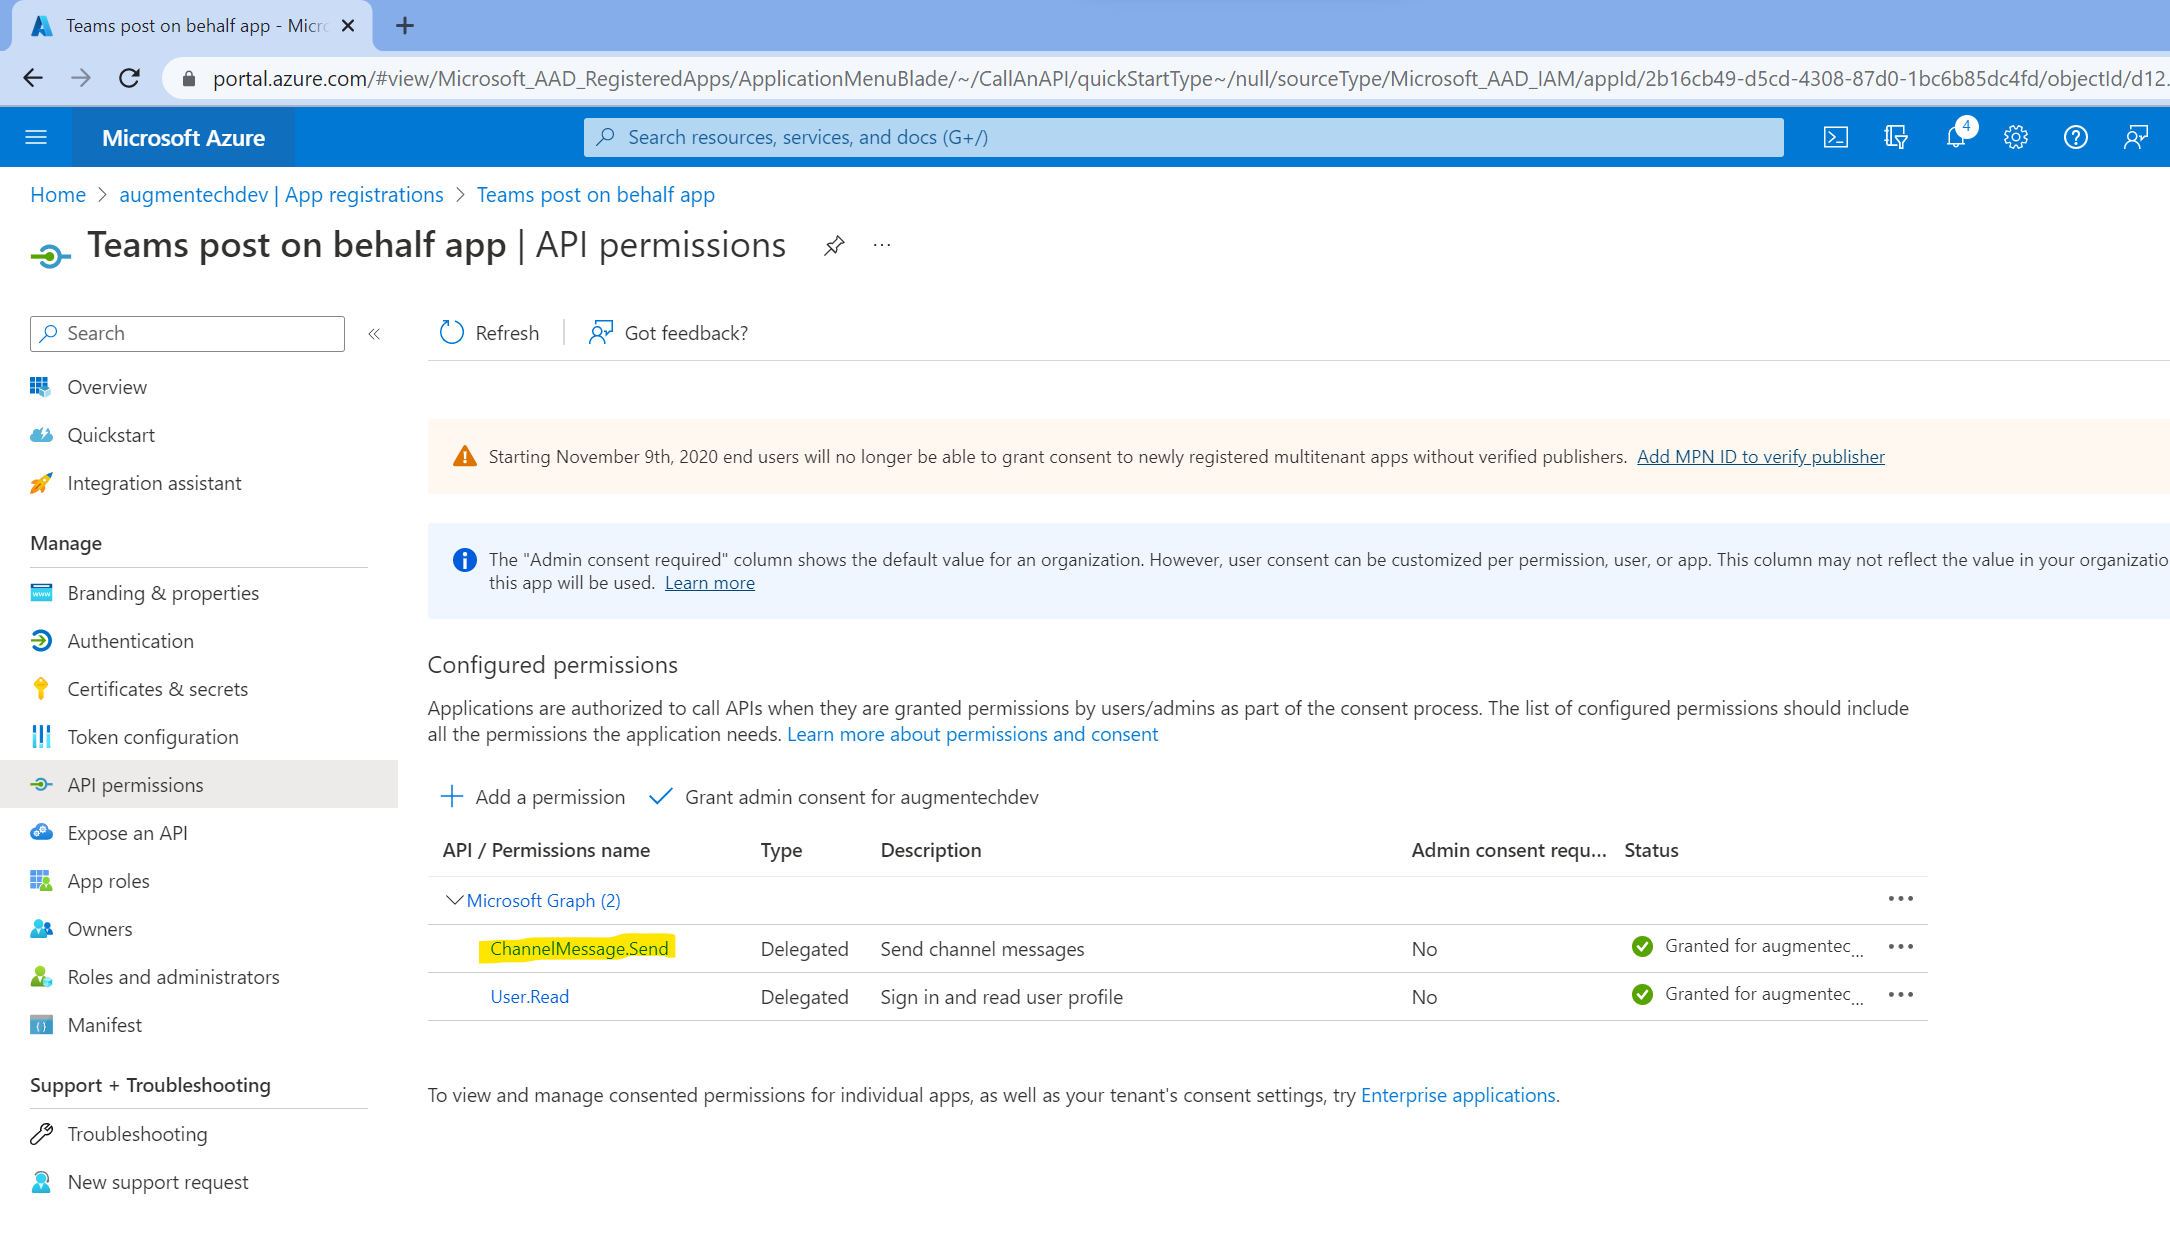
First thing we need is an Azure AD app setup with the Microsoft Graph ChannelMessage.Send delegated permission. This permission is needed for posting messages to Teams using the current user credentials.

I should mention setting up the right permissions is part of a larger configuration in the Azure AD app needed for Single Sign On (SSO) setup in Teams app. You can see the full configuration here: Register your tab app with Azure AD - Teams | Microsoft Learn 


2. Current user's id token from Teams JS SDK v2 

Once the permissions are setup, we need to setup our frontend so that it can grab the current user's id token from Microsoft Teams. More info on Azure AD id tokens here: Microsoft identity platform ID tokens - Microsoft Entra | Microsoft Learn 

Although this token is available from Teams JS SDK v2, it cannot itself be used to make graph calls. We need to exchange it for a Microsoft Graph access token. For this we will send the id token to our backend:

3. Getting Microsoft Graph delegated access token and posting message to Teams

It is recommended to do the token exchange as well as any further Graph calls from the backend of your app instead passing the Graph access token back to the frontend and making the calls from there:

In the code we first graph the id token from the Authorization header, then exchange the id token for a Microsoft Graph access token, then finally we are able to make a Graph call to post a message to Teams as the current user.


Hope this helps!

Tuesday, 16 November 2021

Interactively authenticate Microsoft Graph .NET SDK with Azure Identity library

In this post, we will have a look at the new recommended way of using the Azure Identity library to authenticate to the Microsoft Graph .NET SDK. Since v4 of the Microsoft Graph SDK, using the Azure.Identity library is the preferred way to auth with the Graph over the previous Microsoft.Graph.Auth method. You can read more about it here: https://github.com/microsoftgraph/msgraph-sdk-dotnet/blob/dev/docs/upgrade-to-v4.md#azure-identity

Specifically, we will have a look at Interactive browser based authentication where the user would enter their credentials and the Azure Identity library will fetch the access token based on them.

Before going through the code, let us check out the Azure AD App registration which would be used to authenticate to the Graph API

Since we are going to authenticate from a .NET Desktop console application, we will select Desktop as a platform and add the default redirect URIs. In addition, we will also add http://localhost to the list.

The supported account types can be as per your requirements. I have selected the app to be multi tenant.

Select the Allow public client flows to "Yes":  


Select the needed scopes:


Once all of this in place, we can use the following code to open a browser window and authenticate to the Microsoft Graph once the user enters their credentials:

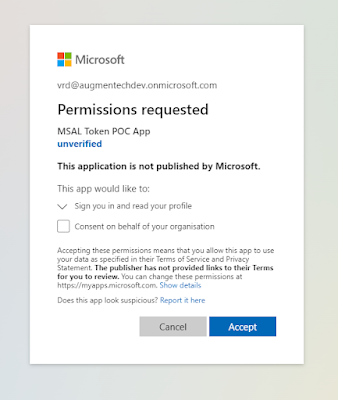
If this is the first time logging into this tenant, you will need to grant permissions to the app:


Once the authentication happens, you will see a similar message in the browser:


and our console window logs the current access token along with the expiry time and also uses the Graph SDK to get the display name of the current user:


Hope that helps!

Tuesday, 5 January 2021

Microsoft 365 multi-tenant apps: Working with application permissions in Microsoft Graph

Creating multi-tenant (SaaS) apps in Microsoft 365 has been possible for a while now. Azure AD multi tenant apps allow us to host our custom applications in an Azure AD/M365 "home" tenant while enabling the apps to also have access to resources hosted in other tenants. To know more about multi-tenant apps, head over to the Microsoft docs: https://docs.microsoft.com/en-in/azure/active-directory/develop/single-and-multi-tenant-apps

Hosting applications in a home tenant as SaaS has a lot of advantages particularly for ISVs when it comes to product based applications. Users are able to consume the apps directly by signing into them instead of the conventional way of an admin having to deploy the product to the customer tenant first. It makes life easy for the admins as well as they don't have to go through complex deployment scripts and instructions. Moreover, after the application is deployed, new features and bug fixes can be rolled out to the application "on the fly" as opposed to releasing feature packs and hotfixes which again have to be installed manually.

So in this post, we are going to have a look at using the Microsoft Graph API in such apps configured to be multi tenant.

(Multi tenant apps also allow users with personal Microsoft accounts to sign into them but that is a topic for another day! Also, in this post we will only focus on the application permissions i.e. granting permissions to applications without a user context)

Configure an app to be a multi-tenant in the home tenant's Azure AD

1) When creating a multitenant app registration, make sure that the "Accounts in any organizational directory" is selected. Also, we need to add a redirect url as this will be the url the admin will be redirected to after successfully granting consent to our application. Ideally, this would be the landing page of your application but in the screenshot I am just using the AAD home as an example:


2) Assign required permissions. In this case, we are going to demo the code to get all the Microsoft 365 Groups on the tenant and also the root SharePoint Online site, so selecting the relevant permissions here:


3) Create a client secret and record it along with the client id. We will need this later in our code.


Granting consent to a multi tenant app in other "consumer" tenant

Next, let's have a look at how the multi tenant app hosted in it's home tenant can be granted permission to access resources in other tenants. 

What we will have to do is to construct a url for admin consent which would be unique to our application. An Azure AD admin of the other tenant will need to navigate to the url and then consent to granting the permissions to our app on the tenant. The Azure AD url will have the following structure:

In the link above, replace the client id with the client id of your multi tenant Azure AD app. Also, notice that we are using the /.default static scope which means that all permissions configured in the app will be requested for consent. 

When the admin navigates to this url, they will see the consent prompt:


Once the consent is granted, the multitenant app will have permissions to access the resources on the other tenant. This can be checked by going to:

Azure Active Directory > Enterprise Applications > All applications and searching for our app there.


This confirms that the multi tenant app has permissions on this tenant. Also this process can be repeated on any number of Azure AD/M365 tenants.

Use the Microsoft Graph API to get Microsoft 365 data from the consumer tenant

With everything setup and also the admin consent granted, let's have a look at the Microsoft Graph code to get data from the consumer tenant.

In this code, I am using the .NET SDK for Microsoft Graph found on nuget here:

Microsoft.Graph

And the new preview version of Microsoft.Graph.Auth found here:

Microsoft.Graph.Auth

And finally here is the code to get all the Microsoft 365 Groups and the SharePoint root site url of the consumer tenant. For the sake of simplicity, I am using a .NET Core console application:

And we are able to get the data from the consumer tenant back:


Thanks for reading! Hope this helps.

Thursday, 5 March 2020

Office 365 CLI: Grant admin consent to specific scopes using Microsoft identity platform (AAD v2)

The Office 365 CLI is great tool for a variety of scenarios. Specifically, I find it super useful for CI/CD and automation. Since there is no official Microsoft Graph Azure DevOps task yet, the Office 365 CLI comes to the rescue when we want to make a call to the Graph from an Azure DevOps pipeline. Most recently, I was using it to deploy a Teams app when I noticed something interesting.

As I was calling the Office CLI from an automated script, I could not use the default deviceCode flow to login as there was no user interaction possible. So the other options were to use the username/password flow or use a custom certificate. I chose the former as it was very convenient and I could store the password securely in a Azure DevOps secret variable.

Now before using the Office CLI on a tenant, we need to consent to the AAD multi-tenant app used internally for authenticating to Office 356 services. This app is called "PnP Office 365 Management Shell" and the consent process is also described in the docs here: https://pnp.github.io/office365-cli/user-guide/connecting-office-365/

If this consent hasn't happened yet, we get the following error:

Error: AADSTS65001: The user or administrator has not consented to use the application with ID '31359c7f-bd7e-475c-86db-fdb8c937548e' named 'PnP Office 365 Management Shell'. Send an interactive authorization request for this user and resource.

If we go ahead with the default consent experience, we are presented with this screen where the CLI AAD app requests a large number of permissions on the tenant:


Now in my case, I did not need all the scopes the CLI was requesting. I only needed AppCatalog.ReadWrite.All to deploy my Teams app.

So that got me thinking, one of the benefits of using the Microsoft identity platform (also called AAD v2) is that apps can request consent to specific scopes:

With the Microsoft identity platform endpoint, you can ignore the static permissions defined in the app registration information in the Azure portal and request permissions incrementally instead, which means asking for a bare minimum set of permissions upfront and growing more over time as the customer uses additional app features. To do so, you can specify the scopes your app needs at any time by including the new scopes in the scope parameter when requesting an access token - without the need to pre-define them in the application registration information.
https://docs.microsoft.com/en-us/azure/active-directory/azuread-dev/azure-ad-endpoint-comparison#incremental-and-dynamic-consent

So armed with this knowledge, I tested whether I could request (and grant) only AppCatalog.ReadWrite.All to the PnP Office 365 Management Shell app.

Turns out it is indeed possible by going to this URL in a browser as an admin:

You will notice that in the client_id param, we are specifying the client id of the PnP Office 365 Management Shell app and in the scope param, we are only requesting the needed scope i.e. AppCatalog.ReadWrite.All


This time, we are presented with a significantly reduced scopes for consent. Notice only the "Read and write to all app catalogs" permission is present along with the couple of default permissions.

After granting the consent and then navigating to Azure AD -> Enterprise Applications -> All applications ->  PnP Office 365 Management Shell -> Permissions, you will see that only the requested scope was granted:


This way, you can only request the scopes you need and also include multiple scopes by separating them with a space

Automating the consent:


If you are like me and would like to automate the consent process as well, that is possible by using the Azure CLI:

00000003-0000-0000-c000-000000000000 is the Application ID of the Microsoft Graph resource in AAD. This will be the same for all tenants.

Hope you found the post useful!

Wednesday, 30 October 2019

Getting anonymous thumbnails of SharePoint Online files with Microsoft Graph

If you are developing an application based on the Microsoft 365 platform which also uses files stored in SharePoint Online, chances are that you might want to make the file thumbnails available on a device (or client) without going through SharePoint authentication. It could be a mobile app or Microsoft Teams app which needs to show the thumbnails. In these cases, the end user has already signed into the app so might not be a good idea to ask them to sign in again to access files stored in SharePoint.

One thing which comes to mind straight away is to use the Data URLs of the thumbnail images. But data URLs can get fairly big as they are just the base 64 representation of the images. Also, if you have large images and you need to display a lot of them at the same time, the data travelling over the wire to your device can get fairly big.

Fortunately, the Microsoft Graph provides a great way to get the thumbnail of a file. It is also provided as an anonymously accessible link (which expires in 1 hour) so we don't have to worry about the user having to sign in again to SharePoint. More details on Microsoft docs:
https://docs.microsoft.com/en-us/graph/api/driveitem-list-thumbnails?view=graph-rest-1.0&tabs=http

This approach works for getting the thumbnails of any type of file stored in SharePoint Online. But in this post, I am going to focus only on modern pages.

First, let's see how the code for this looks in the Microsoft Graph .NET SDK:

This code translates to the following Graph REST API call:

and the response:
(click to zoom)

The thumbnail url returned here can be used on any device, app or Adaptive Card to display the image without the need for authenticating to SharePoint. But bear in mind that this image url is only valid for 1 hour as there is an Azure AD access token attached to it. After that you might have to request a new url by making the same Microsoft Graph call.

Hope this helps!

Monday, 14 May 2018

SPFx: Calling Microsoft Graph API from an AAD secured Azure Function on behalf of a user

This post is part of a series where we explore consuming Azure AD secured Azure Functions from SharePoint Framework components. Articles in the series:

1) SharePoint Framework: Calling AAD secured Azure Function on behalf of a user
2) Calling Microsoft Graph API from an AAD secured Azure Function on behalf of a user (this post)
3) SharePoint Framework: Calling back to SharePoint from an AAD secured Azure Function on behalf of a user

In the previous post, we were successfully able to call an AAD secured Azure Function from a SharePoint Framework web part.

Now once we are in the Function, lets see how to make a call to the Microsoft Graph on behalf of the logged in user. We will only focus on the Azure Function here, to fully understand the set up and auth process, I recommend you check out the previous post.


Updates to the Azure AD app registration:


In order to call the Microsoft Graph, we will need to add a Client Secret to the Azure AD app registration.


We don't need to add any new permission scopes for the purposes of this post as we are going to make a call to the /v1.0/me endpoint which requires the User.Read permission. According to the SPFx docs, if we exchange the SPFx generated token for a MS Graph token, it will automatically have the User.Read.All permission scope.

If you want to do anything beyond this with the Microsoft Graph, you will need to add the relevant permissions scope and grant permissions to it. In the next post, we will see how to do this by granting permissions to the "Office 365 SharePoint Online" permissions scope.

Here is what we are going to do in this post:

When the Azure Function executes, we already have an access token sent by the SharePoint Framework AadHttpClient in the Authorization header. This access token has the "user_impersonation" scope which only allows it to access the Azure Function. It cannot be directly used to call the Microsoft Graph.

In order to obtain new access token that will work with the Microsoft Graph, we will have to request it using the existing access token. Once we have the new token, we are able to make a call to the Microsoft Graph:

Once this function is called from our SharePoint Framework web part, we are able to get data back from the graph:


Thanks for reading!

Monday, 12 June 2017

Access Microsoft Graph from classic SharePoint pages (SPFx GraphHttpClient preview: Under the hood)

Recently, an update to the SharePoint Framework was released which introduced some cool new features including ApplicationCustomizers, FieldCustomizers and CommandSets. You can read more about the announcement here:  Announcing Availability of SharePoint Framework Extensions Developer Preview.

What was particularly interesting to me was the introduction of the GraphHttpClient class which makes it really easy to call the Microsoft Graph from within the SharePoint Framework. To make a call to the Graph, all you have to do is:


And all the plumbing and authentication required to successfully execute the call is handled by the GraphHttpClient class.

At the time of this writing (12th June 2017) the only permission scopes available to the GraphHttpClient are Group.ReadWrite.All and Reports.Read.All So if you call any Microsoft Graph endpoints which require permission scopes apart from these, you will get an "Insufficient privileges to complete the operation." error.

Also, the GraphHttpClient is in preview right now and not meant to be used in production.

So lets see what's going on behind the scenes here. How does the GraphHttpClient get the correct access token scoped to the current user?

Turns out it is really straightforward. If you observe the traffic sent/received, you will notice that to get the access token, the GraphHttpClient makes a request to a new endpoint: /_api/SP.OAuth.Token/Acquire

Update 10/07: According to the guidance released recently, Call Microsoft Graph using the SharePoint Framework GraphHttpClient this endpoint is subject to change and not meant for use in production. But the good news is that as mentioned in this twitter conversation https://twitter.com/simondizparc/status/879636058446680064, Microsoft is working on making the Graph accessible outside the SharePoint Framework. So we will just have to wait until then.

I will just keep my post here for informational purposes:

Since this endpoint is hosted in SPO itself, it knows who the current user is and returns the correct access token. Some additional details are required to call the endpoint such as the current request digest and the resource for which the access token is required i.e. http://graph.microsoft.com

So in theory, if we replicate the behaviour of the GraphHttpClient in a classic SharePoint page, we would be able to call the same endpoint and get the access token. And it works!

Here is my code which uses simple jQuery to get the access token for the Microsoft Graph and makes a call to a /v1.0/groups endpoint. Since it is just JavaScript code, it can be called from a Content Editor or a Script Editor webpart on a classic SharePoint page as well!

And here is the result:


This is very interesting and can open up new possibilities!

Wednesday, 24 May 2017

Create Azure AD App Registration with Microsoft Graph API and PowerShell

Update 29 Aug 2018:
This post used the beta endpoint of the Microsoft Graph which no longer seems to be working.

Please check out this post on how to Create an Azure AD App Registration using the Azure CLI 2.0:
https://www.vrdmn.com/2018/08/create-azure-ad-app-registration-with.html

---------------X---------------

In my previous post, we had a look at how to authenticate to the Microsoft Graph API in PowerShell. In this post, lets have a look at how we can use the Microsoft Graph REST API to create an Azure AD App registration.

You need to create an App Registration in Azure AD if you have code which needs to access a service in Azure/Office 365 or if you are using Azure AD to secure your custom application. If you have been working with Azure/Office 365 for a while, chances are that you already know this and have already created a few App Registrations.

I was working on an Office 365 project recently where we had some WebJobs deployed to an Azure Web App. These WebJobs processed some list items in SharePoint Online. So naturally, we needed to use an Azure AD app to grant the WebJobs access to SharePoint Online.

For deploying this application, we were using Azure ARM templates and executing them from PowerShell. With ARM templates, we were able to deploy the Resource Group, App Service Plan, and Web App for the WebJobs. But for creating the App Registration, the two options available to us were the New-​Azure​Rm​AD​Application cmdlet which is part of the Azure Resource Manager PowerShell or the /beta/applications endpoint which is part of the Microsoft Graph API.

We found that the New-​Azure​Rm​AD​Application cmdlet is limited in features compared to the Graph API endpoint. For example, you can create an App registration with the cmdlet but you cannot set which services the app has permissions on. For setting that, you need to use the Microsoft Graph API which has the full breadth of functionality. That is why going forward, the Microsoft Graph should be the natural choice for creating Azure AD app registrations.

The way we are going to create the app registration is by making a POST request to the /beta/applications endpoint. The properties of our Azure AD app such as it's Display Name, Identifier Urls, and Required Permissions will be POSTed in the body of the request as JSON.

(As you have probably noticed already, this endpoint is in beta right now. I will update this post once it is GA)


1) Getting the App Registration properties:


The JSON we will POST will be an object of type application resource. Instead of manually "hand crafting" the JSON, it is recommended to download it from the Azure AD manifest of the app registration. Here is how:

a) Manually create an app in Azure AD by going to Azure AD -> App Registrations -> New application registration 

b) Configure it as required. E.g. Set the display name, Reply Urls, the Required permissions and other properties needed for your app

c) Go to your app -> Click on Manifest and download the JSON


Once you have the required JSON, you can delete the manually created app. Going forward, when deploying to another tenant (or the same tenant again), you can just run the following PowerShell script and won't have to create an app registration manually again.


2) Creating the App Registration with Microsoft Graph API and PowerShell:


Here is the PowerShell script you will need to create the Azure AD App Registration. I should mention that the Directory.AccessAsUser.All scope is needed to execute the /beta/applications endpoint.

After the script is run, we can see that the Azure AD app registration was successfully created:


What is happening in the script is that we are using the Get-MSGraphToken function to get the access token for the Microsoft Graph with ADAL. Then using the token, we are making a POST request to the /beta/applications endpoint. The JSON posted to create the app is pretty self explanatory in terms of displayname, identifier urls and reply urls.

What is really interesting is the requiredResourceAccess property which, at first glance, seems to have some random GUIDs. But this is in fact the Required permissions needed for my app. This JSON specifies that my app needs the following permissions:

1) Office 365 SharePoint Online: Read and write items in all site collections 
2) Windows Azure Active Directory: Sign in and read user profile

Your app might need permissions to different services. Just configure the permissions manually as required and then download the JSON from the Manifest.

After the script is run, when I go to Azure AD, I can see that my app has been created and all required properties have been set:


3) Trusting the app:


We have automated the creation of the application but it still needs to be trusted. Fortunately or unfortunately, it is still a manual process to trust the application. If you want to trust the app for all users in the tenant click on the Grant Permissions button:


Or if your application needs to be trusted by each user individually, you can skip this step. The user will be presented with a consent screen when they land on the application.

4) Troubleshooting with Fiddler:


If you have any errors while running the script, you can use Fiddler to determine the exact error being returned by the Microsoft Graph. I found it really helpful myself:

PowerShell would give me this:


But then I was able to get the real error from Fiddler:


Hope you found this post useful. Thanks for reading!

Monday, 22 May 2017

Authenticating to the Microsoft Graph API in PowerShell

In this post, lets have a look at how we can authenticate to the Microsoft Graph REST API through PowerShell. There are a few examples already available online but either they refer to old endpoints or they present the user with a login prompt to enter a username and password before authentication.

A few other examples ask for a client id to be submitted with the authentication request. You can get this client id when you register a new app in Azure AD. But what if you don't want to create an app registration? You already have a username and password, so creating a new Azure AD application just for authentication seems redundant.

Fortunately, there is way to authenticate to the Microsoft Graph API without any login prompts and without the need to create an explicit Azure AD application.

To avoid using any login prompts, we will use the AuthenticationContext.AquireToken method from the Active Directory Authentication Library (ADAL).

To avoid creating a new Client Id and Azure AD application, we will use a well know Client Id reserved for PowerShell: 1950a258-227b-4e31-a9cf-717495945fc2 This is a hard coded GUID known to Azure AD already.

Here are the steps we are going to do:

1) Make sure we have the username and password of a user in Azure AD
2) Use the username, password and PowerShell client id to get an access token from ADAL.
2) Use the access token to call the Microsoft Graph REST API.

Before going ahead, make sure you have the Microsoft.IdentityModel.Clients.ActiveDirectory.dll on your machine. If you have been working with Office 365/Azure PowerShell, chances are you have this already. If not, you can get it from a number of places. You can use the Azure Resource Manager PowerShell cmdlets to get a hold of it: https://docs.microsoft.com/en-us/powershell/azure/install-azurerm-ps?view=azurermps-4.0.0 or you can use nuget to download it: https://www.nuget.org/packages/Microsoft.IdentityModel.Clients.ActiveDirectory

And here is the PowerShell script to authenticate the Microsoft Graph:


Running this script gets the current user from the /v1.0/me endpoint:


Thanks for reading!